Tag Archive for: simple living

Changing the Story: Talking Rubbish on the Tedx Stage

Taking the stage at last year’s TedX Perth event has to be one of the highlights of the year. On behalf of the zero waste and plastic-free community, the opportunity to share the message about living with less waste with 1700 people was pretty mind-blowing.

From a personal perspective, talking in front of that many people was pretty mind-blowing too!

I never thought of myself as a public speaker. At school, if asked to speak in front of the class, I’d end up bawling until I was allowed to sit back down. (I’m sorry, classmates, for having to put you all through that.) And yes, this was in my teens.

When I first began writing this blog back in 2012 it was completely anonymous.

I’m not someone who loves the limelight.

My first public speaking opportunity came in 2013, when Plastic Free July asked me to talk for 5 minutes in front of 60 people. The only reason I said yes was because I felt that the message I had to share was more important than my personal fear of embarrassment/humiliation/self-doubt.

I remember pacing in the toilets beforehand, heart racing and sweaty palms, panicking about standing in front of all those people.

After that 5 minute talk, where I spoke too fast, flailed my arms wildly and trembled, a radio host who was watching asked me for a pre-recorded interview. I said no.

He approached me again as I was leaving. After some persuasion about how important the message was, I reluctantly agreed.

Then the next community group or organsiation asked. And the next.

And that is how this non-public speaker became a public speaker. Whenever I was asked to speak or present, I’d remember that the story and the cause is the most important thing, and I’d bite my lip and agree.

And in time, with practice, I got better. I learned to slow down. I learned not to panic. I felt more confident in myself, and in what I was talking about.

I still flail my arms uncontrollably! Something to work on ;)

Now, I love to speak to others. It’s a way to amplify the message. I can do what I do, and tell all my friends, but the impact is limited. When I start to speak to people who don’t know me and share my story with them, that’s when the message really starts to spread.

If you’re passionate about the plastic-free life and the zero waste movement (or something else!), then I encourage you to get out there, into your community, and spread the word. You don’t have to take the stage at a big event (at least, not at first)! I have spoken to groups as small as 15 people.

The opportunities are everywhere: at your local library, the farmers’ market, your workplace, a local school or community group. Your message is too important not to share.

You don’t have to be a public speaker. I wasn’t. You don’t have to love standing in front of an audience, or have confidence in spades. I didn’t. I’m just someone with a message I want to share. That’s all you need to get out there and make a difference.

Now I’d love to hear from you! If you get a chance to watch the video, I’d love to hear what you think! And if you’ve tips for keeping flailing arms at bay, I’m all ears ;) Have you personally had any experiences of speaking in public? Is it something that you embrace, or that you dread? Is it something you’d like to do in 2017? How have you managed to conquer your nerves? Do you have tips for anyone starting out? Is it something you still struggle with? Anything else you’d like to add? Please tell me your thoughts in the comments below!

[leadpages_leadbox leadbox_id=1429a0746639c5] [/leadpages_leadbox]

5 Reasons to Choose Second-Hand (+ What My Second-Hand Home Looks Like)

Perth is apparently the most isolated city in the world. With isolation comes lack of choice. I sometimes joke that the reason I’m a minimalist is because there is simply nothing to buy in Perth. When you come from Europe, the selection seems limited, expensive, and online shopping is still in its infancy – if anything is ordered online from the east coast of Australia, it takes at least two weeks to arrive. (And costs a fortune in delivery fees.)

It is actually faster to order products from the UK for delivery to Perth than from the east coast of Australia (just think of the carbon footprint of all that online shopping).

Sadly, this lack of choice extends to the second-hand market, too. Most councils allow three free verge collections every year, meaning households can dump their unwanted furniture and other bits and pieces to be taken straight to landfill, which no doubt reduces the pool of second-hand goods further.

I was lamenting this the other day as I was scrolling through Gumtree and finding only ugly, MDF and Ikea furniture available. If I was in London, I thought, I’m sure I could find exactly what I wanted… now. I looked wistfully at a website for one of Australia’s better-known furniture stores. More convenient, maybe, yet I know most (all?) of that beautifully styled furniture is mass produced in China.

But was I tempted?

No. Every piece of furniture we own is second-hand. Every single piece. There are other things we have bought new, for sure, but not the furniture. When you have a 100% success rate, it seems a shame to break it ;)

What do I love about second hand? It might not be as convenient as walking into a high street store and picking something off the shelf, but there are plenty of other benefits. These are my top 5:

1. Saving resources and reducing waste.

There is already enough stuff in the world without needing to make more. Using what already exists makes far more sense: it’s better for the environment, it saves resources, it reduces emissions, and it reduces waste. Oh, and it saves on all that new packaging, too!

2. There’s less “guilty” attachment.

I didn’t always buy second-hand. When I lived in the UK I bought lovely things that weren’t cheap. When I moved to Australia, I sold many of those things for far less than I paid for them. Some were only a year old. I knew I was moving to better things, but it was definitely a lesson that buying new can be a waste of money, and there are better things to spend money on than stuff.

I can see how it is tempting to keep things we don’t really like, need or use, simply because we paid more than we should have in the first place, and won’t be able to recoup that. When you buy things second-hand, you’re much more likely to pay a fair price – and if you change your mind, be able to sell it on at a similar price.

3. It means stepping off the consumer treadmill.

For me, going to furniture stores meant seeing beautifully styled and laid out settings that I couldn’t afford, and didn’t even know that I “needed” until I stepped foot into the store. It meant trying to keep “up-to-date” and “accessorising” – which I now think meant spending money I didn’t have on stuff I didn’t need.

Now I don’t step into those stores, I have no idea what is “on trend” and I don’t feel the pull to spend my money on “stuff”. I find it safer not to browse. Instead, if I need something (and only then), I look in the second-hand stores or online. If I find something I like, at a price I’m happy to pay, then I buy it. There’s no clever marketing or external factors influencing my decisions.

4. It’s more community-friendly.

High street stores and national or international chains are where most people buy their new furniture. These businesses rely on global supply chains and overseas manufacturing; they order huge quantities and often externalize costs to keep prices low. They also encourage us to consume more and more.

Second-hand stores are mostly independent and local. Many sellers on Gumtree or eBay (or other classifieds sites) are regular people, trying to make a few extra dollars (or pounds, or whatever currency it is) getting rid of excess stuff.

I have the choice to line the coffers of big businesses, or choose to support smaller ones and keep the money within my local community economy.

5. Second-hand pieces have stories.

There’s something much more rewarding about choosing a one-of-a-kind second hand piece. than a generic 600-more-in-stock identikit piece from the furniture store. Whether it’s the thrill of the find, the history you uncover about the item, the conversations you have along the way, the trouble you go to to get it… second-hand pieces just have stories oozing from them. That is what gives them character.

Our furnishings won’t be gracing a design magazine any time soon. But they suit us and our lifestyle, and they saved huge amounts of new resources being used. And every item has a story :)

The bed and side table:

When we moved into our first flat in Australia, we actually slept on an air mattress for the first three months. Eventually we had to hand it back as it was needed by its owner (my sister-in-law!), and we bought this bed. The side table is one of a set of three nesting tables: the other two live in the living room.

bedroom-bed

The side tables were purchased from an eBay seller who restores furniture and the bed and mattress from Gumtree.

Clothes Rack and Chest-of-Drawers

When we bought our flat there was supposed to be a huge built-in wardrobe across the entire length of the bedroom. Knowing we wouldn’t use it, we requested it not be built, and found this clothes rack on Gumtree instead which takes up a fraction of the space.

The chest of drawers has had many uses in its life: from junk to board games to tools – it is now in the bedroom. It was restored by the seller who replaced the top with 70s laminate : /

bedroom-wardrobe-chest-of-drawers-hoarder-minimalist-treading-my-own-path

The rack is a current Ikea model and at any stage there seems to be at least 5 on Gumtree. I wish more people shopped second-hand!

The Desk and Chair

I remember when we picked up the desk from a Gumtree seller, she was having a party and there must have been 50 people in her house! The desk had seen both her kids through school and onto university, and she was pleased to hear I was studying and it would continue to enjoy its life. Now it’s my work desk.

The chair is one of our dining chairs. I cannot see the point in owning a separate office chair.

desk

The desk and chair.

The Dining Table

This table was an Ikea table that we bought second-hand, and was still flat-packed in the owner’s garage. It came with four chairs: the fourth chair lives with my desk. I’m not a fan of Ikea but at least this table is actual timber, rather than laminate. We’ve been saying that we will upgrade now we’ve moved and have space to fit more than 4 people in the flat, but we never seem to rush these things…

table-treading-my-own-path

Our dining table.

The Seating Area

Our seating area is a bit of a mish-mash of things, but it does the job. The chair on the right was technically my husband’s before he moved to the UK. He gave it to his parents, who kept trying to give it back to him when we moved here. Eventually we had room for it, and so we took it back. He did buy it new but to me it’s second-hand!

The sofa was our old neighbours who left it in our last flat when she moved out (we moved across the hall). She’d either found it on the verge, or paid $10 for it at a second hand store. My husband was never keen on it, and it was super worn out with itchy cushions, but the frame is solid. We decided to get it reupholstered. We probably should have waited until we moved to choose the colour, and it wasn’t done quite how we asked, but it’s definitely given it a new lease of life.

The chair on the right we gained from a swap table at a local event. We took a stainless steel pot with a lid that doesn’t work on our induction cooktop (shame, I liked that pot). We weren’t going to take anything in return, but then we spotted the chair and thought it could come in handy. It kinda just sits there awkwardly, but it does get used!

In between the sofa are the two other tables from the nest of 3. We call them the tiny tables as I hadn’t checked the dimensions when we bought them and I thought they’d be much bigger. I went to the shop with my mother-in-law and we were asking the guy if we’d need to put the back seat of the car down – he looked at us like we were crazy. Turns out I could fit them in my lap! This is the only second-hand item I’ve probably paid too much for.

sofa

Random chair collection and the nest of tables.

old-sofa

Just to give you some comparison, this is the old sofa before it was reupholstered. It was very sunken!

Whilst all the furniture is second-hand, not everything in our home is. Our original washing machine and fridge were both second-hand, but when we moved to our new flat we chose to buy new (I discussed why here).

We also bought some new things from before our zero waste days: our dinner plates and bowls, for example. Even since our zero waste days, there is the odd new purchase. Most recently (by which I mean, April) I bought some indoor plant pots.

Whilst I’d love for everything I own to be second-hand, sometimes it just isn’t convenient enough. I’m not perfect, and I’m okay with that. It’s something to work towards ;)

Now I’d love to hear from you! Tell me, do you shop second-hand? What things do you choose second-hand, and what things do you choose new? What are your top reasons for choosing this? What is your favourite second-hand purchase? Have you had any bad experiences with buying second hand? Have you had any bad experiences buying new, for that matter?! Anything else you’d like to add? Please leave a comment with your thoughts below!

[leadpages_leadbox leadbox_id=1429a0746639c5] [/leadpages_leadbox]

3 Zero Waste Recipes: DIY Cashew Milk, Homemade Almond Milk + Almond Pulp Brownies

Nut milk. The name sounds kind of ridiculous. But it looks like milk, has a similar shelf life, can be used in similar ways, and in many cases the nuts do actually have to be “milked”, so it’s easy to see why the name took hold!

milking-almonds-to-make-nut-milk-treading-my-own-path

When I started out on my plastic-free journey, I bought cow’s milk that came in returnable glass bottles. But it wasn’t stocked in many places, so finding it was hard – and a bit of effort. Gathering those glass bottles together to return them meant a heap of clutter and a journey across town with them all (there was no deposit return either, only goodwill). Plus what to do with all those lids?!

I began making nut milk alongside dairy milk, because it was a lot easier to find nuts in bulk, and they have a long shelf life (they will last for months in a jar in the pantry, or even better, the freezer). I found nut milk worked just as well in baking, in porridge and in coffee, and I began to use it more and more.

Eventually I thought more about the impact of the dairy industry on the planet. Cows need a lot of water and land to produce milk, they produce huge amounts of methane, cause soil erosion, and the product has to be transported fresh, meaning a higher carbon footprint. Nuts use less water, the trees are beneficial for the environment, and the products have a long shelf life.

Nut milk seemed like the greener option. I decided to stop buying dairy milk altogether (my husband stopped too, but later).

almond-milk-and-cashew-milk-treading-my-own-path

But of course, I don’t buy nut milk. Some commercial brands of nut milk are little more than bottled water! Alpro’s nut milk contains only 2% almonds, and the second biggest ingredient is sugar. Unnecessary packaging aside, shipping all that water across the globe seems like such a waste when we can ship dry nuts (or even better, use local ones) and make our own.

And I have to tell you, making your own is super easy. It requires no specialised equipment, and takes very little time. You’ll need a blender, but it doesn’t have to be a fancy one.

How To Make Cashew Milk

Cashew milk is my go-to milk because it’s the easiest. Cashews are already quite soft, so they do not need to be soaked for a long time. They also contain very little fibre, so there is no need to strain.

To make:

Soak 1 cup of raw cashews in water for a few hours or overnight. Rinse, and blend with 4 cups water. Done.

I tend to blend my cashews with 1 cup of water at a time, for 30 seconds, before adding the next cup of water. I find that there are less (no) lumps in it this way.

Makes 1.2 litres. Lasts 7 – 10 days in the fridge. It may get thicker over time, in which case add a little more water to it.

cashew-milk-and-cashews-treading-my-own-path

cashew-milk-makes-great-plant-based-coffee-treading-my-own-path

Cashew milk works absolutely amazingly in coffee, too :)

How to Make Almond Milk

Almond milk is the most common nut milk, but it isn’t the easiest or quickest to make. That doesn’t mean it’s hard, mind! It just needs soaking a little longer, and also straining.

To make:

Soak 1 cup of raw almonds in water for at least 12 hours, and even 24 hours (change the water every 8 hours or so). Rinse, and blend with 4 cups of water.Now you need to strain.

I strain my almond milk using cheesecloth as it has a fine weave and is 100% cotton. Spread the cheesecloth over a bowl or jug, pour the milk over and allow the almond milk to drip through. Squeeze to get any remaining drops out.

straining-almond-milk-treading-my-own-path milking-almonds-to-make-nut-milk-treading-my-own-path

I bought my cheesecloth off the roll at a fabric store – it is very inexpensive. (Cheesecloth is not the same thing as muslin. Muslin has a much looser weave and the fibre all gets stuck!)

Alternatively, you could use a clean tea towel or old pair of tights, or even a fine mesh sieve. Before I had the cheesecloth, I used one of my mesh produce bags. There is absolutely no need to buy an expensive plastic nut milk bag!

Makes about 800ml, and leaves a cup of almond pulp. Don’t throw the almond pulp away! It will last in the fridge for a week, or freeze it. And then make chocolate brownies : ) (Recipe below).

fresh-almond-pulp-and-almond-milk-treading-my-own-path

Fresh almond pulp (almond milk on the right). I use cheesecloth the strain, and scrape the excess pulp off with a knife.

How to Make Other Nut Milks

Other nut milks can be made in the same way, and most will require some kind of straining, although they won’t produce as much pulp as almond milk does. I’ve made macadamia milk (no need to strain), brazil nut milk and walnut milk.

Cheaper Nut Milk Alternatives

Nuts can be expensive. Increasing the ratio of nuts to water will make a more cost-effective milk, but will also dilute the milk. I tend to use the ratio 1:4 nuts:water but this could be increased to 1:5 or 1:6.

As well as nuts, you can also make plant-based milk with seeds, oats and peanuts (which are techincally a legume, not a nut).

Pumpkinseedmilk

Homemade pumpkin seed milk :)

These work out much cheaper than nut milks. I’ve tried making sesame seed milk (not recommended – it has a very strong flavour!), pumpkin seed milk (which is absolutely delicious) and sunflower seed milk. Flaxseed milk is also popular, although I’ve never tried this.

As above, the principle is the same. Soak, then blend 1 cup seeds with 4 cups water, and strain.

Now, let’s talk about what to do with the leftover pulp.

What to Do with the Leftover Pulp: Make Almond Pulp Brownies

This recipe has become my go-to almond pulp recipe. I’ve made savoury crackers, and macaroons too, but nothing beats chocolate-y goodness, so I always come back to this one.

vegan-almond-pulp-aquafaba-brownies-treading-my-own-path

Ingredients:

180g sugar (I use rapadura sugar)
1 cup almond pulp, approx (the pulp left over from using 1 cup of almonds to make almond milk)
80g cocoa powder (I’ve used both cocoa powder and raw cacao for this – I prefer cocoa powder but it doesn’t really matter. You might want to add a little more sugar if using cacao, though)
1/2 cup (110g) coconut oil (I use deodorised as I find the coconut oil flavour a little intense in desserts)
9 tbsp aquafaba (chickpea water – effectively a waste product being put to good use. Find out more here!)
1/2 cup (60g) spelt or other flour
1 tbsp vanilla essence
1/2 tsp salt
1 cup macadamias/walnuts/raspberries/chocolate chips/something else delicious
(or you could leave plain. But I consider all good brownies to need some kind of crunch)

Optional: a few tablespoons of cacao nibs and/or chopped nuts to top.

Method:

Line a square baking tin (if you use baking paper) and preheat the oven to 175°C.

Melt the coconut oil in a pan. Turn off the heat, add the almond pulp and stir to combine.

In a separate bowl, combine the sugar, cocoa powder and flour, and mix well. Add to the pan and stir in. It might seem really dry at first, but it will incorporate. Once combined, add the vanilla essence, salt and walnuts (or delicious thing of your choice).

In a tall cylinder, whisk the aquafaba to form stiff peaks. (This will take longer than you think.) I use a stick blender with a whisk attachment and it takes at least 5  minutes of  constant whisking. Add the aquafaba to the brownie mixture in the pan, slowly folding to incorporate with as little stirring as possible.

This yellow liquid is what you get when you cook chickpeas and strain (and keep) the water

aquafaba-and-chocolate-brownie-mix-treading-my-own-path

Once incorporated, pour into the baking tray. Sprinkle the toppings on (if using) and bake in the oven for 20 – 25 minutes until the top is dry.

chocolate-brownie-slab-treading-my-own-path vegan-almond-pulp-aquafaba-brownies-treading-my-own-path plant-based-aquafaba-brownies-treading-my-own-path

Best stored in the fridge if you don’t demolish the whole lot in one sitting.

Now I’d love to hear from you! Have you ever made nut milk (or seed, oat or rice milk)? Which is your favourite? Which is your least favourite? If you’ve never made it before, is there something putting you off? Do you have any other alternatives to suggest? What about aquafaba – have you ever experimented with that? Are you just a little bit tempted to make these chocolate brownies?! Anything else you’d like to add? Please tell me your thoughts and leave a comment below!

Essentials for a Zero Waste Kitchen

When it comes to the kitchen, I would not call myself a minimalist. At least, not by “minimalist” standards (whatever they are anyway). That said, I do not consider anything I own to be unnecessary – I do not own special Christmas crockery, or fancy obscure gadgets (cherry stoner, avocado slicer, chocolate fountain), for example.

I own a lot of kitchen things because I like to cook, and I especially like to eat. Whilst I think it’s possible to live zero waste without needing to cook everything from scratch, I personally enjoy making food from scratch. Cooking is my creative outlet.

Making food from scratch requires a bit more stuff.

What is more important to me than minimalism is zero waste, and my kitchen has found a balance that I am happy with. We rarely buy anything new. Our last purchase (in February) was when we moved into our new home. We had to buy a frying pan as our old one didn’t work on the  induction hotplate. Borrowing the neighbours’ pan several times a week didn’t really work out for us! (Or them!)

I thought I’d show you round our kitchen, and talk about our zero waste kitchen essentials. Essentials, of course, are a personal thing, depending on what you like to eat, living arrangements, how you cook and where you live.

I don’t think everyone living a zero waste lifestyle would need to own everything that I do. This isn’t an instruction manual, it’s a snapshot of the choices that we’ve made in living zero waste (with a hint of minimalism thrown in).

A Tour of our Zero Waste Kitchen

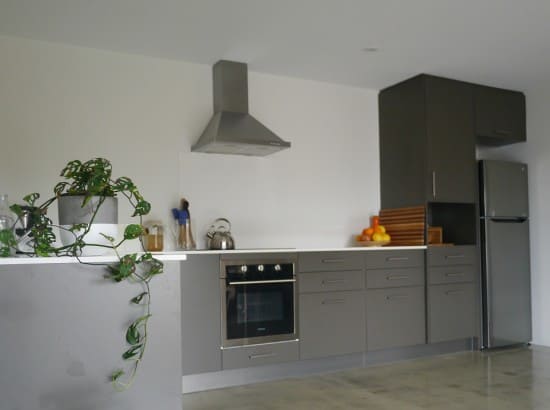
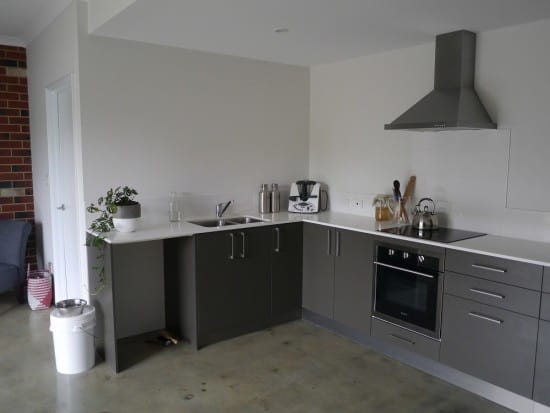
When I shared this photo on a previous tour of my house, someone asked me if I’d tidied up. OF COURSE I TIDIED UP! My house is not ever as tidy as this unless I make a concerted effort. For example, the draining board is almost always full of drying dishes (one of the downsides of zero waste living is the extra washing up). And there’s often ferments, or sourdough, or harvested veggies sitting on the side.

Yes, I tidied up for you guys ;)

kitchen-pana-hoarder-minimalist-treading-my-own-path

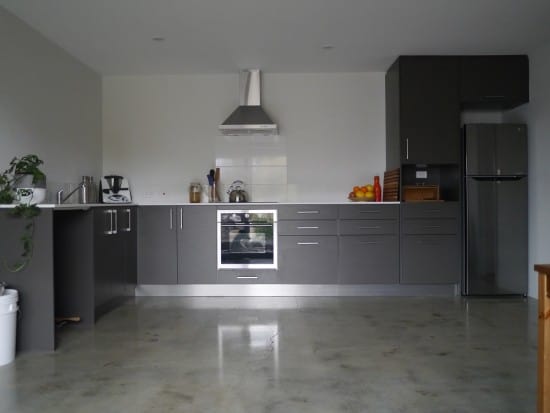
My zero waste, minimalist (ish) kitchen.

Let me introduce the kitchen. It’s an L-shape with an impractical amount of cutlery drawers (there are 7!) and very little cupboard space. I am determined not to add cupboards to the wall, as I like the white space. I’d rather put up pictures!
kitchen-sink-hoarder-minimalist-treading-my-own-path

Kitchen Counters: On our kitchen counters we have 2 large Klean Kanteen growlers. When we run the hot water, it actually takes 7 litres of water to run hot, and we can’t just throw this down the drain. I used to use old wine bottles but we’d end up with 11 or so on the counter, and I couldn’t bear the clutter! These growlers can be used for beer, and we can take them camping.

The white machine in the corner is our food processor (it’s called a Thermomix). It’s got a stainless steel bowl, and also has the function to heat. I use it every day – to blend, chop and mix, mostly. Before this, I had a Magimix, but the bowl was plastic.

Next to the hotplate is a glass jug that doubles as a utensil holder. We have 3 silicon spatulas, a couple of wooden spoons (one for sweet things and one for savoury) and a rolling pin.

The kettle is a stovetop one that we bought second-hand. I like that it lives on the hotplate, rather than cluttering up the counters.cupboard-open-kitchen-hoarder-minimalist-treading-my-own-path

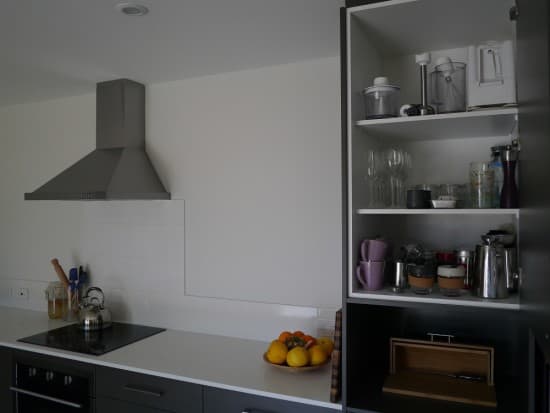
Tall Cupboard: The cupboard on the right was intended to be a pantry, but unless you’re 6 ft tall it’s not very practical and there would be a huge amount of wasted space.

Top shelf: we have a stick blender with various attachments (I sold the ones I didn’t need on eBay!) and a spiraliser. Possibly the only gadget I have that’s a bit gimmicky, but we use it a lot in summer. In fact, my husbands uses it, so it’s staying!

Middle Shelf: we have wine and champagne glasses (currently 5 wine and 2 champagne), water glasses (5 assorted), two short coffee cups (that were originally yoghurt pots), salt and pepper grinders and my onyx ice cube tray. At the back are some glass jars I was storing for a workshop, and my husband’s cycling water bottle.

Bottom shelf: this is the coffee/tea shelf – you just can’t be minimal about that! We own 8 mugs (which seems excessive but my husband originally had 16!), our coffee press, two KeepCups, bits and pieces for the coffee machine (handle thingy, jug, funnel) and of course, tea and coffee.

junk-drawer-hoarder-minimalist-treading-my-own-pathDrawer 1: I guess the top drawer in our kitchen would be classed as our junk drawer. We keep Hans’ (our adopted greyhound) lead and muzzle in here, sunglasses, garage clicker, pens and seeds. As we had so many drawers that weren’t that useful for much else it made sense to keep this stuff here.

reusables-drawer-hoarder-minimalist-treading-my-own-path

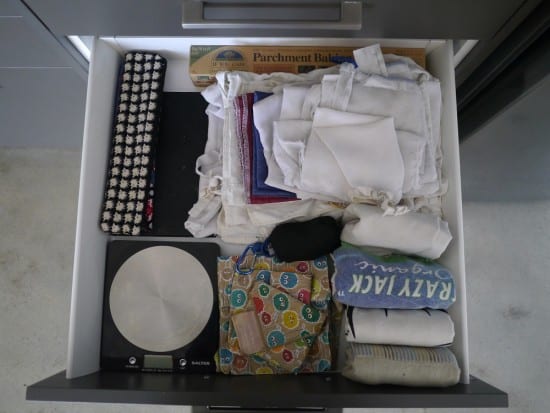
Drawer 2: The second drawer down contains our kitchen scales (so necessary!), our reusable shopping bags, produce bags and reusable wraps. There’s also a black book where I keep my most-used recipes. And yes, I use baking paper (which I reuse, and then compost). You can read why here. food-storage-hoarder-minimalist-treading-my-own-path

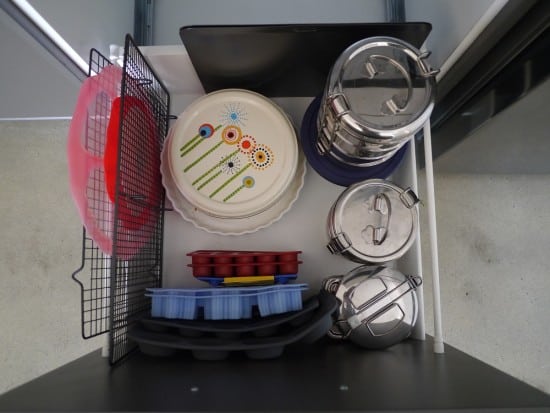
Drawer 3: The third drawer contains most of my reusables. I have 3 baking sheets (one is in the fridge) and 2 cooling racks. I find it useful to have 3 trays when I’m baking as otherwise it takes twice as long and uses more electricity.

The pink and red circles are silicone bowl covers (there’s a white one too that might have been in the fridge).

Then there’s the rest of my silicone bakeware, stainless steel food storage containers and glass Pyrex. I own a lot more Pyrex but it’s often in the fridge or freezer holding leftovers.kitchen-drawer-hoarder-minimalist-treading-my-own-path

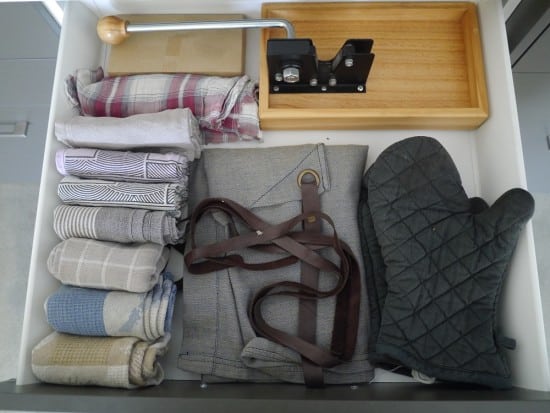
Drawer 4: This drawer contains our oven gloves, an apron (I am a messy cook!) and far too many tea towels. I think three is enough, but we will use these out and not replace them. The contraption at the back is a macadamia nut cracker. Those things are tough! (We often buy 5 kg sacks of the nuts, and shell by hand.)

bakeware-drawer-hoarder-minimalist-treading-my-own-path

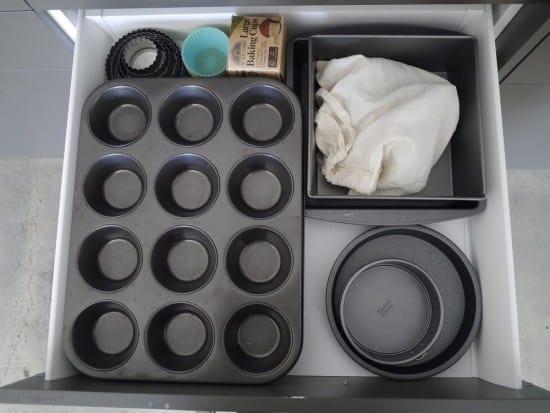
Drawer 5: The rest of my bakeware. Yes, it is necessary to have all of these different sizes! I have 2 square tins, a muffin tin, individual silicone cupcake cases, two sandwich tins and a tiny cake tin for experiments!

I tried to choose something to get rid of when we moved, and I just couldn’t. You know what? I’ve used every single thing since we moved. I guess they are just all essentials!

bowls-and-bakeware-hoarder-minimalist-treading-my-own-path

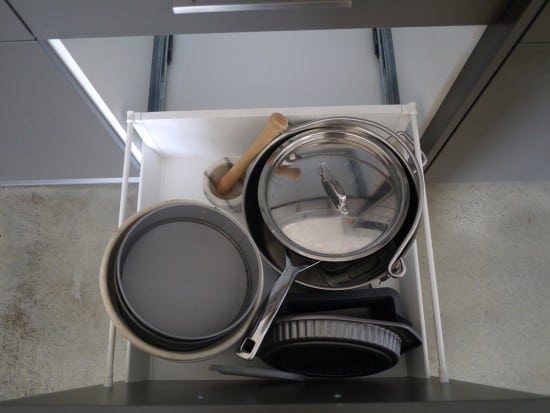
Drawer 6: Okay, so maybe there’s slightly MORE bakeware in here. And I haven’t used that flan tin in the last 6 months, Still useful, I say!

You’ll notice that despite the front of the drawers being enormous, the sides and back are the same depth as a regular drawer, making them very hard to fill. Hence why the bakeware is spread across three drawers – it is in no way because I have too much!

I have a big maslin pan which I use for preserving and also for cooking up big batches of chickpeas. My frying pan sits on top, and in between is my glass loaf tin – sourdough rusts the metal ones.

Underneath the round cake tin is a banneton basket (for proving sourdough) and three large bowls (one ceramic, two glass).

The pestle and mortar is a charity shop find.cutlery-drawer-hoarder-minimalist-treading-my-own-pathDrawer 7: Much as I hate plastic, I dislike a jumbled cutlery drawer more. And there seemed no point discarding what we already had to buy something new and plastic-free.

We have two sharp knifes, and a cutlery set for four (it was originally for 8 but we decluttered the other half). There’s two sets of camping cutlery also. We also have a set of salad servers and a big serving spoon, two tea strainers, a spirit measure, champagne stopper, metal chopsticks, a vegetable peeler, thermometer and corkscrew. Plus there’s some reusable straws (in the boxes).

Of everything, a good sharp knife (ours is the Global brand) is definitely an essential. We also have a set of measuring spoons (not pictured).

crockery-drawer-hoarder-minimalist-treading-my-own-path 
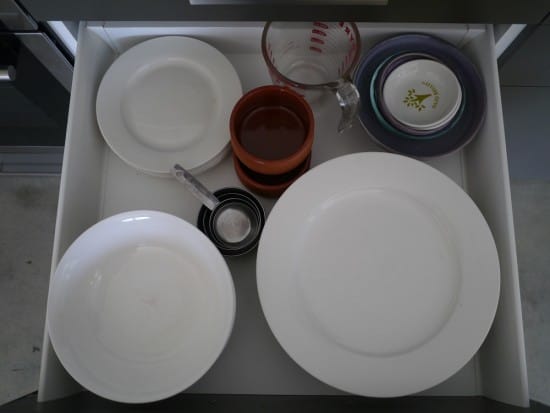
Drawer 8: our crockery. We have 6 dinner and side plates, and 5 bowls as one broke (which is fortunate as the drawers are too shallow to hold six bowls). There’s my set of measuring cups, a Pyrex measuring jug and assorted bowls and dishes that get used for various things. The two brown ones were the containers for some fancy dips purchased at the supermarket!

saucepans-hoarder-minimalist-treading-my-own-path

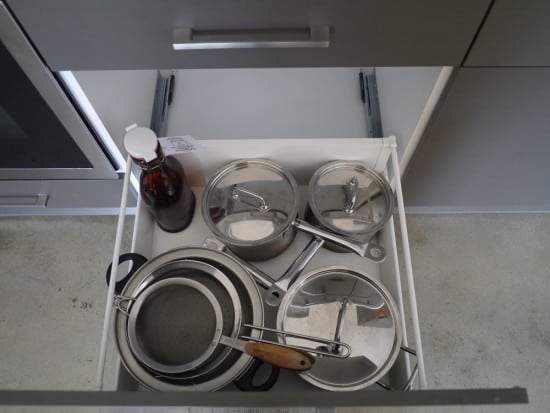
Drawer 9: We have 3 saucepans, and I wouldn’t like any less. I tend to use them for storing leftovers in the fridge also. I have two sieves and two colanders. I use them all, but I am sure once they break I will manage with less.

The glass bottle is a beer growler for our local zero waste beer store.

drawer-under-the-oven-hoarder-minimalist-treading-my-own-path

Drawer 10: The drawer under the oven is even shallower than the other 6, and barely anything fits. We keep our two stainless steel roasting dishes in here and our rectangular Pyrex containers (we have 2, but one is currently in the freezer).

under-the-kitchen-sink-hoarder-minimalist-treading-my-own-path

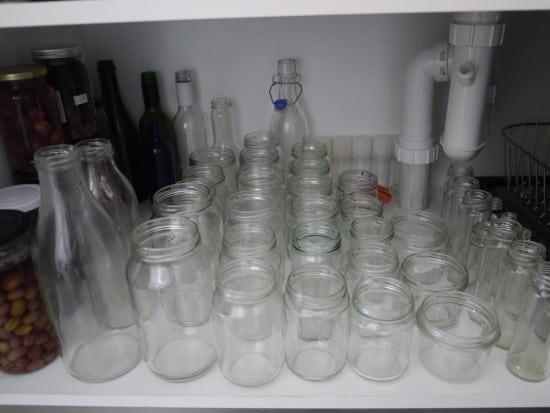
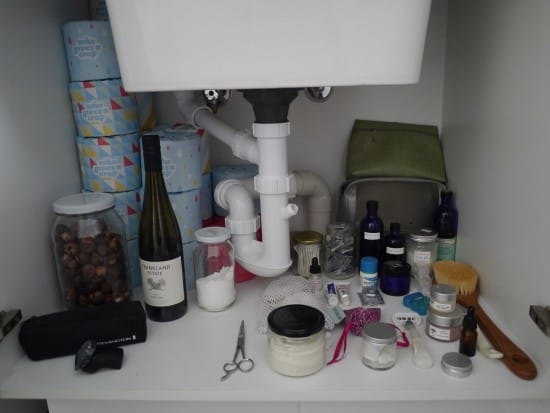
Cupboard under the sink: We keep our extensive jar collection here. Glass jars are useful for everything, and are definitely a zero waste essential!

corner-cupboard-hoarder-minimalst-treading-my-own-pth

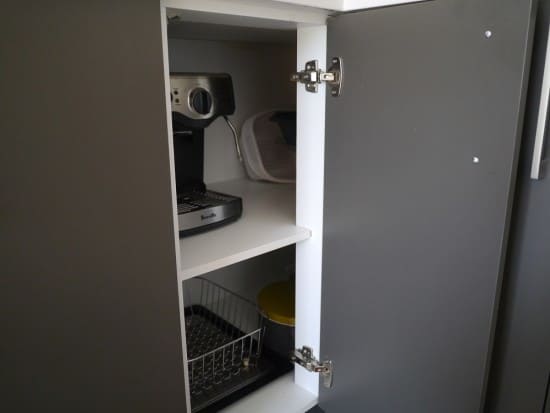
Corner Cupboard: We keep our coffee machine here, and the dish drying rack. There is also a plastic colander that came with the house (randomly) and more storage tins.

Zero Waste Plastic Free Pantry

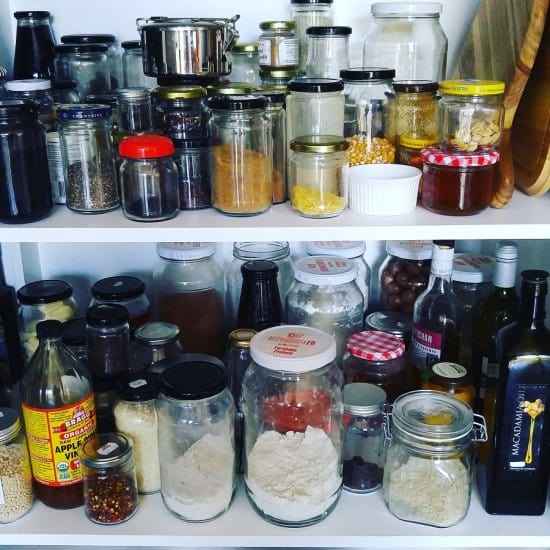
Other cupboard: As well as storing our food, we keep our chopping boards here.

That’s the tour!

Now I’d love to hear from you! Tell me, what are your zero waste kitchen essentials? Do you love cooking, or hate it? How does your kitchen compare with mine? What could you not do without? What can you do perfectly well without? Have you ever thought you’d not be able to manage without something, only to find that you could? Is there anything that I have that jumps out at you as surprising? Are you a gadget fan, and if so, what are your favourite gadgets? Are you much more minimalist than this? Anything else you’d like to add? Please tell me your thoughts in the comments below!

[leadpages_leadbox leadbox_id=1429a0746639c5] [/leadpages_leadbox]

Introducing Hoarder Minimalist: the Decluttering Guide with a Conscience

On my decluttering journey, I found two questions that nobody seemed to talk about. The first was “how”. There were plenty of resources on the “why”, and the benefits that a life with less could bring. More time, and more freedom. Less clutter, less stuff, less frustration and less stress. I knew that was what I wanted. I could imagine what it felt like. But…

How did I actually get from where I was, to where I wanted to be?

I knew that a “packing party” wasn’t going to work for me. (Ryan Nicodemus from the Minimalists famously held a packing party, where he boxed up the entire contents of his house, and over three weeks discovered what he needed and what he didn’t. At the end of the three weeks, he discarded everything he didn’t use.) There was no way I could do that. There was no way I wanted to do that. I wanted to take my time and think through my decisions. But I didn’t want to be thinking through my decisions for the next few years!

Other than a few decluttering games, I couldn’t really find much information on the “how”.

The second was the waste. Everything I read seemed to gloss over the bit where we have to decide what we are going to do with the stuff! It seemed to be whittled down to a few words: “donate, sell or discard.” What was the best way to donate? Where was the best place to donate it? How did I ensure I wasn’t just burdening the already full charity shops? What about selling? And most of all, surely there was a better place for everything else than “discard”?

Was it even possible to declutter without sending anything to landfill?

I’ve always been passionate about living with less waste. Yes, what that looks like has changed over the years (gone are the days when I thought that recycling everything was good enough!). Decluttering and minimalism have been extensions of this for me: both in terms of resources (owning stuff that I don’t use is a waste of resources) and in the wider sense (wasting my time, energy, money and at times, my sanity). I couldn’t declutter if I thought everything was going to end up in the bin; for me, it would defeat the purpose.

I’m know I’m not the only one who feels like this. I know I’m not the only person who dreams of a life with less waste and less stuff, and wants practical steps to achieve it without sending plastic sacks of usable items to landfill!

So how does somebody who cares about waste declutter, and what do they do with the things that they no longer need?

Those were the questions that I couldn’t find the answers to. Now I’ve got to the end of my decluttering journey, I have those answers, and I want to share them with you.

I’ve spent the last few months pouring all of the lessons learned, a-ha moments realised and the actions taken, and I’ve created a resource that I’m really proud of. Called Hoarder Minimalist, it’s a comprehensive guide to decluttering with a conscience. It’s not just a bunch of tips and tricks: it’s a practical plan with actionable steps for anyone wanting to live a life with less stuff, who values experiences over things, and who doesn’t want to trash the planet in the process.

banner_availblenow_940px-latestbook-workbook-plannerDecluttering isn’t something that can be finished in a single weekend, but it doesn’t need to take forever! There is an end and you can get there. I know that by sharing my experiences, you will make progress quicker and see results faster. Whether you’ve been decluttering for a while, you’ve just started out, or you’re still in the thinking-about-it stages, the life you dream about is just around the corner… and whist the journey is rewarding, the end is definitely better! After all, it’s about more than stuff. It’s about freedom.

Introducing…Hoarder Minimalist: Decluttering the Zero Waste Way

Hoarder Minimalist offers a Main Book, a Workbook and a Journey Planner. The Main Book (147 pages) is the roadmap for your decluttering journey: an actionable step-by-step guide to living with less. There’s a whole section devoted to letting go of your items responsibly. The Workbook allows you to explore some of the ideas presented in the Main Book in more detail, and to really personalise them to your own individual set of circumstances. The Journey Planner is for you to track your journey, record your milestones and watch your progress unfold.

hoarder-minimalist-bundle

Option One: The Hoarder Minimalist Bundle contains the Main Book, the Workbook and the Planner, and is priced at AU $26.95 (bundled savings $7.95).

buy-it-now-button-200px

Find Out More Button
Hoarder Minimalist Main Book

Option Two: Alternatively, if Workbooks and Planners aren’t your thing, and you don’t want to pay for stuff you don’t need (I get that! You’re decluttering, after all!) the main Hoarder Minimalist book is available to purchase separately for $19.95.

(If you change your mind later on, the Workbook is also available to purchase separately for $14.95).

Buy It Now Button

Find Out More Button

And of course, I cannot wait to hear your decluttering stories! Any revelations, a-ha moments and epiphanies – share them all! I’d love to see any before-and-after pictures too. If you’ve any questions, suggestions or comments, I will be happy to help. I always love to to hear from you. In short, my inbox is always open, as are the comments below!

Good luck with the journey, and I will see you on the other side : )

[leadpages_leadbox leadbox_id=1429a0746639c5] [/leadpages_leadbox]

A Zero Waste Minimalist House Tour (Yes, Hoarders Can Change)

Last week I talked about how I’d successfully decluttered my wardrobe (after many attempts and years of trying). In my journey towards living with less waste, I’ve learned that owning stuff we don’t use, don’t like and don’t need is as much a waste as throwing it away. After all, it’s taking up space, time and energy, and for what?! It isn’t being used!

Decluttering doesn’t have to mean throwing stuff away, though. There is no need to send anything to landfill – so long as you have the patience and the commitment to seek out new homes for the things you no longer require. Even the act of giving things away has really cemented in me the understanding that if I don’t want to create waste, I have to think very carefully about what I let through my front door. If I don’t need it, it isn’t coming in…because it will only be something to deal with (and stress over) later.

After years of battling with trying to let go; knowing that my stuff was taking up my time, energy and space, but feeling powerless to act, I’ve found my own way. A way that didn’t involve car boot-fulls of stuff to the tip, or black bin liners dumped in the nearest charity bin with more that a little doubt that any of those items would get re-sold. I made peace with my stuff, and my past choices. Rather than wasting my energy feeling guilty and remorseful about those choices, I used this energy to find new homes for the things I no longer used. Decluttering with a conscience.

My driving force has always been to find my “enough”. I’m not interested in pursuing as little as possible, or being able to count my possessions, or fit them into one suitcase. My “enough” doesn’t look like that. My “enough” is everything that I need, and nothing more. My “enough” means several different sized baking tins; it means a collection of glass jars for food storage and preserving; it means more than one pair of shoes. What my “enough” is not: it is not stuff languishing in the back of the cupboard. It is not stuff that makes me feel guilty, or remorseful. It is not stuff that I’m keeping “just-in-case” when I know deep down that “just-in-case” will never happen.

On that note, I’d love to show you round my home! This is what “enough” looks like for me. Your “enough” probably looks completely different. It’s not about right or wrong, or better or worse. It’s about being true to ourselves. I’m sure there are things I own that you can’t imagine why I’d need them, and similarly, I’m sure I don’t have things that you couldn’t possibly live without! (The great thing about this is, when other people have things that we don’t own, there is always the opportunity to share – to lend and borrow!)

The Kitchen:

kitchen-counter-hoarder-minimalist-treading-my-own-path cupboard-open-kitchen-hoarder-minimalist-treading-my-own-path

Inside some of the drawers:

junk-drawer-hoarder-minimalist-treading-my-own-path reusables-drawer-hoarder-minimalist-treading-my-own-path saucepans-hoarder-minimalist-treading-my-own-path food-storage-hoarder-minimalist-treading-my-own-path

Under the sink:

under-the-kitchen-sink-hoarder-minimalist-treading-my-own-path

The Lounge Area:

seating-hoarder-minimalist-treading-my-own-path

Our Dining Table:

table-window-hoarder-minimalist-treading-my-own-path

My Desk / The Spare Room:

desk-hoarder-minimalist-treading-my-own-path spare-room-hoarder-minimalist-treading-my-own-path shoes-hoarder-minimalist-treading-my-own-path

The Bathroom:

bathroom-bedroom-hoarder-minimalist-treading-my-own-path shower-hoarder-minimalist-treading-my-own-path bathroom-hoarder-minimalist-treading-my-own-path

The bathroom cupboard:

bathroom-cupboard-hoarder-minimalist-treading-my-own-path

Books:

books-hoarder-minimalist-treading-my-own-path

The Bedroom:

bedroom-bed-hoarder-minimalist-treading-my-own-path bedroom-hoarder-minimalist-treading-my-own-path bedroom-wardrobe-chest-of-drawers-hoarder-minimalist-treading-my-own-path

Under the bed:

under-the-bed-hoarder-minimalist-treading-my-own-path

I used to try to imagine what it would feel like to live in an uncluttered home, and let me tell you, it feels so good to finally be there!  Knowing that there will be no more weekends of sorting and decluttering, and that my weekends are mine to spend how I really want to. Which isn’t rearranging my stuff…again.  I’d wonder if I’d regret letting go of things, but in truth, I haven’t missed anything. It’s amazing how little I truly need. I just needed to let go of the excess to find this out. All that extra stuff was just wasted time, money and energy… and a huge distraction. I just wish I’d realised sooner, and made a few less mistakes along the way.

Decluttering hasn’t been an easy journey for me, but it has been rewarding and so worthwhile. Now I’ve had the chance to reflect, I’ve taken all those lessons and insights, and I’m putting them together into a brand new resource. If you’re looking to declutter your life (and especially if you hate waste!) I think you’re going to love it! All is revealed here.

What’s next for me? Well, I’m keen to keep experimenting with the idea of less. To keep questioning if I really need things, and to let them go if I don’t. I’m confident that by choosing more versatile garments in future, I will minimalise my wardrobe further. I’m sure I can make space in other areas, too. Time will tell : )

Now I’d love to hear from you!? What did you think of my version of “enough”? How does it compare to your idea of “enough”? Has your version of “enough” changed over time? If you are decluttering, what are your current goals? What are your biggest problem areas, and where have your biggest successes been? If you’re already living a minimalist lifestyle, what were the biggest lessons you learned along the way? What were the hardest items for you to give away/let go of, and how do you feel about them now? If you had your time again, what would you do differently? Anything else you’d like to add? I love hearing your thoughts so please leave a comment below!

[leadpages_leadbox leadbox_id=1429a0746639c5] [/leadpages_leadbox]

From Decluttering to Done: can this one step make all the difference?

About a year ago, I was in a local town hall, with friends, watching a live band perform on a Saturday night. I was enjoying the music, and the company, but in the back of my mind I was distracted, thinking about other stuff. Or more specifically, I was thinking about stuff. My stuff.

I’d spent the day trying to declutter. I was planning to continue the following day. I was wondering whether I should get rid of something (I don’t remember what – maybe an item of clothing), or if I needed it, and what the best way to dispose of it would be… and then I caught myself. I noticed what I was doing, and realised how absurd it was.

I was letting my stuff spoil the moment. I was letting my stuff take up valuable space in my mind, as well as in my home. I was letting the process of decluttering take over my free time and my thoughts.

I’d been slowly decluttering over the past three years. I’d got rid of a heap of things I didn’t need and didn’t use, but the process had been slow. Here and now, at the gig, I realised that the longer I took, the more I was taking time and energy away from doing what I really wanted to be doing. (Which was not rearranging my wardrobe – again.)

The longer I took, the more I’d miss out on living my best life. “My best life” didn’t mean anything profound – it was as simple as this one evening.

Being able to spend time with my friends, or relax on a Saturday night. I could carry on decluttering the way I’d been going, and I’d still get there, but it would be long and drawn-out. How many moments like this would I miss in the process? I didn’t want to waste any more time. And so I didn’t. I made a plan.

I was clear what I wanted: a life with less stuff. I knew why in general terms: more time, more freedom, more connections and experiences. Yet I’d never really thought about what this actually looked like or felt like for me. The concert seemed to connect those dots. It really drilled down to my “why”.

What did more time look like? What did it feel like? What did I personally mean by freedom? What kind of experiences was I searching for? Was it about the big, soul-searching experiences, or was it being able to enjoy the simple things on a Sunday afternoon, undistracted by chores and clutter?

Why did I want a life with less stuff? There were many reasons.

I wanted more time.

I didn’t want to spend hours cleaning my home, or sorting, or dusting and vacuuming and putting stuff away.

I didn’t want to spend time rearranging ornaments or shopping for accessories.

I didn’t want to waste time looking for stuff amidst the clutter, or rummaging through overflowing drawers or cupboards.

I didn’t want to open my wardrobe to find a stuffed closet yet nothing to wear, trying on endless outfits before just wearing the same thing I always wore.

I didn’t want to be preoccupied thinking about my stuff.

What did I want to do instead? I wanted to spend my free time exploring, learning, and spending time with the people I care about. Visiting National Parks, reading, and leisurely breakfasts with family.

I wanted to spend my free time experiencing new things, being outdoors, and getting involved with my local community. I wanted to spend time with my friends, in a local town hall on a Saturday night, watching a band – not distracted by old jumpers and other stuff.

I wanted the stuff I owned to be useful and make my life easier – not distract me and take time away from the truly important things.

I wanted more freedom.

For me, freedom simply means having options. It’s not about being able to pack everything I own into a suitcase and heading off into the sunset. For me it’s about being able to make choices about how I spend my time. Not having to work extra long hours to pay for stuff I don’t need, or feeling burdened by a house full of possessions that need maintaining.

For me, freedom comes from having less stuff. Not owning more than I think is necessary (what I call my “enough”). The less I own, the more freedom I create for myself because the more choices I have. My husband and I can live comfortably in a small space with little storage. In Perth, this means we can live in a central location in a neighbourhood we like, close to amenities and transport. If we needed to move, or to pack up, we have the choice to do so – and owning less makes it easier.

My family live on the other side of the world, and part of this freedom means having enough savings in our bank account that if I needed to make a trip home, I could. It is far more important to me to have the money saved for that than to own a brand new dining suite, or the latest mobile phone.

Owning less also means less debt. The only debt we have is our mortgage. We saved up a sizable deposit to reduce the amount of debt we took on, and we made sure we could comfortably afford the repayments. Taking on a mortgage was a big decision, and we would love to be debt-free, but we don’t feel like our mortgage is stopping us doing the things we want to do – and for us, that is important. Previously we rented, and we loved the freedom that gave us. We don’t really see one as being better than the other: both offer different freedoms to us.

I wanted more connections and experiences.

I want to spend time with friends and family, I want to learn and to travel and to experience new things, and I want to have time to get involved in and contribute to my local community. I used to feel embarrassed about inviting friends over because I always felt that my home was a mess. As I began decluttering, a lot of the mess seemed to go away – and what was left was easier to deal with. I can’t believe I let my stuff get in the way of those relationships!

I also found that by breaking the cycle of working and shopping, I could use the money saved to go out for dinner with family, or take a short break down south to get amongst the trees and reconnect with nature. I created space in my evenings and weekends to take part in community events and contribute in a way that added value to my life and allows me to give something back to my local community.

I wanted less guilt, and less waste.

Every time I was faced with something in my home that I didn’t need, didn’t use or didn’t like, I would feel a wave of guilt. I’d feel guilty that I’d bought something that I hadn’t used, feel guilty that I’d got sucked in by some clever marketing campaign, maybe feel guilty that I wasn’t quite how I wanted to be. (If you have anything hanging in your wardrobe that doesn’t fit, you will know this feeling!) I don’t enjoy feeling guilty, so why didn’t I do something about it?

Somehow I’d justify keeping all these things because I hated the waste. Except, I’d failed to see that by keeping things that I didn’t want, didn’t use and didn’t like, I was creating waste. I was wasting good resources by not using them. If I wasn’t going to use them (and I mean by this, if I wasn’t going to use them properly, or regularly – if I wasn’t going to love them and get the best use out of them) then they were already being wasted.

Rather than feeling guilty about getting rid of perfectly good stuff, I began to realise that it was far worse and less ethical to keep perfectly good things for myself when I knew deep down that I wasn’t going to use them. It would be far better to pass them on for someone else to love them and get maximum use from them. Not only that, but all this worrying and contemplating was wasting my time…time I could spend doing other, better things.

There’s nothing wrong with taking time to declutter and make space in our lives. These things do take time. Decluttering is not something that is finished in a single weekend. But time is valuable, and the longer we take, the more we miss out on doing the important things.

I have no doubt that in the three years that it took me to get to this point, I missed out on great opportunities and experiences. After the concert, I was determined not to allow another three years to slip by. I wasn’t putting my dreams on hold for three more years. I didn’t want to ever be at another concert worrying about how many things were in my wardrobe.

More time and more freedom – we all want that. (“I really wish there were less hours in the day”, said no-one, ever.) What was a game-changer for me, what really made me see results, was actually drilling down into the specifics of what more time and more freedom actually looked like in my life, and what benefits they would bring to me, personally. What was it that I really wanted? How would I use this extra time? What did “freedom” actually mean to me? Then the biggest question – how was the stuff I owned preventing me from achieving this? How could decluttering, and letting stuff go, help me get closer to these goals?

Once I was really, truly clear on my goals, everything began to change. Joining the dots shifted my perspective: I was no longer somebody who simply liked the idea of a life with less stuff, and who slowly chipped away at decluttering the excess. The task at hand now had meaning and purpose, and a sense of urgency that hadn’t existed before. Even my decluttering nemesis, the wardrobe, finally came within my grasp. (In next week’s blog I’m going to share some “before” and “after” pictures so stay tuned.)

It’s not enough to simply want to make changes in our lives. We have to know why. We have to be clear on the benefits, and what they mean to us. Change can be hard, and there will be setbacks and wrong turns along the way. Being really clear as to why we’re doing it, and what we truly want, is what enables us to get up after these missteps, dust ourselves off, and try again.

Now I’d love to hear from you! Have you tried to make changes in your life? Have you considered your “why”? Have you thought about what success will look like, and feel like, for you? What are your main reasons for wanting to change? Have you struggled with change in the past, and did you manage to overcome those struggles? o you have any insights or tips to share? Have you embraced the idea of decluttering – and has that embrace transformed into action? Are you stuck at the planning stage? Have you had success – and what were your secrets? Do you have anything else you’d like to share! I can’t wait to hear your thoughts so please leave a comment below!

[leadpages_leadbox leadbox_id=1429a0746639c5] [/leadpages_leadbox]

Can Decluttering be the Opposite of Waste?

For the longest time, I thought that decluttering and zero waste were opposites. Didn’t decluttering mean chucking decent stuff away, and zero waste mean throwing nothing away and hoarding it all?

I couldn’t imagine that the two could work together, yet decluttering has been an important part of my zero waste journey. I’ve come to learn that decluttering and zero waste living are not opposites at all. Decluttering can be just as much about wasting less. If you want to live zero waste, don’t write off decluttering.

Here are five reasons why decluttering is a valuable part of living with less waste.

Decluttering doesn’t mean sending to landfill (or dumping at the charity shop).

When it comes to getting rid of unwanted items, the two most commonly cited options are discard or donate. Discarding really should be a last resort, saved only for those things that are damaged beyond repair, non-recyclable, and possibly dangerous. But what about donating?

Charity shops want goods that are clean, in working order and desirable.They need to be able to sell them! (Charity shops are not places to take soiled, damaged or dubious goods simply because we can’t bear the guilt of throwing them away ourselves.)

But charity shops aren’t the solution for everything, and they don’t have limitless storage. Taking our winter wardrobes in the height of summer will likely mean good quality items end up unsold simply because there isn’t the demand, and offloading things in the week after Christmas when the rest of the country is doing the same thing probably won’t be much help, either. Not all charity shops can accept electrical items.

If you really care about waste, you don’t need to ‘hope’ that the charity shop will on-sell your stuff. You can take matters into your own hands. Finding new owners for the things you want to declutter is the best way to ensure they stay out of landfill.

Before donating, call the charity shop and ask if there are things that they need (and also things that they don’t). There will always be things in high demand and things that aren’t.

Don’t limit your donating to the charity shops. Women’s refuges, charities and animal sanctuaries are other places that accept donations. Schools, clubs, community groups, crafting societies and charities all have needs and might be able to help take unwanted items. Online classified sites like Gumtree are a great way to find new owners for unwanted goods, and a way to offer broken goods for parts and spares.

Decluttering is a way to maximize the use of something.

This sounds counter-intuitive – how is giving something away going to maximize its use? This depends on whether we actually use the things in question. Owning stuff we don’t need, don’t use and don’t like is a complete waste.

There are two main reasons we keep things we don’t need: just in case (fear of the future), or guilt (regret for the past).

We might need it in the future. That is true. But if we haven’t needed it so far, what are the chances? Could we get a replacement quickly, affordably and second-hand? This will depend on individual circumstances, but in most cases, there is no need to keep something just in case.

There will be someone out there looking for that item, who will use it today.

We might feel guilty. There are many reasons that we feel guilt: we made a poor choice, spent too much money, didn’t lose the weight we’ hoped, dislike the handmade gift that we know took so much effort and time.  Keeping something out of guilt does not increase the chances that we will use it.

Keeping an unwanted item and thinking that we somehow alleviate the guilt won’t work. The best way to ease the guilt is to let the item go.

We sometimes try to justify keeping things that that we don’t use rather than giving them away by telling ourselves that we are reducing waste. Actually, the opposite is true. Owning something that you never use is the biggest waste of all. It is far better to give these things to people who truly need them and will use them every day.

Decluttering as an end, not a means.

Decluttering is about removing the unnecessary, the unused and the unwanted from our homes. It’s about removing the excess, and keeping only the things we find useful and beautiful. If our homes are filled with items we use regularly and appreciate, there is little or no waste.

Yet decluttering will only reduce waste if it’s treated as a one-way process, rather than a means. If the purpose of decluttering is simply to make room in the house for a big shopping spree where the old stuff is replaced with a bunch of new stuff, clearly that is going to generate a whole heap of waste.

Until the cycle of consumption is broken, and needless things are no longer brought into the home, decluttering can never mean less waste.

Decluttering helps conserve resources.

Have you ever tried to buy something second-hand, and not been able to find it? Sometimes we need things, and we want to purchase them second-hand, yet that isn’t an option. If we really need that item, we’ll probably have to go and buy it new.

Yet somewhere, there would have been an unwanted, second-hand option that would have been perfect.

Rather than keeping things to ourselves, we should embrace the opportunity to share what we have. There are so many resources tied up in cupboards, wardrobes, playrooms, shed, garages and attics around the world in the form of unused stuff.

Decluttering frees up these resources so others can use them. Donating items we don’t need gives somebody else the opportunity to use them, and helps prevent new purchases.

Decluttering helps form new habits.

I have always found decluttering hard. I found it hard because I was forced to confront my poor decisions (impulse purchases, wasted money, non-repairable items), and my failure to achieve what I’d hoped (hobbies that never got off the ground, clothes I never slimmed into).

I know I’m not alone in this.

We’ve all made choices that we regret, and we’ve all purchased things that in hindsight, we wouldn’t purchase again. Because I struggled so much with decluttering, I now think much more carefully about what I bring into my home. It forced me to examine my old habits, and think about the decisions I had made in the past.

As a result, I now make better choices. Can the item be mended? Can it be recycled? Is it built to last? Do I have a real, genuine need to own it? Is there a second-hand market for it?

I can appreciate well-made clothes, or admire chic decor or clever design, but that doesn’t mean that I need to make a purchase.

There will always be beautiful things. If I don’t need it, or can’t see how I will dispose of it responsibly, then I don’t buy it.

Now I’d love to hear from you! Are you living or working towards a zero waste lifestyle, and how do you feel about decluttering? Is it something you’ve struggled with or something you’ve embraced? Have your views changed over time? What have you struggled to declutter? What are the reasons that held you back? What are your success stories? Are you a master declutterer? What are your tips for ensuring your items find good homes? What unconventional places have you found that will accept your unwanted items? Anything else you’d like to add? Please tell me your thoughts in the comments below!

[leadpages_leadbox leadbox_id=1429a0746639c5] [/leadpages_leadbox]

What This Single Wardrobe Item Taught Me About Minimalism

I recently took a trip to the charity shop to find myself a black, long-sleeved top. My previous one had life-expired at the end of last winter, and I needed one to wear underneath a big thick woolly jumper dress (we are in the depths of winter here in Perth, and Australia gets colder than you might expect).

The shopping trip was uneventful – after visiting a few stores, I found a suitable black top (made from 100% cotton – I’m trying to reduce the amount of plastic fibres in my wardrobe) and took it home.

What I bought wasn’t interesting. What was interesting was the realisation that came afterwards.

What one black top made me realise about minimalist living...

What one black top made me realise about minimalist living…

I was trying to remember what the last item of clothing was that I bought. I thought back over the last couple of months, but I couldn’t think of anything.

I thought back a little further, but still nothing.

I remembered that at the start of the year I went on holiday. I definitely didn’t buy anything whilst I was away, and I didn’t buy anything new for the trip. I thought back to last year. I remembered I purchased a new bra (actually, two). That would have been last September. I didn’t buy any new clothes for 9 months.

What was most interesting to me was not that I hadn’t purchased any clothes for 9 months, but that I hadn’t even noticed. I hadn’t wanted or needed to buy anything, and so I hadn’t.

What I owned already was enough. There had been no struggle, no doubt, no frustration and no resentment that I hadn’t purchased anything. That’s what it is meant to feel like, I realised. Minimalism, decluttering and finding our “enough” has nothing to do with going without, or holding back.

It is about finding our “enough”.

Being content with what we have. No chasing more or pursuing better.

How things change! Of course, it didn’t used to feel like that. It didn’t feel like that at all! There was a time when I bought new clothes to cheer myself up, to feel better, to “prepare” for a holiday or new job, for a special occasion or event,… oh, and if I just happened to be walking past a shop window and saw something I liked.

I was never a prolific spender, but I had way too many clothes. The idea of not buying anything new even for a couple of months would have sparked fear, resentment, and probably a rebellious why-shouldn’t-I-buy-it shopping trip. (In fact, I remember an specific occasion where that did happen!)

So what changed?

I realized that I owned too many clothes.

That was probably my first realisation. That my wardrobe was full, yet I didn’t wear many of the things that I owned.

I realized that if I couldn’t bear the idea of throwing any away, I had to stop buying more.

In the beginning, I found wardrobe decluttering really hard. I couldn’t bear to part with anything! I didn’t want to get rid of the tatty old worn out stuff (I care too much about waste) but I didn’t want to get rid of the shiny new stuff either. (I would enjoy wearing it once the old stuff wore out, surely?)

My logic was, that if I couldn’t bear to get rid of anything, then I had to stop buying more.

The logic made sense at the time, but it didn’t seem fair. I resented it. Have you ever felt like that? My tattiest clothes made me feel grumpy when I wore them. Every now and then I’d buy something new – because I wanted to cheer myself up, because I was sick of the same old tatty things, or because I needed something to wear.

Despite having a full wardrobe, I just didn’t seem to have anything to wear.

I realized that my relationship with clothes was all wrong.

I started really asking myself why I had a wardrobe full of clothes, but nothing to wear.

I asked myself why I purchased things, and then never wore them.

I asked myself why I used clothes shopping as a way to cheer myself up.

I found some answers.

I realized that I had a tendency to buy clothes that were a little on the tight side (rather than the next size up) because I really wanted to be slightly slimmer than I was. This slimmed-down version of myself never happened, so I was left with a lot of items that were a little too clingy, tight and uncomfortable.

I realised that many items I owned and liked simply didn’t match with other things that I owned. They weren’t complete outfits.

I realised that when I did buy new clothes, it was a reaction to feeling miserable wearing tatty things. I care about waste, but if wearing tatty clothes makes me want to go shopping, that doesn’t work, does it? I realised that I was a little too swayed by adverts and shop windows.

I realised that other things brought more meaning to my life than clothes shopping, made me happier and were far more fulfilling.

I realized that I needed a wardrobe full of things that I actually liked to wear, and that fitted.

This seems so obvious, but the theory did not match the reality when it came to my wardrobe. There were plenty of “used to fit, and maybe will fit again” items, even though I knew it had been years since I last wore them.

There were plenty of items I liked the look of, but didn’t find them comfortable, or practical. There were plenty of items that didn’t match anything else.

What I needed were clothes that did fit, were versatile and practical, that I liked and wore often. Anything else was wasted space (and resources).

I realized, each time I decluttered, that I could manage with far less than I thought.

Most of us have full wardrobes, and wear the same five or so outfits every day. Back in 2014, I thought reducing my wardrobe down to 100 items would be a milestone achievement. At the time I owned 169 items, and that was after 2 years of decluttering!

Yet when I got to 100 items, I realised that it was still far more than I needed. I wasn’t wearing everything I owned. As I reduced further, I still knew there were items I didn’t wear often enough. I went from feeling like I “needed” things to being very clear that I didn’t. I had enough.

Minimalism is not about going without. Minimalism is about finding our “enough”. In those 9 months, I never felt like I was going without. Not buying anything new was easy.

It hasn’t always been easy, but slowly, something has changed. I stopped pursuing more. I stopped seeking solace through shopping. I let go of the idea of “needing” more and embraced the idea of “enough”.

Owning less has been eye-opening, satisfying, and ultimately, very rewarding. But wanting less is even better.

Now it’s your turn – I’d love to hear your thoughts! Are you working towards pursuing a life with less? What lessons have you learned along the way? What a-ha moments came to you? Have you struggled with letting go, and what are your reasons? What obstacles have you faced? Have you ever felt guilt, or resentment, or frustration in the pursuit of less? (Surely it’s not just me?!) How have you been able to turn that round? Or is it something that you still struggle with? Are you new to the journey, and if so, what are your biggest challenges? I’d love to hear about your experiences so please share them with me and leave a comment below!

[leadpages_leadbox leadbox_id=1429a0746639c5] [/leadpages_leadbox]

Plastic Free {Bicarb Free} DIY Deodorant – for Sensitive Skin

I love my homemade deodorant. I first tried it back in 2012 when I was still a little skeptical about DIY concoctions (if I’m honest, I thought they were just for hippies). What made me convert?

The fact it actually worked.

That’s all we want from a deodorant, really. Sure, we don’t want chemicals and excess packaging – but it has to work, right?! There are plenty of natural deodorants on the market, but most are very expensive, don’t smell great and don’t actually work against body odour very effectively, either.

Plus very few have completely plastic-free packaging.

The deodorant I’ve been using since 2012 is a super simple recipe, and all the ingredients are edible (except the essential oil). There’s no heating or melting involved, just a little mixing, which suits my laziness when it comes to these things.

The ingredients are 1 tbsp bicarb, 4 tbsp cornflour (or arrowroot / tapioca flour) and 2-3 tbsp coconut oil. The coconut oil depends on the ambient temperature – you’ll need less in summer and more in winter. You want a paste. Mix in a jar and add a few drops of your favourite essential oil. To apply, get a small amount on your fingertips and rub in. (You can find the recipe here.)

This recipe has been serving me well for 4 years, but bicarb can be a skin irritant for some. It’s fine for me, but my husband reacts to it. I tried changing the ratio from 1:4 to 1:6 and even 1:8 bicarb:flour (note – the more you dilute it, the less effective it is) but the issue was the same. His skin became red, inflamed and sore and it took a few months for it to settle back down again.

Ever since then I’ve said I’ll experiment with a DIY non-bicarb deodorant. I don’t move very fast it seems!

But the good news is I have finally kept my word and made a bicarb free deodorant. Not only that, but I (and my husband) have tested it and can confirm that a) it works (hurrah!) and b) there have been no adverse skin reactions. Phew! I can also buy all the ingredients completely packaging-free.

For anyone else out there who struggles with super sensitive skin and cannot use bicarb deodorants, this recipe is for you. Give it a go.

It’s not quite as simple as just mixing some ingredients in a jar but it’s really not that much harder, promise. There’s some melting involved. Nothing complex – I like to keep things as simple as I can!

Final product: bicarb free DIY deodorant.

Bicarb free DIY deodorant.

TIP: I would also add: it’s not quite as effective as the bicarb version I use, and it works best applied to clean skin. Whilst the bicarb one can mask smells if reapplied, this one won’t!

Bicarb Free DIY Deodorant: Recipe

Ingredients:

1.5 tbsp grated beeswax
1 tbsp shea butter
4 tbsp coconut oil
4 tsp white kaolin clay
8 drops tea tree essential oil
8 drops cedarwood essential oil
10 drops lemon myrtle essential oil

A note about the ingredients:

Beeswax: beeswax is solid at room temperature (it melts at 62°C) so helps make the mix firmer. I used beeswax as it’s really local (my neighbour who lives 4 doors away produced this). The only other solid subsititue I can think of would be cacao butter so maybe next time I’ll give this a go as it would be a great alternative for vegans.

Shea butter: shea butter melts at 38°C so is more solid than coconut oil. It’s very moisturising and is thought be anti-inflammatory – which is good news for sensitive skin.

Coconut oil: this is a soft oil that melts at 25°C. It helps keep the deodorant soft so it can be rubbed into the skin. Coconut oil is also thought to have anti-bacterial properties.

Kaolin clay: kaolin clay is a white clay (bentonite clay has similar properties) that replaces bicarb and does a similar job. It absorbs liquid and neutralises bad smells. Clumping kitty litter is actually made of bentonite clay! There are other types of clay available but these are more expensive. I’ve heard that green clay is the most absorbant of them all so at some stage I’d like to try this… it’s in the queue ; )

Essential oils: I’m lucky enough to be able to buy refills (packaging free) so I have some flexibility with my choice. I chose tea tree oil as it is anti-bacterial and cedarwood as it is anti-inflammatory. Both also have strong smells and are often used in commercial natural deodorant recipes. I find both scents quite overpowering and not hugely pleasant so I used lemon myrtle (which I love!) to mask them. Lemon myrtle is an Australian bush scent with the most amazing smell! If you have limited choice, go for a single oil and choose one that you can use elsewhere. Tree tree oil is affordable, available in larger sizes (meaning less packaging overall) and great for cleaning too. (When choosing essential oils, it is important to read up on the properties, particularly if you are pregnant.)

Ingredients for making bicarb-free deodorant (for sensitive skin).

Ingredients for making bicarb-free deodorant (for sensitive skin).

Method:

Heat some water in a pan on the stove, and place a glass bowl over the pan. You don’t want to heat the oils directly as you’ll damage them. Add the beeswax to the bowl and stir until melted (I used a metal spoon as it’s easier to clean than wood).

Add the coconut oil and continue to melt, stirring occasionally. Once both are melted, add the shea butter and remove the bowl from the heat.

The shea butter should melt with the heat of the other two ingredients. You can place back on the heat if it needs some help but be careful of overheating shea butter as it can turn grainy. Stir to aid the melting process and to combine.

Add the clay 1 tsp at a time and whisk to incorporate. Once all 4 tsp have been added, leave to cool, whisking occasionally. It will begin to thicken after only a few minutes (less if your room is cold). Once you notice the thickening and there is no head radiating from the mix, add your essential oils to the mix and whisk in. If you add them when it’s still hot, you will lose all their beneficial properties!

Final product: bicarb free DIY deodorant.

Final product: bicarb free DIY deodorant.

Pour into a shallow jar with a wide neck or a tin, and leave to set. It will set into a paste that feels tacky and is easy to scoop with your fingers. (If you live in a very cold climate and find it too hard, you may like to add more coconut oil or less beeswax next time to get the right consistency, but it will soften with the warmth of your skin.)

Store with the lid on in a dark place. To apply, take a small amount with your fingertips and rub into your skin. will keep for ages.

Now tell me…are you going to make it?! If yes, I want to hear what you think! If not, why not? Have you ever tried making DIY deodorant before? What ingredients did you use and what success did you have (or not have)? What about other DIY skincare products – are you a fan or do you tend to put them in the “too-hard” basket? What are your simplest solutions to bathroom essentials? I love hearing your thoughts so please leave me a comment below!

[leadpages_leadbox leadbox_id=1429a0746639c5] [/leadpages_leadbox]