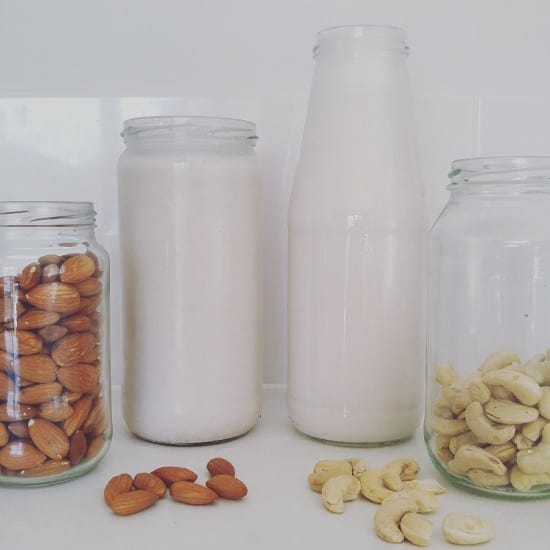
3 Zero Waste Recipes: DIY Cashew Milk, Homemade Almond Milk + Almond Pulp Brownies

Nut milk. The name sounds kind of ridiculous. But it looks like milk, has a similar shelf life, can be used in similar ways, and in many cases the nuts do actually have to be “milked”, so it’s easy to see why the name took hold!

milking-almonds-to-make-nut-milk-treading-my-own-path

When I started out on my plastic-free journey, I bought cow’s milk that came in returnable glass bottles. But it wasn’t stocked in many places, so finding it was hard – and a bit of effort. Gathering those glass bottles together to return them meant a heap of clutter and a journey across town with them all (there was no deposit return either, only goodwill). Plus what to do with all those lids?!

I began making nut milk alongside dairy milk, because it was a lot easier to find nuts in bulk, and they have a long shelf life (they will last for months in a jar in the pantry, or even better, the freezer). I found nut milk worked just as well in baking, in porridge and in coffee, and I began to use it more and more.

Eventually I thought more about the impact of the dairy industry on the planet. Cows need a lot of water and land to produce milk, they produce huge amounts of methane, cause soil erosion, and the product has to be transported fresh, meaning a higher carbon footprint. Nuts use less water, the trees are beneficial for the environment, and the products have a long shelf life.

Nut milk seemed like the greener option. I decided to stop buying dairy milk altogether (my husband stopped too, but later).

almond-milk-and-cashew-milk-treading-my-own-path

But of course, I don’t buy nut milk. Some commercial brands of nut milk are little more than bottled water! Alpro’s nut milk contains only 2% almonds, and the second biggest ingredient is sugar. Unnecessary packaging aside, shipping all that water across the globe seems like such a waste when we can ship dry nuts (or even better, use local ones) and make our own.

And I have to tell you, making your own is super easy. It requires no specialised equipment, and takes very little time. You’ll need a blender, but it doesn’t have to be a fancy one.

How To Make Cashew Milk

Cashew milk is my go-to milk because it’s the easiest. Cashews are already quite soft, so they do not need to be soaked for a long time. They also contain very little fibre, so there is no need to strain.

To make:

Soak 1 cup of raw cashews in water for a few hours or overnight. Rinse, and blend with 4 cups water. Done.

I tend to blend my cashews with 1 cup of water at a time, for 30 seconds, before adding the next cup of water. I find that there are less (no) lumps in it this way.

Makes 1.2 litres. Lasts 7 – 10 days in the fridge. It may get thicker over time, in which case add a little more water to it.

cashew-milk-and-cashews-treading-my-own-path

cashew-milk-makes-great-plant-based-coffee-treading-my-own-path

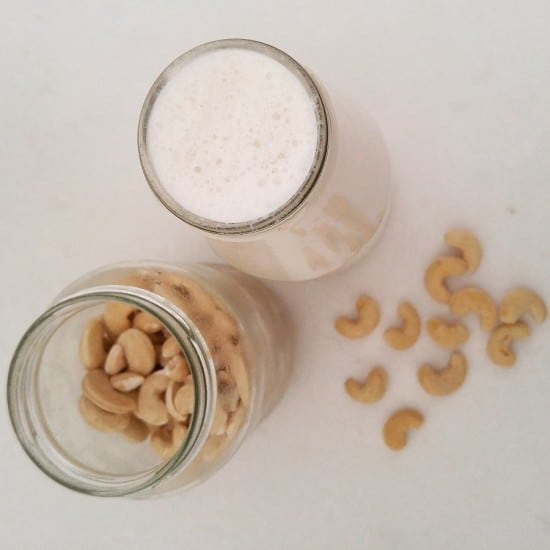
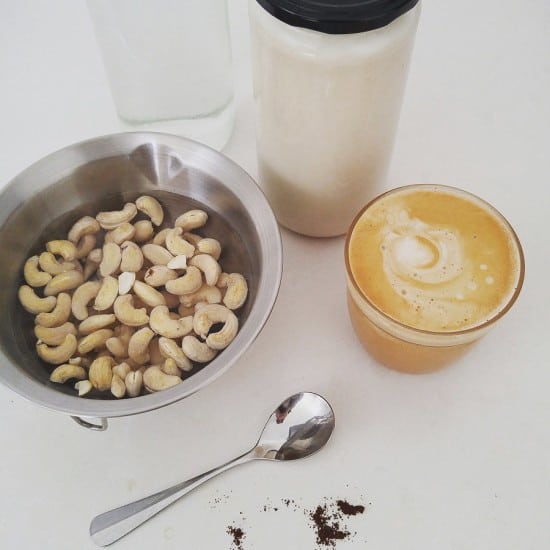
Cashew milk works absolutely amazingly in coffee, too :)

How to Make Almond Milk

Almond milk is the most common nut milk, but it isn’t the easiest or quickest to make. That doesn’t mean it’s hard, mind! It just needs soaking a little longer, and also straining.

To make:

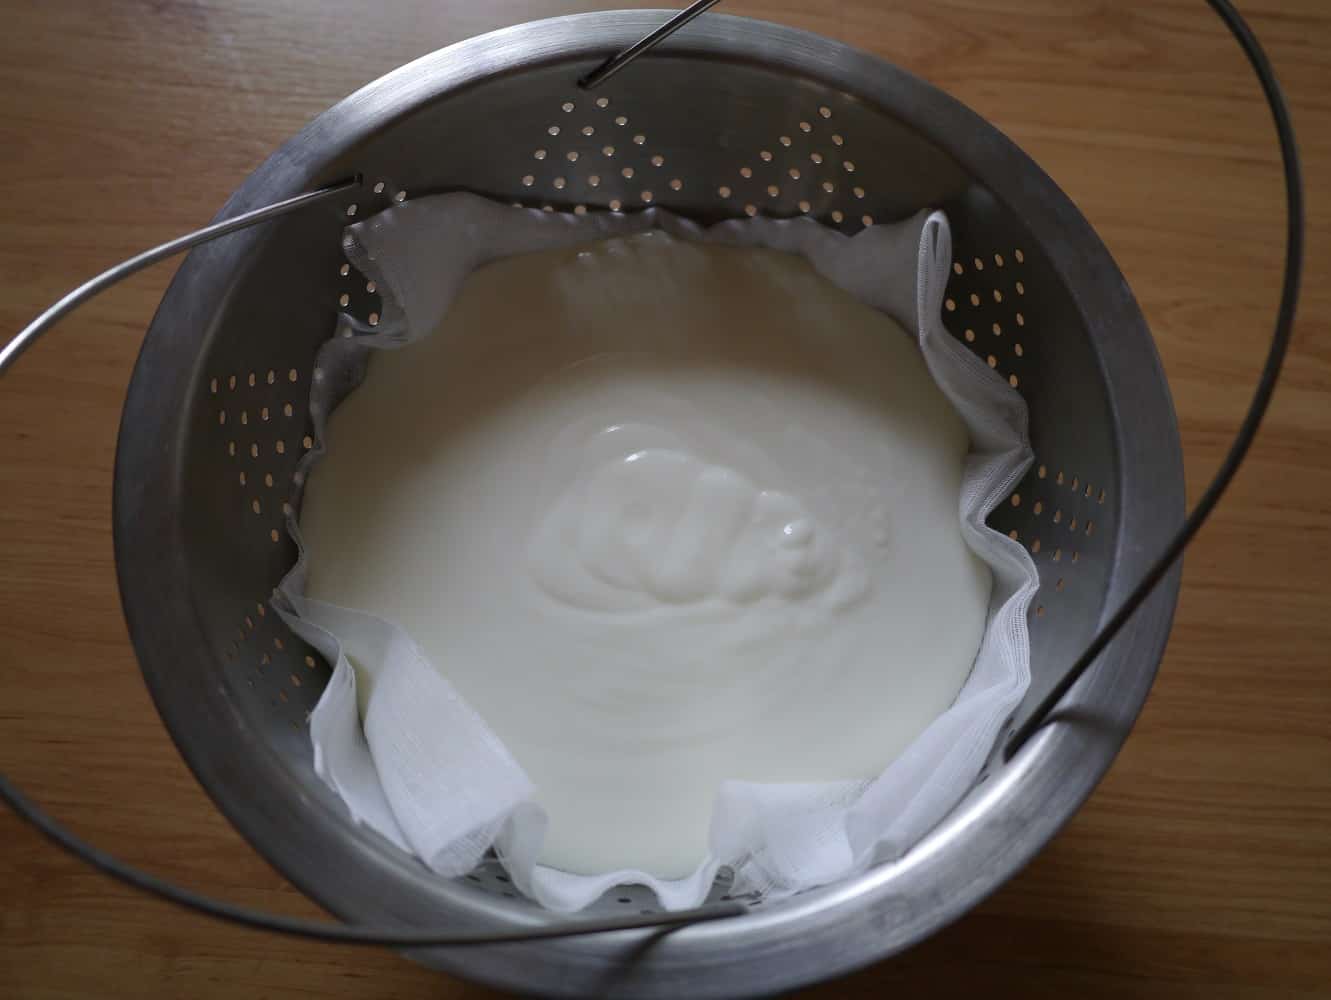
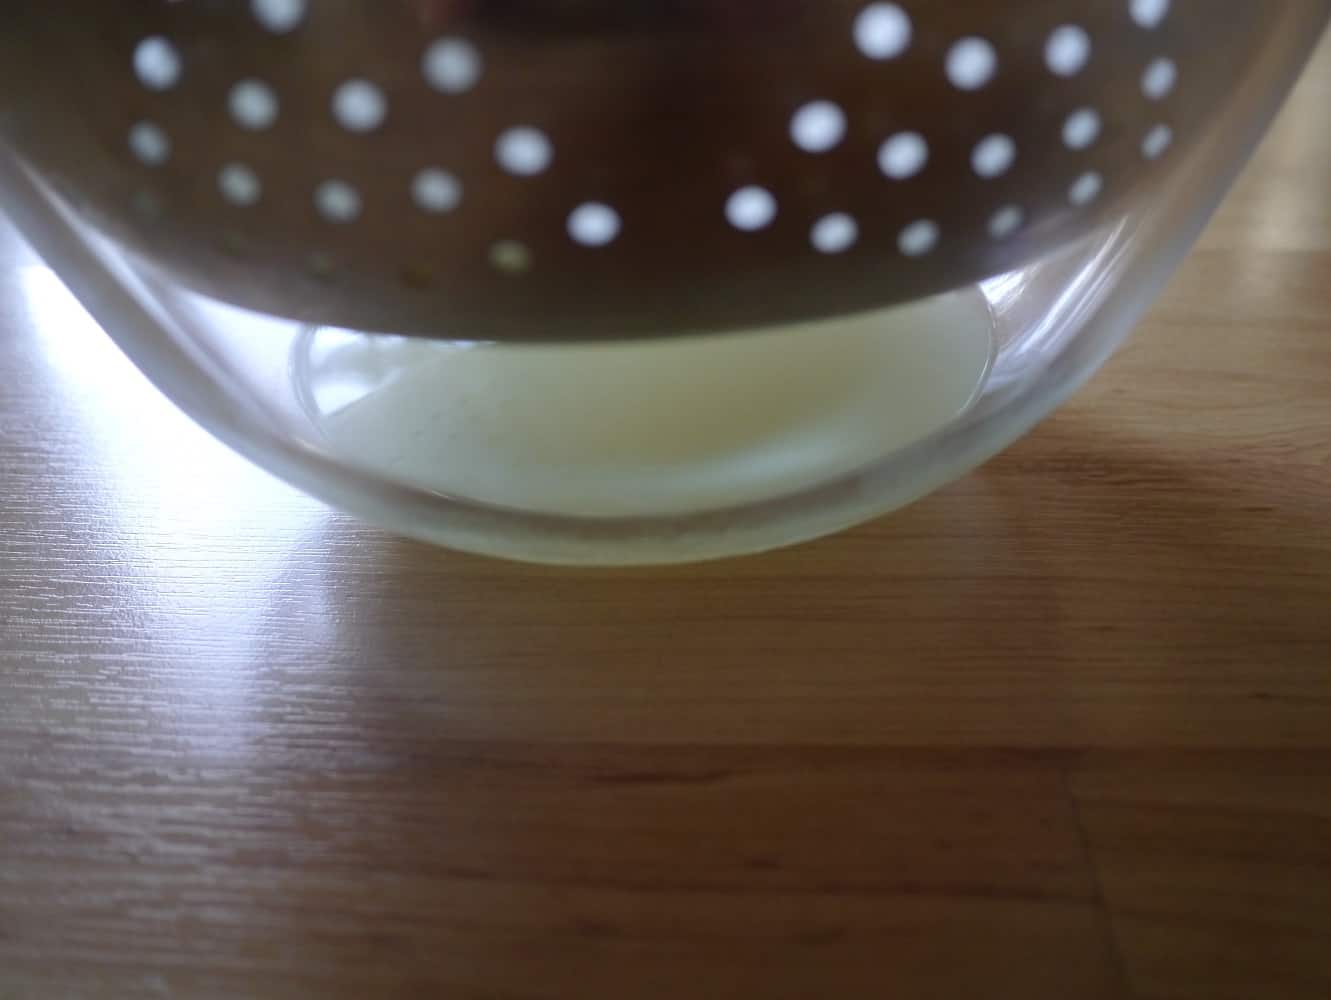
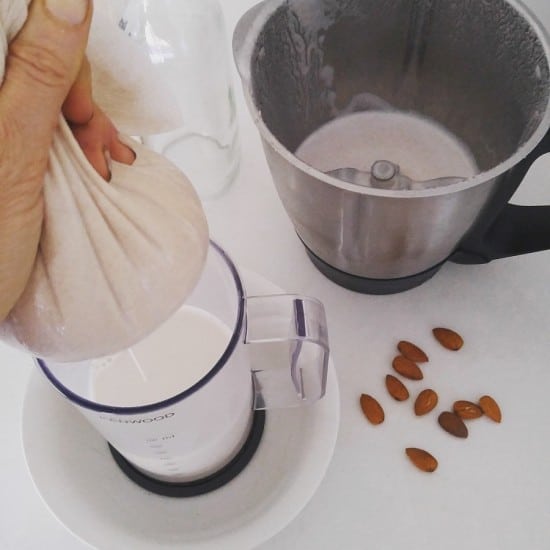
Soak 1 cup of raw almonds in water for at least 12 hours, and even 24 hours (change the water every 8 hours or so). Rinse, and blend with 4 cups of water.Now you need to strain.

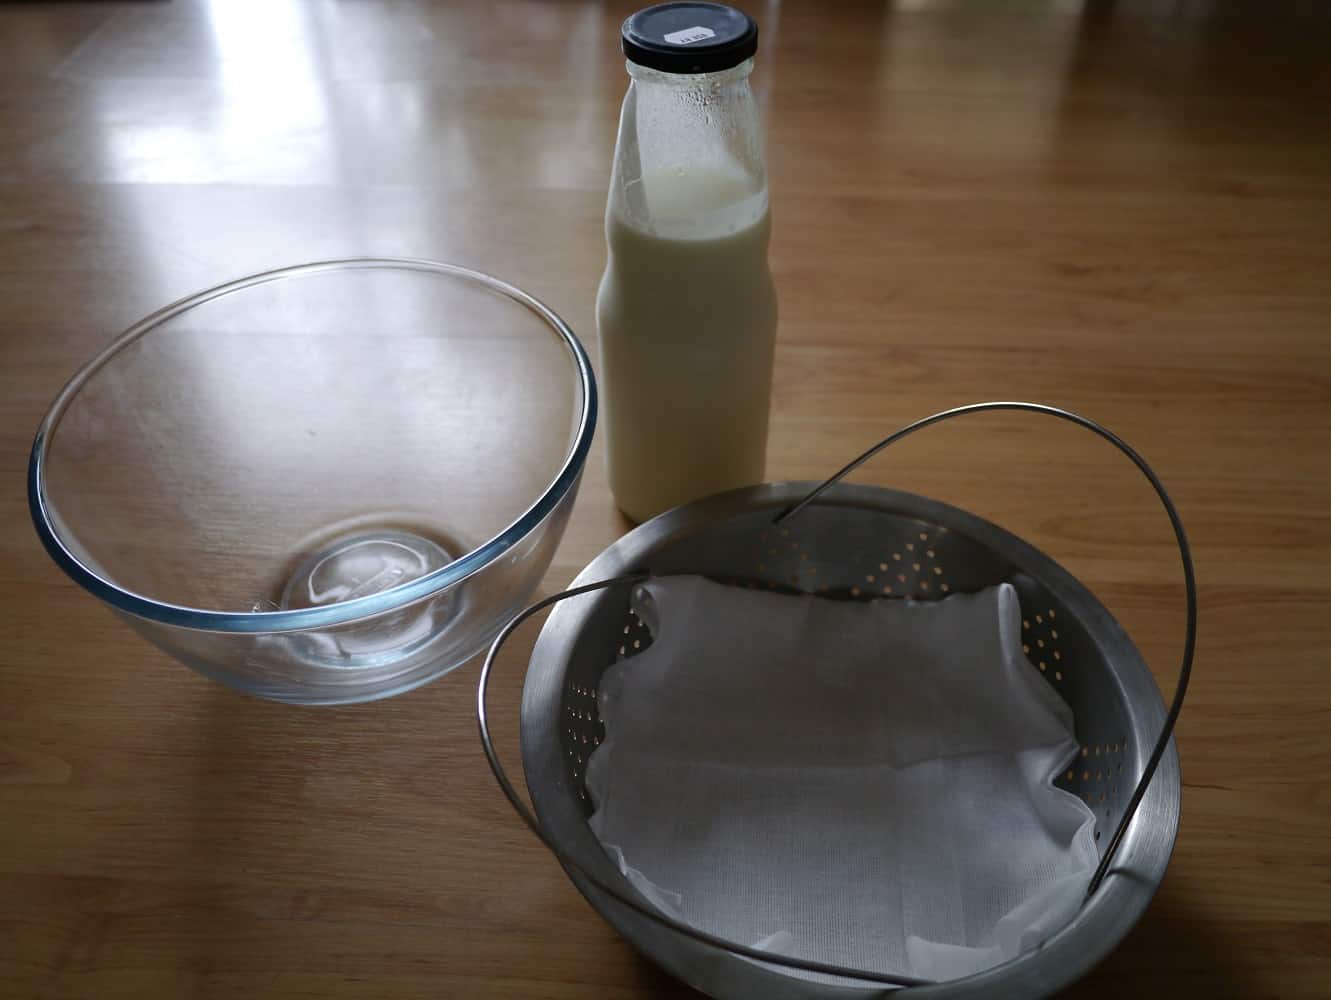
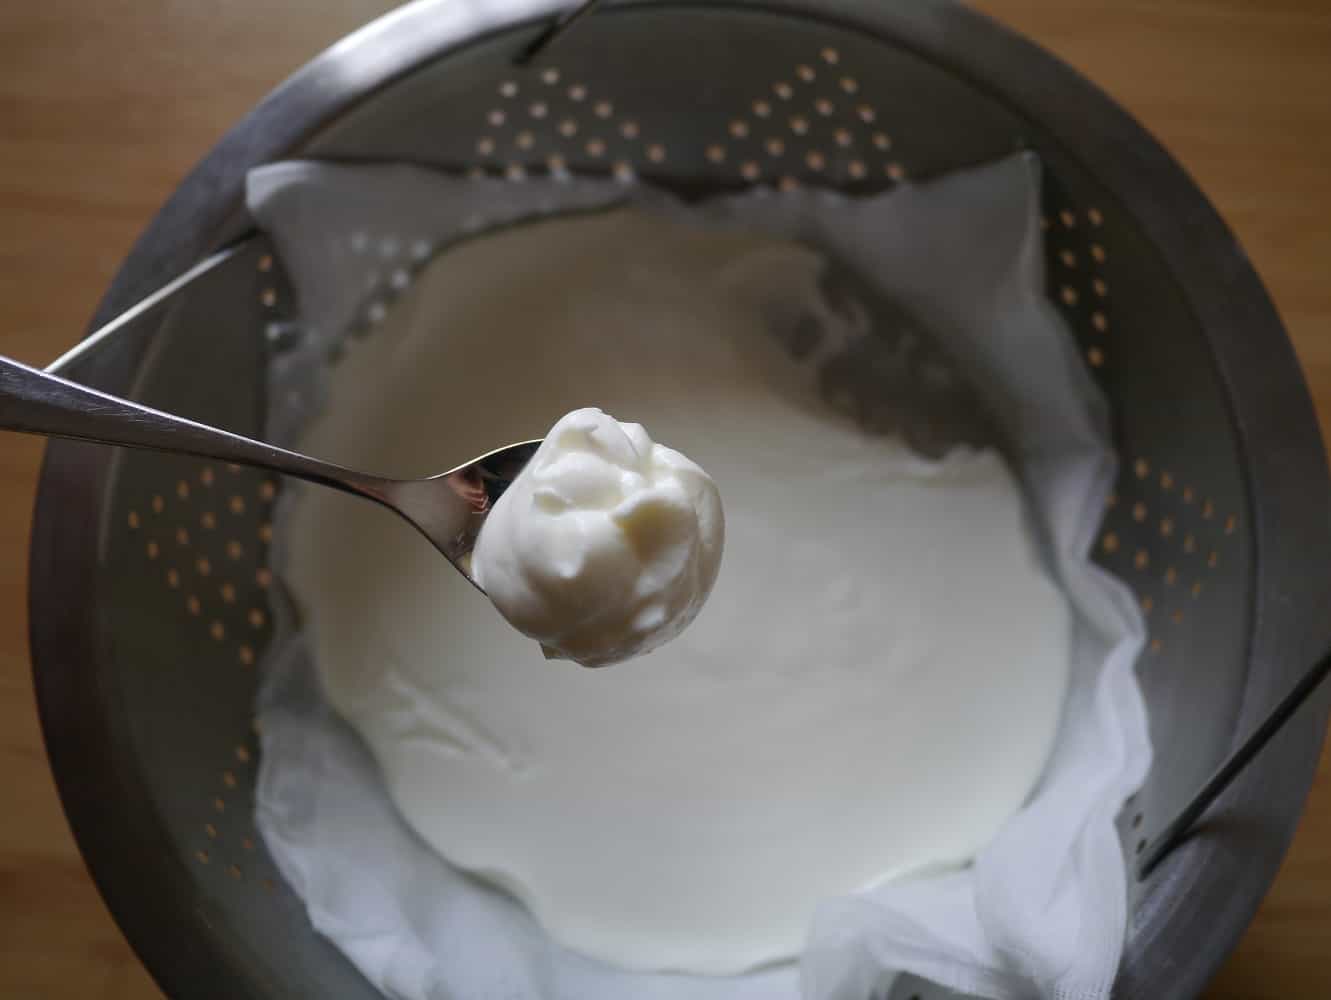
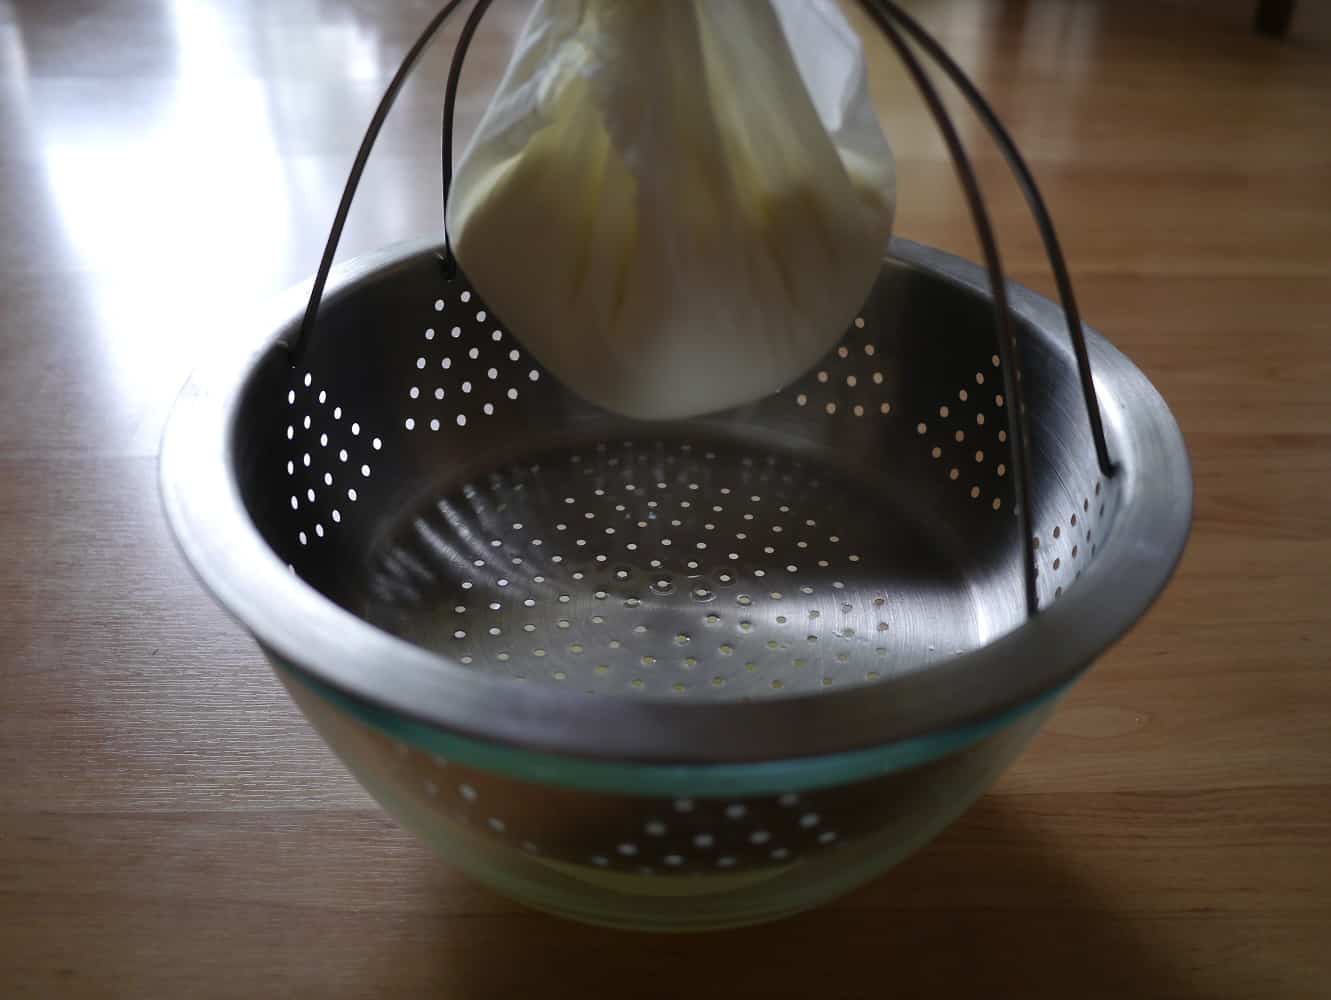
I strain my almond milk using cheesecloth as it has a fine weave and is 100% cotton. Spread the cheesecloth over a bowl or jug, pour the milk over and allow the almond milk to drip through. Squeeze to get any remaining drops out.

straining-almond-milk-treading-my-own-path milking-almonds-to-make-nut-milk-treading-my-own-path

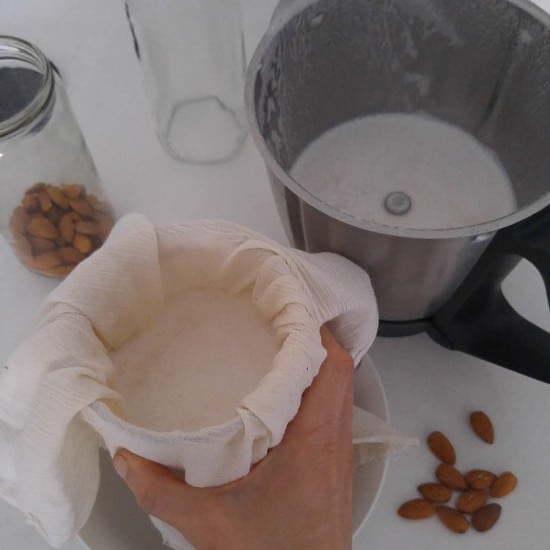
I bought my cheesecloth off the roll at a fabric store – it is very inexpensive. (Cheesecloth is not the same thing as muslin. Muslin has a much looser weave and the fibre all gets stuck!)

Alternatively, you could use a clean tea towel or old pair of tights, or even a fine mesh sieve. Before I had the cheesecloth, I used one of my mesh produce bags. There is absolutely no need to buy an expensive plastic nut milk bag!

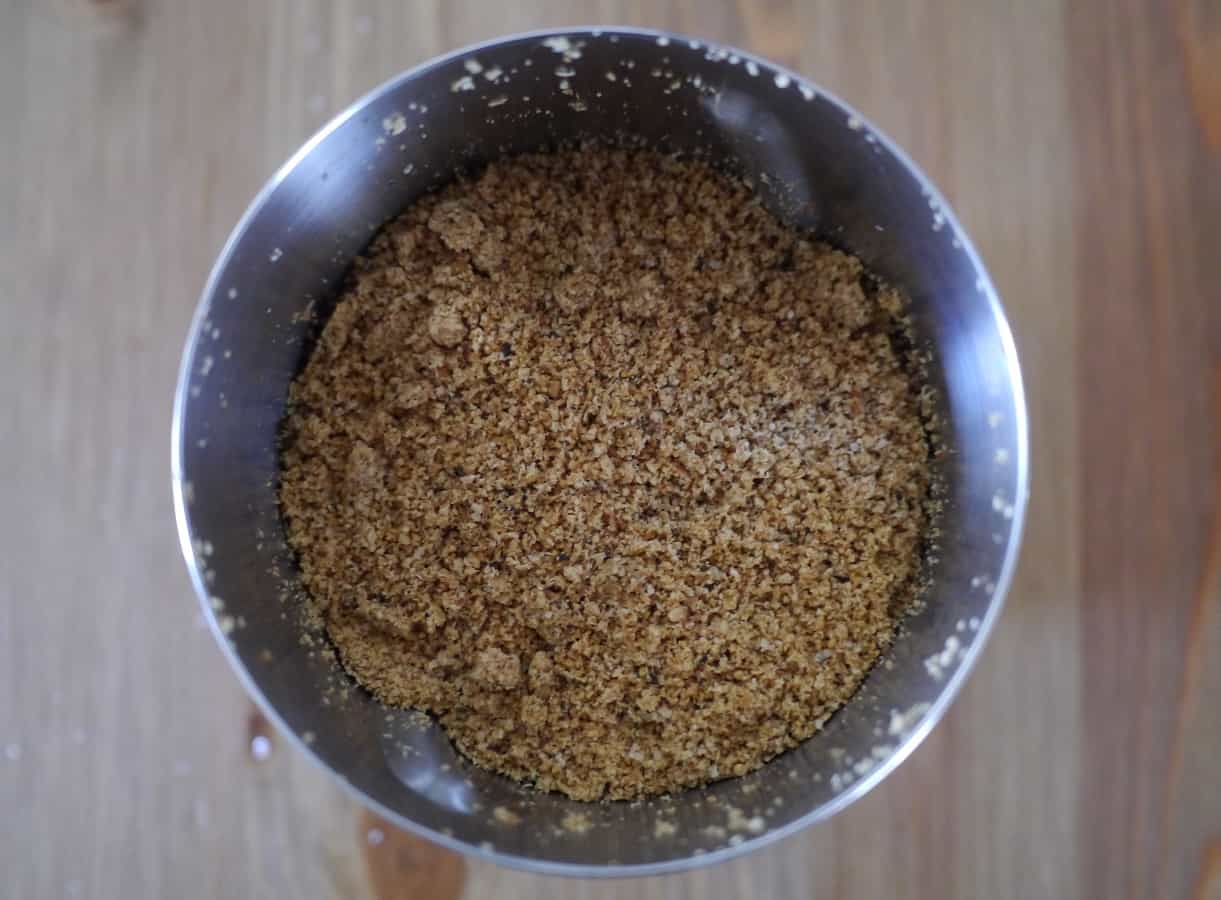
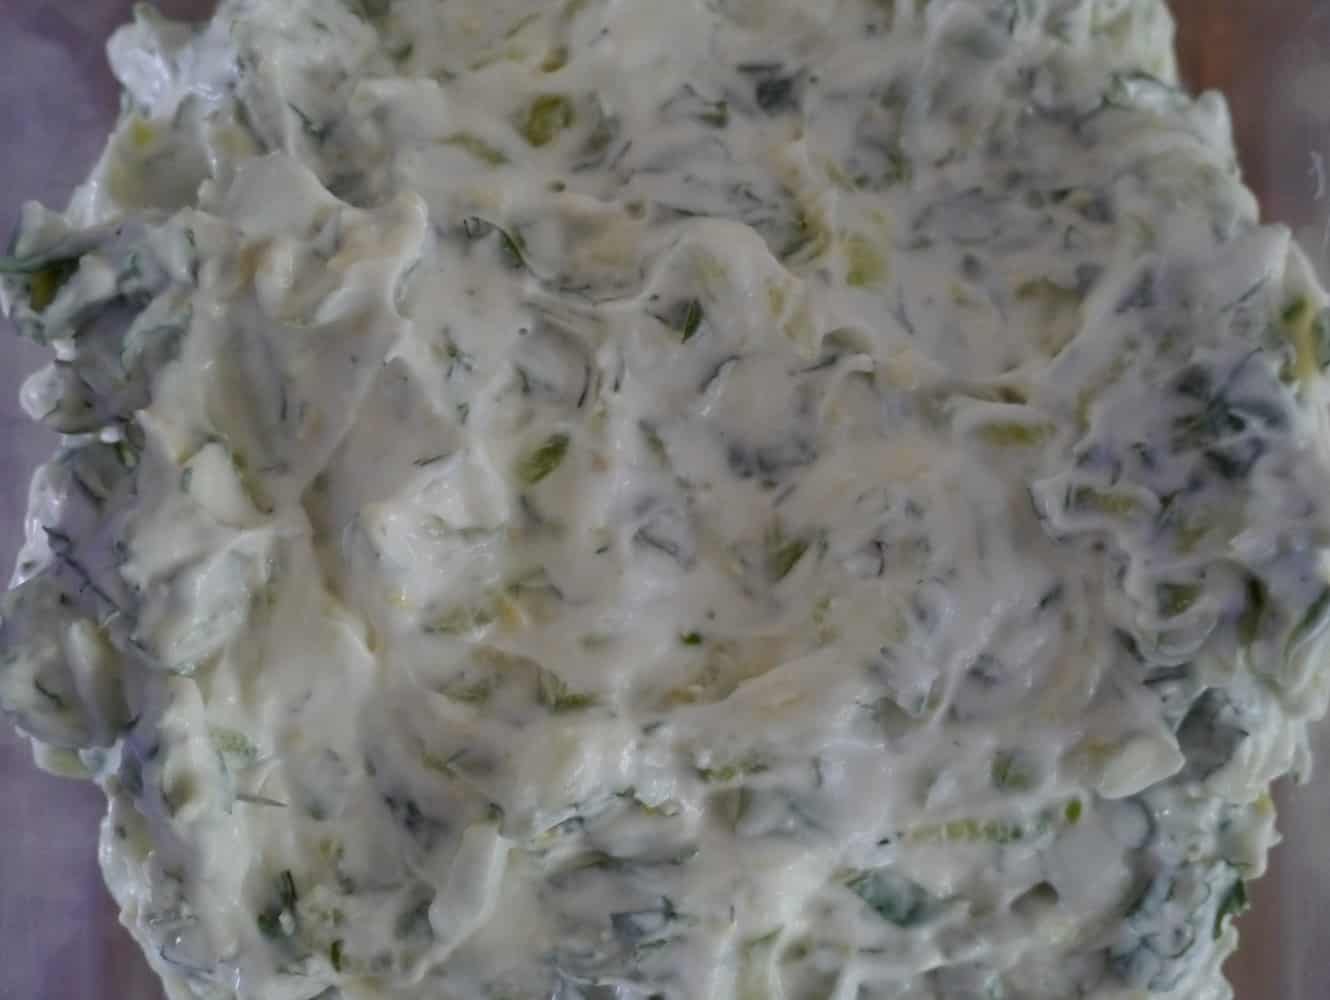
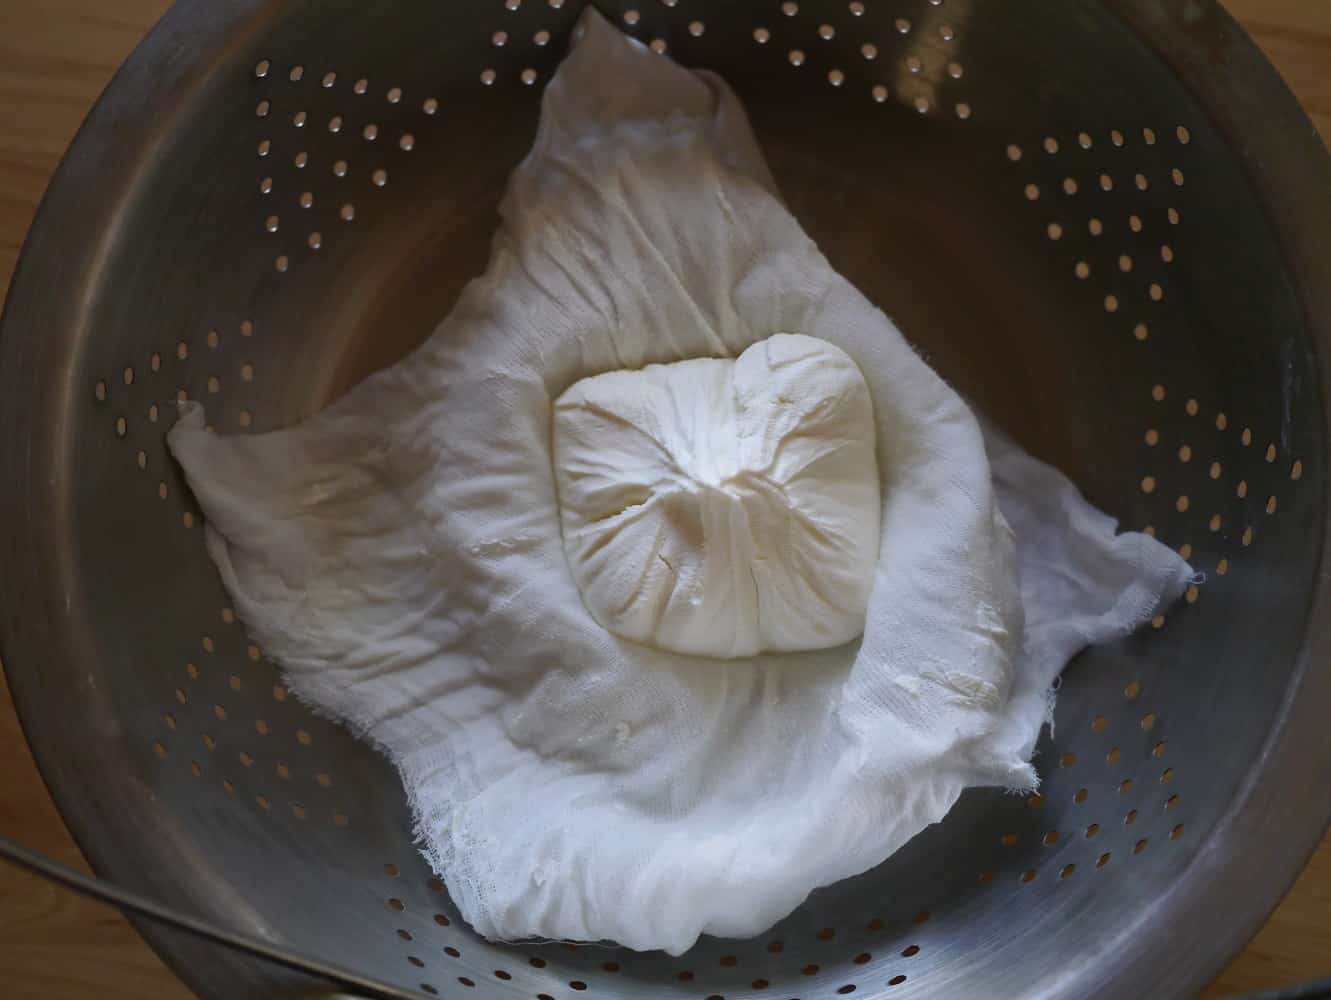
Makes about 800ml, and leaves a cup of almond pulp. Don’t throw the almond pulp away! It will last in the fridge for a week, or freeze it. And then make chocolate brownies : ) (Recipe below).

fresh-almond-pulp-and-almond-milk-treading-my-own-path

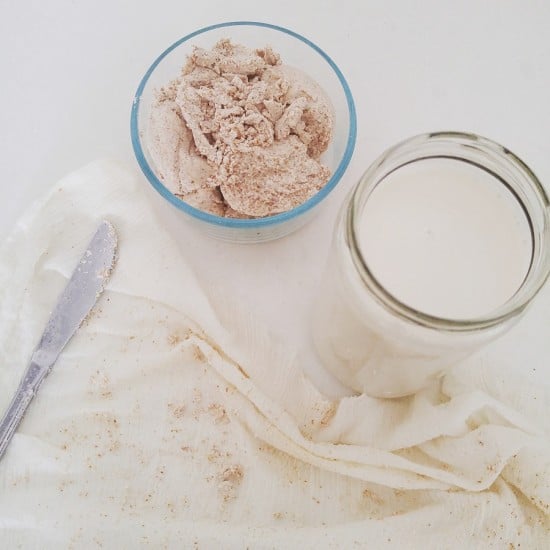
Fresh almond pulp (almond milk on the right). I use cheesecloth the strain, and scrape the excess pulp off with a knife.

How to Make Other Nut Milks

Other nut milks can be made in the same way, and most will require some kind of straining, although they won’t produce as much pulp as almond milk does. I’ve made macadamia milk (no need to strain), brazil nut milk and walnut milk.

Cheaper Nut Milk Alternatives

Nuts can be expensive. Increasing the ratio of nuts to water will make a more cost-effective milk, but will also dilute the milk. I tend to use the ratio 1:4 nuts:water but this could be increased to 1:5 or 1:6.

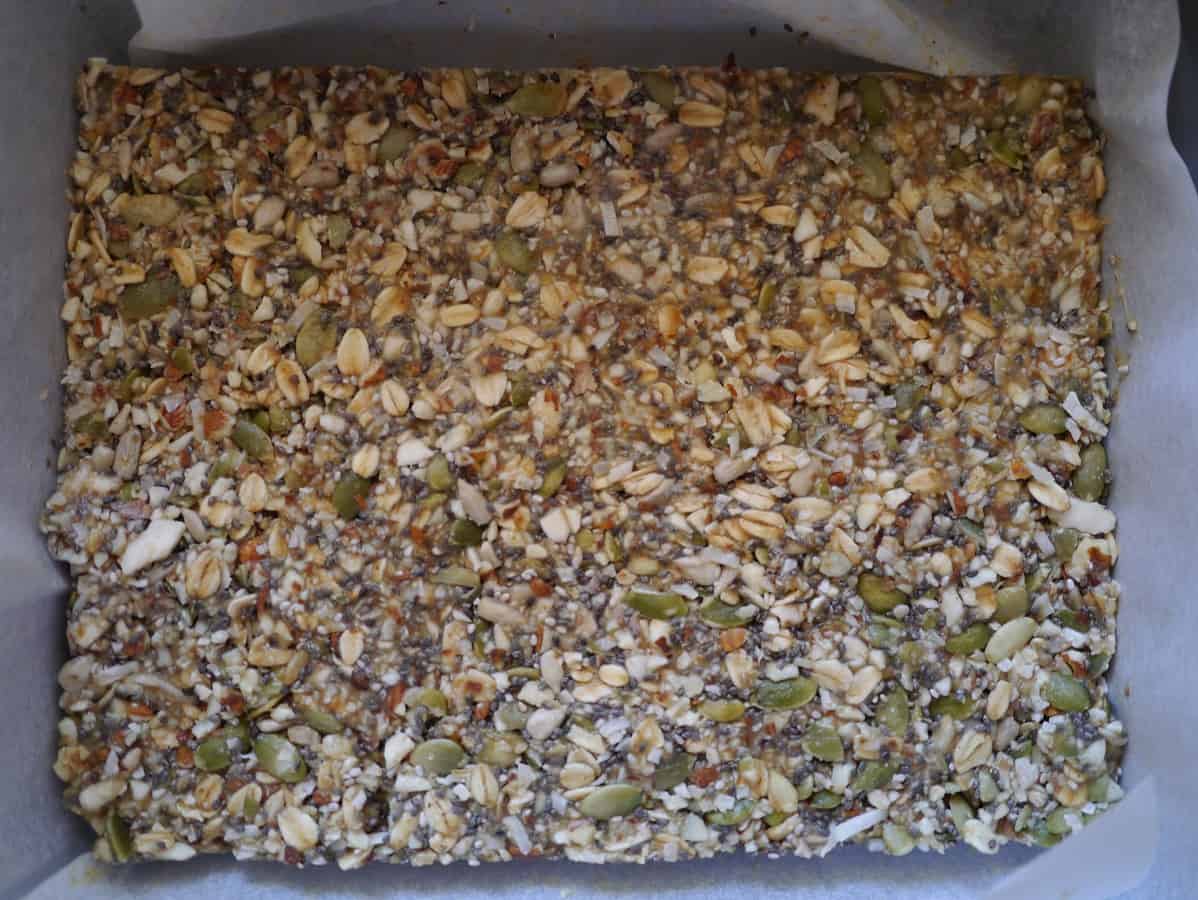
As well as nuts, you can also make plant-based milk with seeds, oats and peanuts (which are techincally a legume, not a nut).

Pumpkinseedmilk

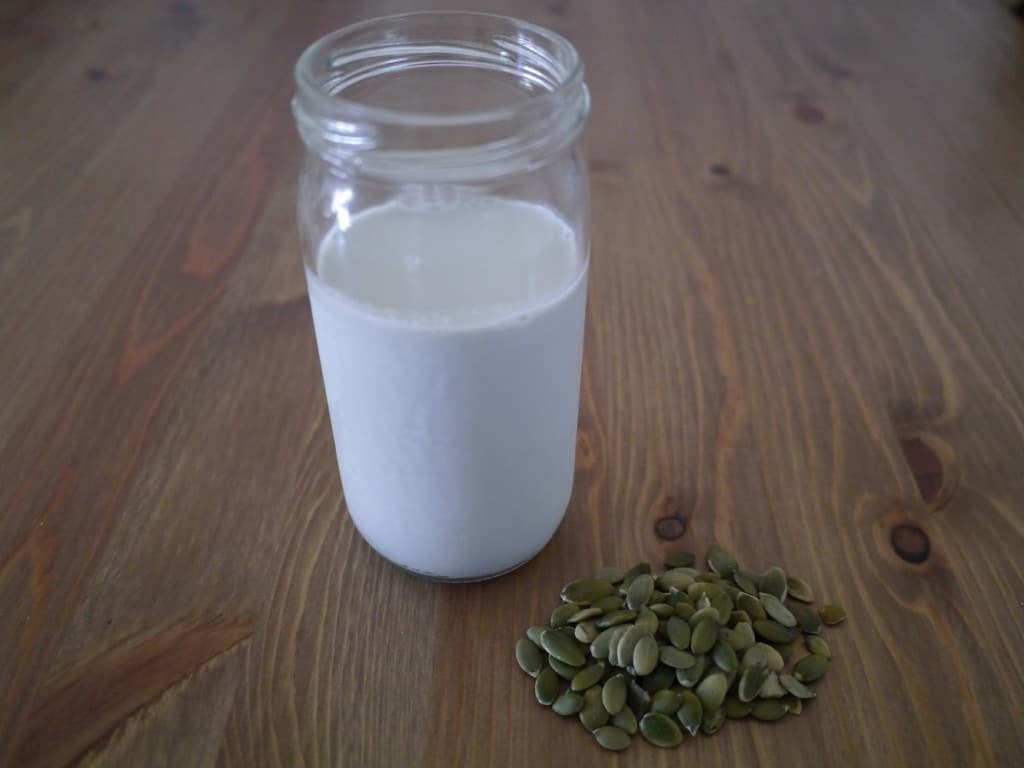
Homemade pumpkin seed milk :)

These work out much cheaper than nut milks. I’ve tried making sesame seed milk (not recommended – it has a very strong flavour!), pumpkin seed milk (which is absolutely delicious) and sunflower seed milk. Flaxseed milk is also popular, although I’ve never tried this.

As above, the principle is the same. Soak, then blend 1 cup seeds with 4 cups water, and strain.

Now, let’s talk about what to do with the leftover pulp.

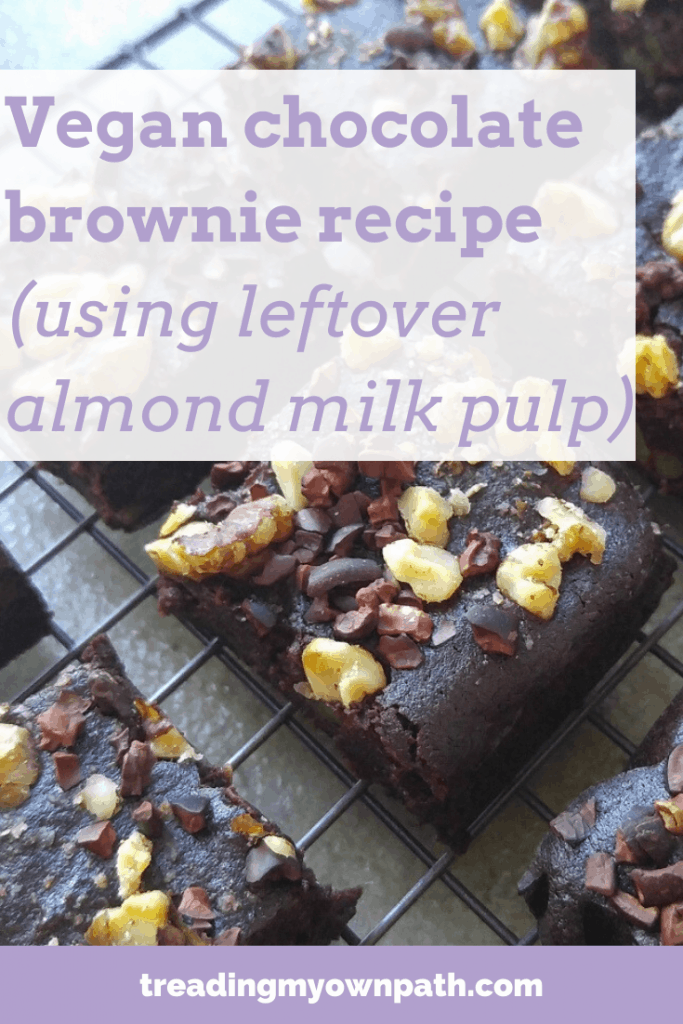
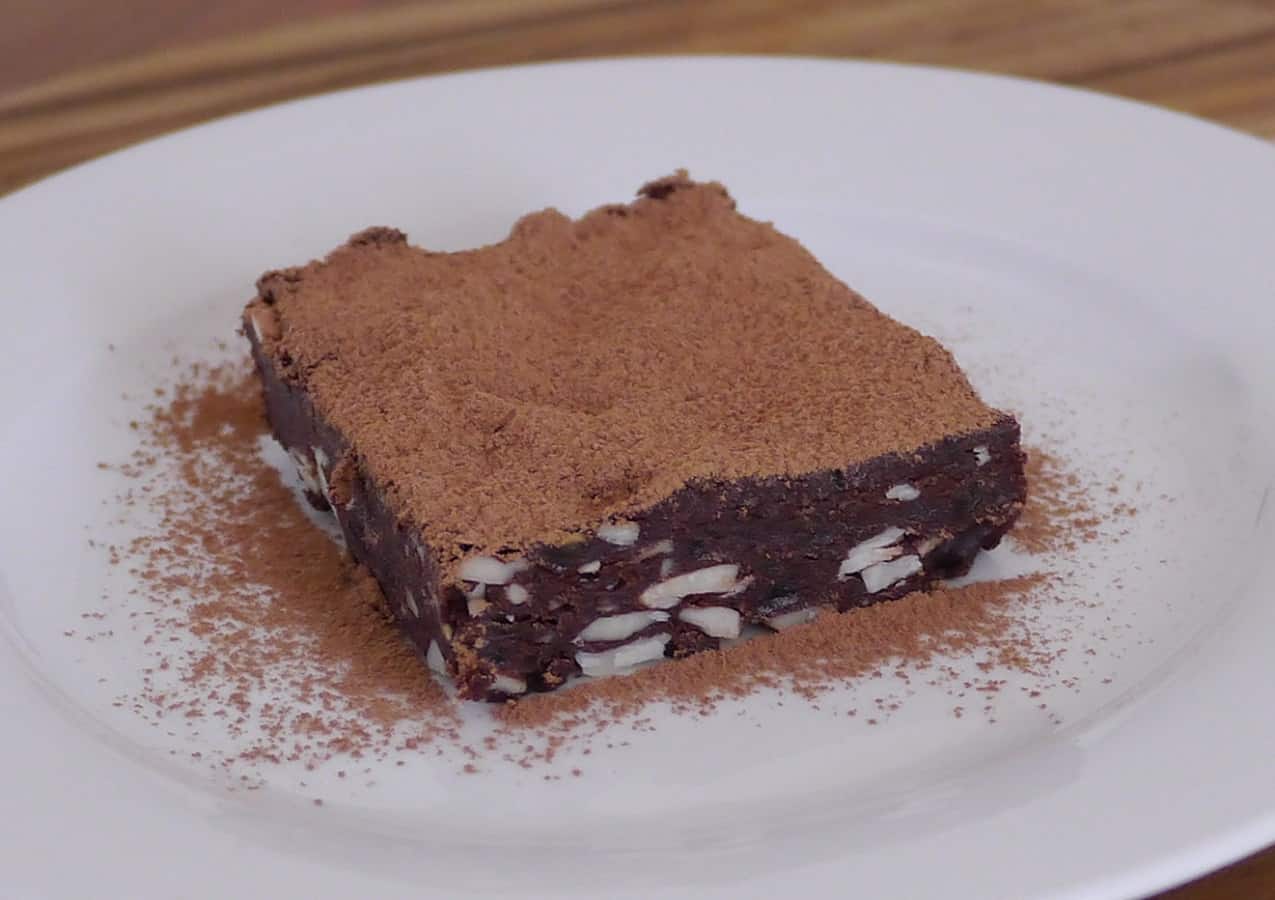
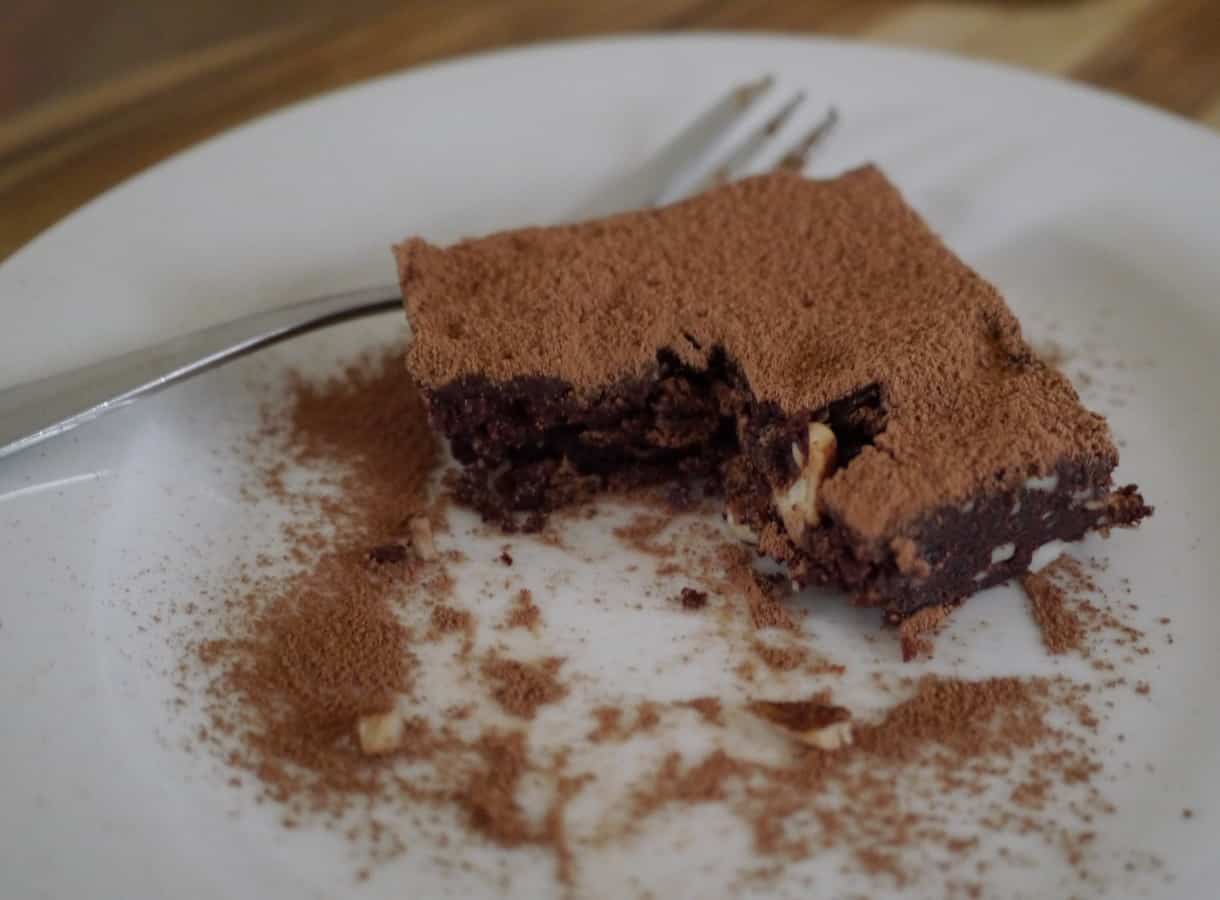
What to Do with the Leftover Pulp: Make Almond Pulp Brownies

This recipe has become my go-to almond pulp recipe. I’ve made savoury crackers, and macaroons too, but nothing beats chocolate-y goodness, so I always come back to this one.

vegan-almond-pulp-aquafaba-brownies-treading-my-own-path

Ingredients:

180g sugar (I use rapadura sugar)
1 cup almond pulp, approx (the pulp left over from using 1 cup of almonds to make almond milk)
80g cocoa powder (I’ve used both cocoa powder and raw cacao for this – I prefer cocoa powder but it doesn’t really matter. You might want to add a little more sugar if using cacao, though)
1/2 cup (110g) coconut oil (I use deodorised as I find the coconut oil flavour a little intense in desserts)
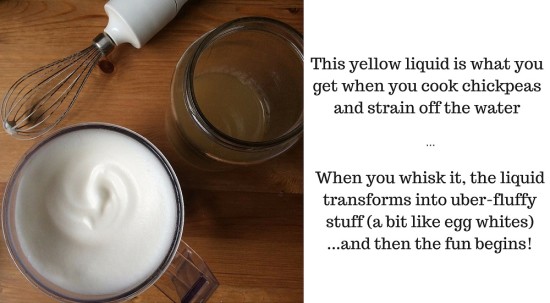
9 tbsp aquafaba (chickpea water – effectively a waste product being put to good use. Find out more here!)
1/2 cup (60g) spelt or other flour
1 tbsp vanilla essence
1/2 tsp salt
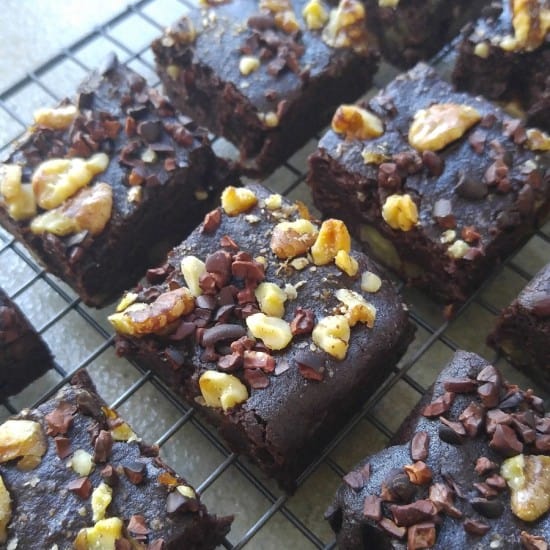
1 cup macadamias/walnuts/raspberries/chocolate chips/something else delicious
(or you could leave plain. But I consider all good brownies to need some kind of crunch)

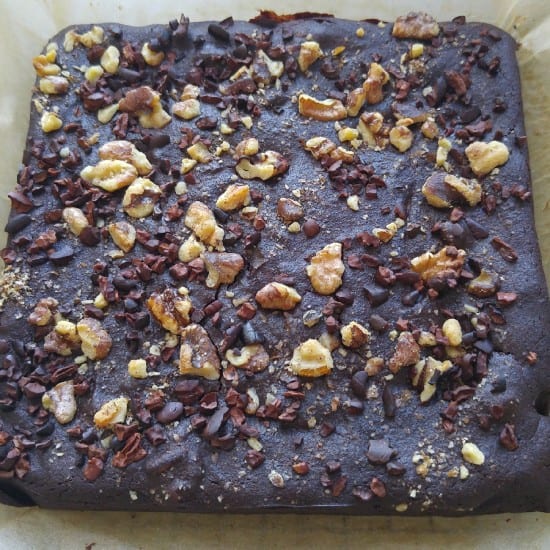
Optional: a few tablespoons of cacao nibs and/or chopped nuts to top.

Method:

Line a square baking tin (if you use baking paper) and preheat the oven to 175°C.

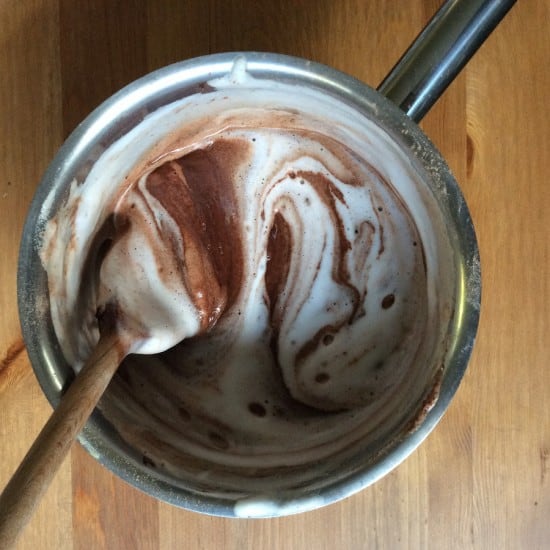
Melt the coconut oil in a pan. Turn off the heat, add the almond pulp and stir to combine.

In a separate bowl, combine the sugar, cocoa powder and flour, and mix well. Add to the pan and stir in. It might seem really dry at first, but it will incorporate. Once combined, add the vanilla essence, salt and walnuts (or delicious thing of your choice).

In a tall cylinder, whisk the aquafaba to form stiff peaks. (This will take longer than you think.) I use a stick blender with a whisk attachment and it takes at least 5  minutes of  constant whisking. Add the aquafaba to the brownie mixture in the pan, slowly folding to incorporate with as little stirring as possible.

This yellow liquid is what you get when you cook chickpeas and strain (and keep) the water

aquafaba-and-chocolate-brownie-mix-treading-my-own-path

Once incorporated, pour into the baking tray. Sprinkle the toppings on (if using) and bake in the oven for 20 – 25 minutes until the top is dry.

chocolate-brownie-slab-treading-my-own-path vegan-almond-pulp-aquafaba-brownies-treading-my-own-path plant-based-aquafaba-brownies-treading-my-own-path

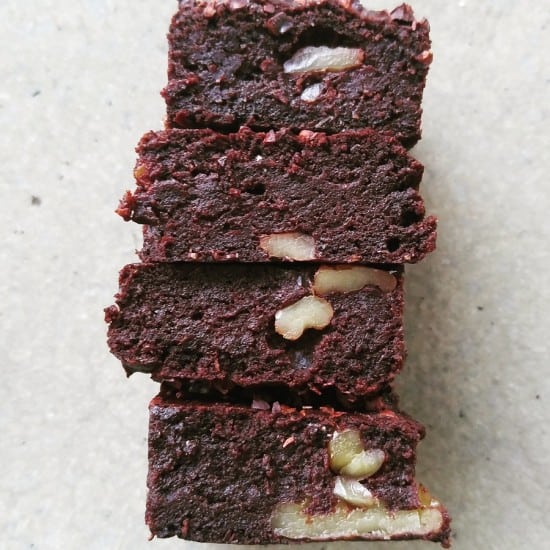
Best stored in the fridge if you don’t demolish the whole lot in one sitting.

Now I’d love to hear from you! Have you ever made nut milk (or seed, oat or rice milk)? Which is your favourite? Which is your least favourite? If you’ve never made it before, is there something putting you off? Do you have any other alternatives to suggest? What about aquafaba – have you ever experimented with that? Are you just a little bit tempted to make these chocolate brownies?! Anything else you’d like to add? Please tell me your thoughts and leave a comment below!

My Chemical-Free, Natural (and edible) Skincare Regime

My husband remembers the time, way back in our very early days of dating, when we took a holiday together and almost half of my luggage consisted of toiletries. I would like to tell you he remembers this fondly, but rather he shakes his head at the memory and tells me he was thinking: “who is this girl?!” Such was his despair (although I didn’t know it at the time) that it’s probably a miracle our relationship made it beyond the holiday…

The skincare and body products I use today are such a far cry from back then that now I find it hard to believe myself. In those days, I bought into plenty of the marketing ploys. I figured expensive products were better for me. I reasoned that beautiful celebrities endorsing a product was a reason for me to buy it. I trusted the assistants that told me I needed several different products to do the same job. What this really meant: I gave big multinational pharmaceutical companies my money (far too much of my money) in order to purchase (mostly) unnecessary products with questionable ingredients. I consumed a lot of wasteful packaging, and my bathroom was always cluttered. I was locked into a cycle of buying and stockpiling products.

Today, I’ve reduced what I use to the essentials. I’ve simplified. Mostly I use ingredients, and I can find almost all of them at the grocery store, and at bulk stores. I tend not to buy pre-made products: nothing I use has more than a handful of ingredients that I mix together as I need. There’s no pressure. Ingredients are rarely on sale or marketed cleverly in an attempt to make me buy more, so I do not buy more than I need.

My Chemical-Free (Edible) Skincare Routine: Then vs Now

When I talk about chemicals, I’m referring to man-made, synthetic and petroleum-derived products. For me, chemical-free means natural and safe. Not everything that occurs in nature is safe, of course. My rule is: if it’s edible, then I use it. If it’s not, then I don’t.

Skincare: Face

THEN: Back in my pre- plastic-free and pre- zero-waste days, I used eye cream, a day moisturiser and night moisturiser, usually purchased from one of those fancy counters in the shopping malls. I used cleanser and toner. Occasionally I would be persuaded to buy some other nonsense product by the sales assistant like skin brightener, or serum, or whatever they were trying to plug that month. I often had random packets of “free sample” cluttering my space that I rarely used. I used a face scrub to exfoliate, usually purchased from a chemist or supermarket. I purchased lip gloss, but rarely used it.

NOW: I replaced all of the moisturizers with a single product: oil. Moisturisers are made with oil, water and emulsifier to bind them together, whereas oil is just that – one ingredient. Water-based products like moisturisers need preservatives to stop them going bad, whereas oils are fairly stable and do not. Almond oil is my staple. If I’m away from home, or I have run out of almond oil, I will use olive oil or coconut oil.

To clean, I use bar soap. I don’t make my own, I buy from a local lady who specialises in natural skincare. It’s made from a blend of coconut oil and olive oil and doesn’t dry my skin out. I don’t use a product to exfoliate, I use a flannel. It works much better, I find.

Bulk Soap Chopped Into Bars Zero Waste Natural Beauty Treading My Own Path

I buy soap in 2kg blocks because this way it is packaging free and I can cut the bars myself to a size I like. All you need is a knife: soap is very easy to cut.

Bodycare:

THEN: I used store-bought deodorant, body moisturiser or lotion, a razor with refillable blades and shaving foam. I used handwash to wash my hands, and shower gel to wash in the shower. I had a separate hand & nail moisturiser. I used store-bought toothpaste to clean my teeth.

NOW: I make my own deodorant using bicarb, corn flour, coconut oil and essential oil (you can find the recipe I use here). I never had much luck with store-bought chemical-free brands but this stuff actually works! (Added bonus: I can buy all the products packaging-free.)

I no longer have a separate body lotion or hand lotion and use almond oil. Ditto with the shaving foam. I use an epilator mostly which is used on dry skin, but if I use a razor blade then I use almond oil. I use a body brush to exfoliate rather than products with “exfoliating properties” (usually plastic microbeads).

Dry Body Brush

A body brush replaces the need for exfoliating products. This one is made of FSC wood with natural bristles. I’ve had it for almost four years and it still looks (almost) like new.

I use bar soap (the same as I use to wash my face) to wash my hands and body.

I make my own toothpaste using very similar ingredients to those in the deodorant (you can find the recipe I use here, and it has been approved by my dentist). When I first made it I used peppermint essential oil, as I do with the toothpaste, but I’d get confused which container was which, and I didn’t enjoy smelling like toothpaste, so now I use a different one.

DIY Homemade Toothpaste Zero Waste Plastic Free Treading My Own Path

I used to make toothpaste with glycerine, but now I use coconut oil as I couldn’t find glyerin in bottles without a plastic lid, and I already use coconut oil for many other things. This kilo of bicarb has lasted a couple of years, but I can now buy in bulk so won’t need the box – or to buy a kilo at once! The essential oil bottles I get refilled.

Hair Care:

THEN: I used Herbal Essences shampoo and Herbal Essences conditioner (the one in the yellow bottle). They changed the packaging and then tried to discontinue the product at one point, and I remember trawling all of the discount chemist stores in a mild panic trying to stock up on these two products. I used a hair serum that was a salon-owned brand only available in the UK and only at the salons, so getting it was a real pain. When I moved to Australia I purchased 6 bottles to bring with me, and when my sister came to visit she brought some with her too (this was all pre-Plastic Free July 2012). My haircare routine caused me so much stress, but I was terrified that my curly hair would be unmanageable without these products. I did use Frizz-Ease serum on special occasions, too. I guess you’d say their marketing campaigns were very effective on me!

NOW: I wash my hair with rye flour, and I use white vinegar as a conditioner. It makes my hair soft, shiny and manageable, without the need to apply any other products. I have used bicarb soda in the past but I prefer rye flour – it’s plant-based (bicarb is mined), has a gentler pH, is easier to make a paste in my hand, and makes my hair shinier than bicarb. If rye flour is not available, I switch to bicarb. I prefer white vinegar to rinse my hair over apple cider vinegar. The smell dissipates far more quickly, and my hair feels and looks better. White vinegar has a lower pH than apple cider vinegar (meaning it is more acidic) so I dilute white vinegar with water more than I would dilute apple cider vinegar with water before using.

Rye Flour Shampoo Zero Waste Treading My Own Path

I buy rye flour from the bulk store, and I sieve with a tea strainer before using in my hair to remove any big flakes. I also find towel drying my hair removes excess flour. When it’s dry, I give my hair a good shake to remove any flour that might remain.

I don’t use any hair serums or gels. I find the vinegar does a good job on its own. If my hair was particularly frizzy I would just rub a little almond oil in my hands and run my hands through my hair.

A summary of all the ingredients I use now:

Skincare Regime Zero Waste Bathroom Products Treading My Own Path

Some of the products I use in the bathroom. From left to right: a jar of rye flour (for shampoo), white vinegar (refilled using an empty wine bottle), homemade deodorant and almond oil. Below left: a bar of soap. Below right: a towelling pocket I use when the soap is too small to pick up. I pop the scraps in here and use as a flannel to ensure none of the soap is wasted.

The products I use in my bathroom are: rye flour, sodium bicarbonate, white vinegar, corn flour, essential oil, coconut oil, almond oil and bar soap. Just a handful of ingredients (8, in fact) that do the jobs of a much bigger handful (or small suitcase-full) of products, all with many ingredients of their own. Most ingredients I use live in the kitchen, where they are also utilized, and my first stop when I run out of something in the bathroom is always my own pantry.

And the benefits? I could tell you about not using chemicals, about supporting the local economy rather than the big multinational pharmaceuticals, about stepping off the consumer treadmill and no longer being sucked into the marketing campaigns. I could talk about no longer buying more than I need, and the reduction in clutter in my bathroom. I’m going to tell you the most surprising benefit of all: simplicity and freedom. When I first gave up plastic and began looking for alternatives, I thought I’d have to learn how to make my own shampoo and moisturiser. I thought it would be difficult, and time-consuming. Rethinking what I was using, and why, and then looking for suitable alternatives made me realise it was only as complicated as I made it. Ditching all the products that were unnecessary, and choosing the simplest options for what remained was all I needed to do.

Now I’d love to hear from you! Do you have a natural and chemical free skincare routine? Can you eat your beauty products? Do you make any of your own products and would you like to share the recipe(s)? Have you had any dismal DIY fails or bad experiences along the way and want to share the lessons you learned?! Do you find it hard to let go of those store-bought products? Is there a particular product you struggle with replacing? Tell us your experiences and please leave a comment below!

How to Get Candle Wax out of Glass Jars

You’ve probably seen pictures on Pinterest or elsewhere of jam jars holding candles and tealights and looking oh so magical. Magical, yes, but are they practical? By that I mean, how on earth do you clean the glass jars afterwards?!

I’m not really into candles. I’m definitely not into conventional tealights, those mass-produced paraffin (petroleum-based) white wax versions. Nor am I keen on soy-based candles, because unless it is clear where and how the soy is grown (and it usually isn’t clear) it could be contributing to rainforest destruction and population displacement. Plus, those soy tealights are often housed in polycarbonate casings – and that means single-use plastic! Beeswax would be my preferred choice, but beeswax is expensive. Besides the expense, I think they make surfaces look cluttered and just gather dust. I think candles are a luxury that I just don’t need.

Last weekend, though, I splashed out and bought some candles. We had some friends around at the weekend for a belated housewarming – it is pretty exciting to be able to get more than four people in the flat at once (that’s all the old place could handle). However, the light in our flat isn’t ideal in the evening, so my boyfriend decided it would be good to get some candles. Yes, it was his idea! We borrowed two lamps from his parents, and I bought some beeswax candles to put in glass jars.

I was determined to reclaim my glass jars once the candles had burned out. I used wide-neck jars (so I could get my hand in there afterwards), and put each candle in an upturned jam jar lid, which I thought would neatly capture all the wax

Turns out I know nothing about candles. Once they had burned out, the wax had spilled over the jam jar lid and glued it to the bottom of the jar, along with so much melted wax it was ridiculous.

Melted beeswax candleThis is what my poor glass jar looked like. The wax looked well and truly molded in there. But I wasn’t chucking it away without a fight. Oh no!

I had visions of boiling the jar in a pan to release the oil and other complicated and hazardous methods for removing the wax, but I thought I should check with the internet first, and I came across a far simpler alternative. So simple, in fact, that I wasn’t entirely convinced it would work.

Put the jar in the freezer.

Yep, that’s it. Apparently the wax shrinks slightly when frozen, just enough to loosen it from the glass.

So I stuck the jar in the freezer for an hour. This is what happened:

melted beeswax candle in a glass jar Freezing melted beeswax to remove from a glass jar Removing melted beeswax from a glass jar frozen melted beeswax leftover melted beeswax

I did use a knife to dislodge the wax, but it came out very easily. The wax is very brittle, and shatters. I’m keeping the leftover wax (HOARDER ALERT!) for the time being, as it is expensive to buy. Who knows, maybe I can make my own candles? Erm…or maybe not.

If I buy candles again, I don’t think I’ll bother placing it on a jam jar lid. It’s probably an unnecessary step.

I am so excited about this trick that I thought I’d share it with you. You know me, I love zero waste, and I also like it when you try something for the first time and it actually works! Apologies if you’re not into candles…then again, neither was I four days ago. But now, maybe I’m going to become a candle person after all.

How to make your own baking powder

I started making my own baking powder when I heard that some baking powders contain aluminium. I didn’t want to be eating that. Also, baking powder contains gluten in the form of wheaten cornflour. Some of my family members are coeliac and I like to bake for them, so I need a gluten-free baking powder. That is also aluminium free. And ideally doesn’t come in plastic.

Turns out, baking powder is the easiest thing to make in the world. You need just two ingredients, cream of tartar and bicarbonate of soda.  The ratio is 2:1 so 2 teaspoons of cream of tartar needs 1 teaspoon of bicarb.

Mix them together and voila! You have super easy baking powder. Store in a jar in the cupboard until needed.

Some recipes also add 1 part cornstarch too, which means cornflour, but as cornflour is actually made of wheat and not corn (bizarrely) I don’t add this. I have seen a gluten-free cornflour available that is actually made with corn so at some point I might try it, but I think it works fine without.

What else do you need to know? It has a slight tendency to clump because it hasn’t got caking agents added. This isn’t a problem of course, just give the mix a good stir before you use it.

The other great thing is that you can make small batches as you need it, so it doesn’t sit in the cupboard slowly going out of date. No matter how much baking I do, I’ve never been able to use up an entire container of baking powder before I exceed the expiry date, so this suits me much better.

My weekend baking extravaganza

I set myself a challenge this weekend. I decided to try three new recipes of things that I’ve never made before. I love food and I love cooking (which if you read this blog you’ll probably have noticed) but I often feel like I’m making the same things over and over again. That’s partly true because I get a seasonal veg box delivered, and the contents don’t vary much week to week – especially in winter. I consider myself pretty good at knocking something nutritious and tasty up out of whatever is in the fridge and in the pantry, and I love making recipes up, but when I have the same ingredients I tend to make the same kinds of things.

I was feeling a bit stifled, creatively speaking. I don’t tend to use cookbooks and recipes much apart from special occasions, but I decided maybe this was what I needed to re-spark my culinary inspiration. I decided I’d find three recipes that looked great and that I’d never made before, go shopping for any new ingredients that weren’t already hanging about, and get baking.

I had such a fun time! It was great to make things with new ingredients, and follow other people’s recipes rather than tinkering for hours with my own. I used spelt flour for the first time, made raw vegan chocolate brownies and learned about wakame gomasio. It’s definitely re-sparked my creativity again; I’ve been thinking up new ideas and I’m already planning some variations and new recipes.

Here’s a mini showcase of my weekend (I’m so proud of my efforts I thought I’d take the opportunity to show off!):

rawpasty cookedpasty pasty rawbrowniejpg brownie2 brownie3 brownie4 bars2 slicej bars3 So I have a challenge for you. This weekend, make a recipe that you’ve never made before. Maybe something you’ve been meaning to make for a while. Maybe just flick through some cook books for inspiration. You’ve got a week to find a recipe and make sure you’ve got all the ingredients to hand. Good luck!

In addition to my renewed passion for cooking, the other great thing about the challenge was that I started my week with a fridge full of delicious things to eat. How awesome is that?!

Wakame gomasio: what it is and how to make it

I came across a recipe I wanted to try this weekend and one of the ingredients was wakame gomasio. I had no idea what this was. Even more mysteriously, the recipe had an alternative – sesame seeds. What kind of exotic fancypants ingredient with a name like that can be substituted simply with sesame seeds?

So I looked it up. It took me a while to find out what it was and how to make it, but now I know I thought I’d share it. Plus it’s super delicious so I think it’s worth knowing about!

Gomasio (which is also spelled gomashio) is basically a mix of toasted ground sesame seeds and salt. It’s a Japanese condiment that’s also popular in macrobiotic diets (something I don’t know a lot about). Sesame seeds are high in calcium, iron, magnesium and B vitamins (full nutritional information here).

Wakame is a sea vegetable that has been grown by Japanese and Korean sea farmers for centuries. It is an edible seaweed that is high in iodine, calcium and B vitamins (full nutritional information here). It’s also high in sodium so has a salty taste. My local health food store sells this in bulk (plastic-free!).

So wakame gomasio is wakame and gomasio. Fairly straightforward really!

How to make wakame gomasio

The hardest thing is probably finding the wakame, although I found it in several local health food stores. You could also try the Japanese section of your grocery store or online. It looks like this:

wakameIf you can’t find it (or don’t want to use it, simply omit and use the recipe to make gomasio).

Ingredients:

1 piece wakame (when ground should be roughly equal to 1 tbsp)
1/2 cup sesame seeds
1 tsp salt

Method:

Toast the wakame in an oven at 160°C for 10 minutes until dry and crisp.

Meanwhile, in a pan heat the sesame seeds on the lowest heat for 5-10 mins, stirring with a wooden spoon, until the seeds have changed colour from pale to golden. Try to remove them from the heat before they start to pop; if they do begin to pop remove from the heat immediately.

Add all the ingredients to a grinder or mortar and pestle, and grind until you have a coarse powder.

wakamegomasio wakamegomasio3And that’s it!

You can change the quantities of salt and wakame as you wish. If you aren’t using wakame, ratios of sesame seeds:salt can vary from 5:1 (found in commercially available varieties) to 18:1 for traditional Japanese gomasio. If you are using wakame, ratios for sesame seeds:wakame vary with 8:1 being an average. Start with this and adjust to find the combination that you like.

What to do with it

It’s a healthier alternative to salt, and it smells and tastes amazing. In Japan it’s used to season rice. The recipe I used it for was pastry. Feel free to try it whichever way you wish!

Homemade Hummus and Tzatziki (2 Simple DIY Recipes)

Homemade dips are delicious, plastic free, don’t contain a list of additives as long as your arm and are made with real ingredients, not bulked out with cheap ‘fillers’. What’s not to love?!

If you’re reading this and thinking, oh but I don’t have time for all that fiddly stuff, I want to try to convince you otherwise. There’s so many that you can make that are ready in minutes! Sure, if you want to try to recreate anything with the words ‘slow-roasted’ or ‘honey-glazed’ or ‘aged’ it’s probably not going to be a quick process, but there’s so many others that just involve combining a few ingredients and – ta-da!

Two of my favourites to make are hummus and tzatziki, because the recipes are so simple, cost next to nothing to make and taste fantastic. Hummus is a middle-eastern dip made from chickpeas and tahini (a paste made from ground sesame seeds). It’s dairy free and suitable for vegans, and tahini is a great vegan source of calcium. Tzatziki is a Greek dip made with yoghurt, cucumber and mint.

Hummus

dips8jpg

I only buy dried chickpeas which are much cheaper and save wasteful packaging. I buy 1kg at a time, soak them overnight and boil for 1-1/2 hours. This makes a ridiculous amount of chickpeas but they freeze amazingly well, so I separate into a few containers and freeze what I don’t need.

This makes a shedload – just under 1 litre.

Ingredients:

650g cooked chickpeas (approx 400g dried chickpeas)
200g unhulled tahini paste
2 cloves garlic, crushed
40ml freshly-squeezed lemon juice (about 2.5 tbsp)
5 tbsp water

dips1jpg

Method:

Put the chickpeas, tahini, lemon juice and crushed garlic in a food processor and blend until smooth. Add water until the mixture is a soft paste. You don’t want it to be runny.

Serving suggestions: if you want to be fancy, you can top the hummus with some whole chickpeas, drizzle with olive oil, sprinkle on some sesame seeds or season with spices (try ground cumin, cumin seeds, paprika or cayenne pepper).

This can be kept in the fridge for up to a week.

dips2jpg dips4jpg dips7jpg dips10jpg dips11jpg

Tzatziki

This makes about 500g

275g strained (Greek) yoghurt – if you want to make your own see instructions here)
1 English cucumber or 1 1/2 lebonese cucumbers
1tbsp grated lemon zest
1 tbsp lemon juice
large handful chopped mint (6 – 8 tbsp)
2 tbsp dill (optional)

dips12jpg

Method:

Cut the cucumber into segments and remove the seeds (if your cucumbers don’t have very many seeds you can skip this step but mine had LOADS of seeds).

Grate the cucumber. If you have a food processor it will be superfast but if not then a normal grater is fine.

Put the cucumber in a clean dry tea towel, and squeeze tightly over the sink to drain the excess water.

Stir the cucumber into the yoghurt. Add the lemon juice and zest and chopped herbs and mix to combine.

This will keep in the fridge for at least 2 days.

NB: Don’t let any of the steps be a dealbreaker – if you don’t have Greek yoghurt and don’t want to strain it then you can use normal yoghurt; it will just make the dip much more runny. If you don’t want to strain the cucumber, the extra water will just make the dip a bit more watery. When I’m feeling lazy I just chop some mint, squeeze a bit of lemon juice, grate some cucumber and add to normal yoghurt.

dips13jpg dips14jpg dips15jpg dips16jpg dips21jpg dips23jpg dips24jpg dips25jpg

How to Make Labne (Cheese) and Greek-style Yoghurt

I recently started making my own yoghurt (you can read about it in this post). The next part of my yoghurt adventure is making Greek-style yoghurt and labne. The great news is that making it requires no additional ingredients and no cooking either!

In case you’ve never heard of it before, labne (also spelled labneh or lebni) is a simple fresh-tasting cheese made from yoghurt that originates from the Middle-East. It is made by straining the yoghurt to drain off the liquid (whey) and leave the solids (curds). The longer that yoghurt is strained, the firmer the consistency. Labne can be made after 4-6 hours and up to 3 days; thickened Greek-style yoghurt is the intermediate product formed after straining for 2-3 hours.

How is this different to shop-bought Greek-style yoghurt?

There’s no additives! Real natural yoghurt is fairly thin and runny. Draining the liquid off is the natural way to make the yoghurt thicker, but the final volume is much smaller. 1 litre of milk will make 700ml yoghurt, which if strained for several hours will result in around 350ml Greek yoghurt. To save money, instead of straining yoghurt, manufacturers may leave the whey and use additives to bulk and thicken the yoghurt artificially, including gums, gelatine, starch and milk powder. In Australian supermarkets it is almost impossible to find any yoghurt for sale without one or more of these additives. In the UK the market is much better and natural Greek-style yoghurt is more readily available.


Let’s get making!

You will need: 1 litre yoghurt, muslin (cheesecloth), a bowl and a sieve or colander. If you don’t have any muslin, you could improvise with other (very clean) material such as an old sheet or tea towel.

How to make thick Greek-style yoghurt

Fold the muslin so it is 4 layers thick and place in the colander. Place the colander over a bowl.

labne1jpg

Pour the yoghurt onto the muslin. The whey will begin dripping into the bowl below straight away.

labne2jpg

labne3jpg

Leave for 2-3 hours until thickened.

labne4jpg

Place in a glass jar and store in the fridge. The yoghurt will last for several days.

Note: if your room is not too warm it is fine to leave out on the side whilst the whey drips out. If it is a particularly hot day or you would prefer, place the bowl in the fridge instead of leaving at room temperature.

How to make labne

This is a lengthier version of the previous recipe, and it starts in an identical manner. By leaving the yoghurt for longer you will make labne instead of Greek-style yoghurt.

Fold the muslin so it is 4 layers thick and place in the colander. Place the colander over a bowl.

Pour the yoghurt onto the muslin. The whey will begin dripping into the bowl below straight away.

After 2-3 hours, take the four corners of the muslin to make a parcel, and hang over the colander to aid dripping. I used a clothes peg.

labne8jpg

labne6jpg

After 6 hours, the yoghurt will have thickened enough to make a soft cheese. You can leave this longer if you want the cheese firmer – leave for up to 2 days in the fridge to make a really firm labne.

labnes1jpg

This is how my yoghurt looked after straining for 6 hours.

When you are happy with the consistency, remove the curd ball from the muslin. You can eat it straightaway or store covered in olive oil in a jar in the fridge – it will keep for up to a week.

Storing your labne with herbs and olive oil:

You will need a clean glass jar, olive oil and some fresh herbs.

labnes2jpg

Cut the curd into pieces and shape into walnut-sized balls with your hands.

labnes3jpg

labnes4jpg

Add the balls to a clean jar along with some herbs, and cover with olive oil.

labnes5jpg

labnes6jpg

labnes7jpg

This will keep in the fridge for up to a week.

Using what’s left – the whey

I used 700ml yoghurt to make my labne, which made enough cheese to fill one small jar, and I was left with 350ml of whey.

wheyjpg

This cloudy yellow watery liquid (which has a similar taste to yoghurt) contains proteins, minerals such as calcium, potassium and B2 as well as friendly lactobacteria, making it a great probiotic. Don’t throw it away!

So…what should you do with it then? Well. It can be drunk as a probiotic drink. It can be used to replace the water when making bread products, or to replace the buttermilk in other recipes. You can use it to soak lentils and grains. Apparently. I wouldn’t like to recommend any of these things without trying them out myself first though, so expect a follow-up blog post in the coming weeks with some helpful tips with what to do with all the leftovers! In the meantime, you can leave it in the fridge in a sealed glass jar for several weeks.

Two simple recipes for do-it-yourself toothpaste

This weekend we finally finished off the toothpaste we have been using since last year, purchased before our plastic-free adventure began. We had a bit of a stockpile of the old stuff to use up, but now the last little bit is gone, and from now on I’m gonna make my own.

I’ve been suspicious of conventional toothpastes for a while and stopped buying them 18 months ago. Conventional toothpastes are full of cleaning agents, detergents, preservatives, anti-microbial agents, and thickeners, and many of these ingredients are questionable in terms of their effects on the body.

Three Nasties in Conventional Toothpaste

Sodium lauryl sulphate
This is added as a foaming agent and detergent. It is a known irritant.

Sodium fluoride
This is added to toothpaste to help prevent cavities. However it is toxic by ingestion and can be fatal. It can affect the heart and circulatory system. In younger children too much fluoride can cause fluorosis, which is when the enamel of the teeth is discoloured and the teeth have brown markings.

Triclosan
This an anti-microbial and anti-bacterial agent used in toothpaste to help prevent gum disease. However, it has a number of other impacts on humans and the environment. For example, triclosan is fairly stable and fat soluble, meaning it can accumulate in the body. It has been found in blood, urine and breast milk. It is a demonstrated endocrine disruptor and has potential links to breast cancer.

Despite its stability, it can react with chlorine in tap water and sunlight to form toxic intermediate and breakdown products such as dioxins, which are highly toxic, and chloroform, which is a carcinogen. Triclosan is also toxic to aquatic bacteria, phytoplankton, algae and fish. (This fully referenced fact sheet is great if you want more information.)

There are also concerns that its widespread use may cause resistance in bacteria similar to the way antibiotic-resistant bacteria developed.

So what are the alternatives?

You can buy natural toothpastes but they are expensive (and some still contain questionable ingredients), and they almost all come in plastic packaging. Making your own safe, inexpensive, packaging-free toothpaste seems to be the best solution.

How to Make your Own Toothpaste

You can make your own toothpaste simply in just a couple of minutes using only a handful of ingredients.

Bicarb soda – is an abrasive agent that removes dental plaque and food from teeth. It also neutralises stains and odours.

Sodium chloride (salt) – is a mild abrasive and also has anti-bacterial properties.

Glycerine/glycerol – is a sweet-tasting colourless odourless liquid that makes the paste smooth, provides lubrication and acts as a humectant, helping the toothpaste retain water. You can buy glycerine at a pharmacy.

Peppermint oil – this gives the toothpaste its minty taste. You can also use other essential oils but ensure they are food grade.

toothpaste2jpg

Ingredients:

4 tsp bicarb soda
1 tsp sodium chloride (salt)
3 tsp glycerine
8 – 10 drops peppermint oil

Method:

Measure dry ingredients into a bowl. Add glycerine and stir to form a paste. Add essential oil.

bicarbandsaltjpg glycerin2jpg

Alternative Recipe – Glycerine-Free Toothpaste

There is a lot of information on the internet regarding  glycerine in toothpaste. It all seems to come from one source, Dr Gerard F. Judd, who wrote a book called ‘Good Teeth, Birth to Death‘ published in 1996 in which he claimed glycerine coats the teeth and prevents remineralisation. I have not read the book but if using glycerine in toothpaste is something that concerns you, you can replace the glycerine with coconut oil.

Coconut oil has anti-microbial properties and because it is solid below 25ºC it works well as a glycerine substitute.

To make this version use the recipe above but substitute 3 tsp glycerine for 2 tsp coconut oil.

toothpaste1jpg bicarbandsaltjpg coconutoiljpg

The Taste Test

Neither toothpaste willtaste like conventional toothpaste, so don’t be surprised! Bicarb soda and the salt make the taste very salty. The glycerine version is slightly sweeter and has more of the texture of conventional toothpaste. It has a higher melting point, whereas the coconut oil will melt in your mouth – literally – and has a mild coconut taste and the texture of oil. If you’re not worried about glycerine (and if you’ve been using conventional toothpaste you’ve probably been using glycerine in that) I would recommend starting with that, and once you get used to the taste you could consider making the switch to coconut oil.

Deodorant: why natural is better and how to make your own!

Before you roll your nose up at the idea of making your own deodorant, let me tell you that is exactly how I was about a year ago. So what changed? Why would I want to make my own deodorant anyway?

Well… the first thing was that I became increasingly interested in what ingredients go into beauty products. I learned that some of the ingredients used in regular products are not good. And when I say ‘not good’, we’re talking carcinogens, neurotoxins, irritants, even pesticides.

Conventional anti-perspirant deodorants (the kind you buy in chemists, supermarkets and beauty stores) contain, among other things, aluminium salts. These have been linked to breast cancer. There is a LOT of info about this on the web; studies have been carried out that ‘prove’ they do with just as many that ‘prove’ they don’t. Whilst the verdict is still out, why take the risk?

The second thing that made me want to stop using conventional deodorant was learning about the way aluminium salts work. Aluminium salts are what makes a deodorant ‘anti-perspirant’, and they work by blocking the pores, or more specifically the sweat ducts. Sweat is still produced by the sweat ducts, but it cannot escape. Sweating is a natural process that has two useful functions – it regulates our body temperature by cooling us down, and also allows us to excrete toxins. (The skin is an excretory organ.) If we’re blocking our sweat ducts, then the toxins cannot be released, so where are they going? My view is, that if the body was designed to allow us to sweat, it’s probably best to let it do it’s thing.

These two reasons were enough to convince me to stop using conventional deodorant. However, I had mixed results with store-bought natural deodorants. They are often expensive, almost always come in plastic packaging, and I would say half of the ones I’ve tried don’t actually work. Let’s face it, the reason we use deodorant is to prevent ourselves from smelling bad. I’m willing to give up aluminium salts, but only if I’m exchanging it with something that will actually work. Natural and useless has no appeal.

So not being completely satisfied with the natural products on the market, I contemplated the concept of making my own. But what actually convinced me to make my own deodorant was meeting other people who made their own deodorant…and didn’t smell! For me that was the final reassurance I needed to jump in and give it a go…

Super Simple DIY Deodorant

This is a really simple recipe that only requires 3 ingredients and will take you about 5 minutes. What’s even better is that the ingredients are cheap, being things that you’d find in your grocery cupboard and are all safe enough to eat!

Makes enough to fill a small jar. Effective enough to last all day without reapplying!

Ingredients:

1 tbsp bicarb soda
4 tbsp cornflour / arrowroot powder (sometimes called tapioca flour)
2-3 tbsp coconut oil
optional: essential oils (therapeutic or food grade)

Mix bicarb soda and cornflour together in a bowl.

deo2jpg

Add 2-3 tbsp coconut oil. (Coconut oil has a melting point of around 25°C, so it will depend on the temperature of your kitchen whether it is solid or liquid. If it is solid, immerse the jar in a bowl of warm water for a few minutes and the oil will melt.)

Stir to form a paste.

deo6jpg

This looks runny because I had to warm my coconut oil slightly to melt it. As it cools it will stiffen to form a paste.

Add a few drops of essential oil if using (if not the deodorant will have a mild and pleasant coconut smell.)

Pour into a clean jar.

deo9jpg

How to Apply

Apply a small amount with fingertips  to underarms and rub in well.

How to store

I keep mine in the bathroom, where usually it maintains a good consistency. If the day is particularly hot and the deodorant completely liquifies, stir with a clean teaspoon and put in the fridge to harden. If it is too stiff, put the container in a bowl of warm water to soften.

Tips

  • Some people are sensitive to bicarb soda. My boyfriend has particularly sensitive skin and so I use the ratio 1:6 bicarb to cornflour. I tried the ratio 1:8 but found it was only effective for 6 or so hours after applying. I have also made it for myself using 1:4 with no problems, and I know people who use 1:1.
  • Everyone is different, so if you find my recipe doesn’t work for you, try tweaking it by adding more bicarb.
  • The amount of coconut oil you need will depend on the temperature of your house. I use less in summer and more in winter because our bathroom temperature fluctuates to maintain the same consistency.