Make Your Own: Plastic-free, Sugar-free Muesli

I used to be a huge lover of breakfast cereals. I’d hoard them. I actually had a cupboard dedicated to breakfast cereal. I liked to have a minimum of 5 different choices in my cupboard, and I remember once having 11 different types on the go. I’m not the only one either, it seems. In 2011 Australians spent $1.17 billion on breakfast cereal, and consumed almost 8 kilos per person!

My tastes changed over time of course – as a kid I loved Frosties (I cringe at that thought now), as a teenager my staple cereal was Fruit ‘n’ Fibre, and as an adult I fell for those luxury muesli lines with the beautiful packaging.

But then I began to fall out of love with cereals. Firstly there was the media reports revealing how cereals are way too high in salt and sugar. Low fat cereals are particularly high in sugar, and a UK study found cornflakes that contained as much salt as ready-salted crisps. Next was the constant bombardment of adverts and marketing. Oh we’ve made this new product. Oh we’ve made that new product. Oh we’ve made a chocolate version! A cereal bar version! A chocolate cereal bar version! I started getting cereal company fatigue. And then there was the packaging. Boxes that would appear enormous until I opened them to find the contents only half-filled the bag inside. Or packets that would declare “contain 20 servings”, only for me to discover that their interpretation of a serving was 4 teaspoons, and for my portions, the box contained nearer to four servings. Which actually made cereal a rather expensive habit.

And the final straw? Plastic. When I gave up buying anything in plastic, only a couple of options remained. Some super fancy muesli sold in glass jars for exorbitant prices, or plain oats in cardboard. The love affair was over.

But recently, I’ve started craving cereal again, and so I’ve started making my own using the ingredients I get from the bulk-bin stores. It’s super easy and there are limitless possibilities. This recipe is my current base.

I wanted to keep it sugar-free so it doesn’t contain any dried fruit. If one morning I fancy something sweet I add some fresh fruit, or blend a banana with some (cashew) milk and sprinkle the muesli on top.

Or I add a teaspoon of bee pollen or a tablespoon of cacao nibs. You can always add the sugar in, but you can’t take it out!

Recipe: plastic-free, sugar-free muesli

Ingredients:

3 cups coconut flakes
2 cups oats
1/2 cup brazil nuts
1/2 cup peanuts
1/2 cup raw almonds
1/2 cup pumpkin seeds/pepitas
80ml macadamia oil (or other high quality, flavourless oil)

Method:

[I soak my almonds and pumpkin seeds overnight to activate them and make them more digestible, and then dry them out before chopping and adding to the mix. If you can’t be bothered with this step or are short of time, just skip it.]

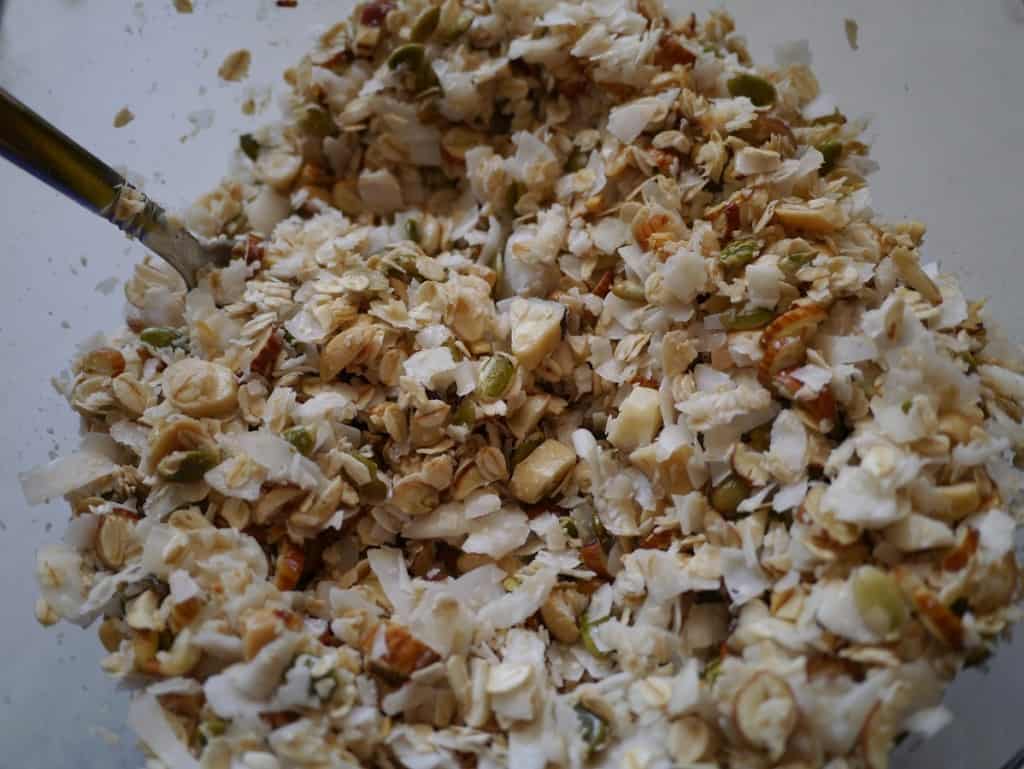
Roughly chop the brazil nuts, peanuts and almonds. Combine in a bowl with the coconut flakes and oats. Stir in the oil and mix well until everything is well coated.

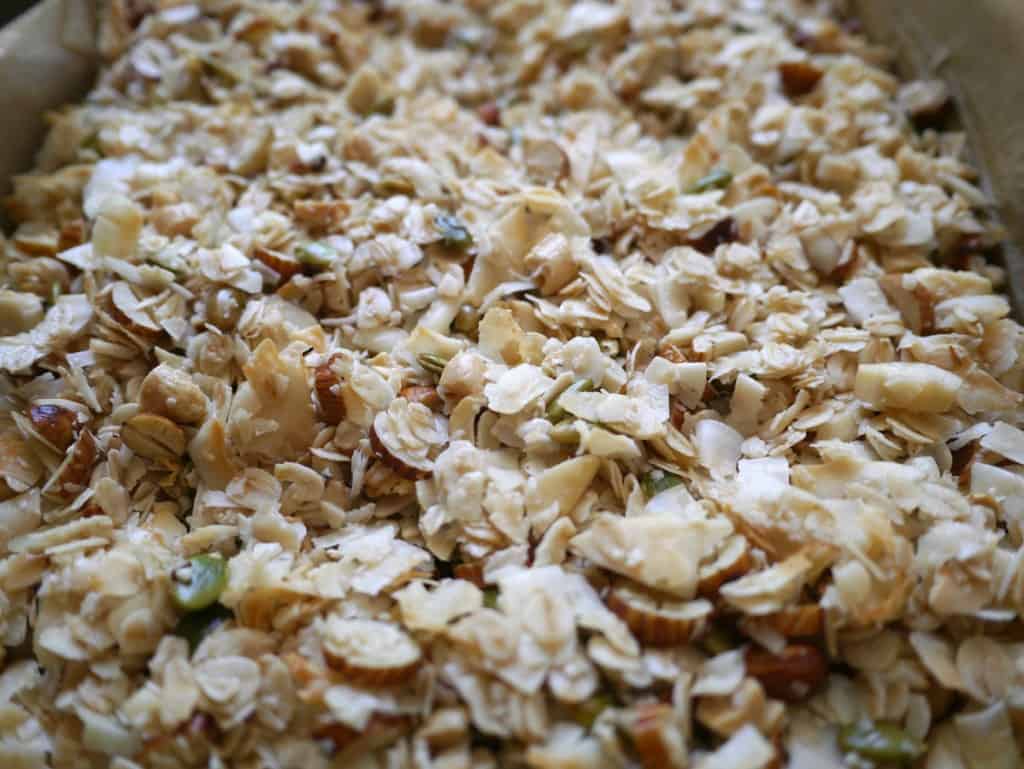
Line a baking tin with baking paper. Spread the mixture evenly over the paper and bake at 100ºC for 30 minutes, until golden. Leave to cool.

Store in a glass jar. It will keep for a few weeks, but I think it is better to make small batches and more often to keep it fresh.

Enjoy!

mueslimix

muesli4

mueslijar

05_03breakfast

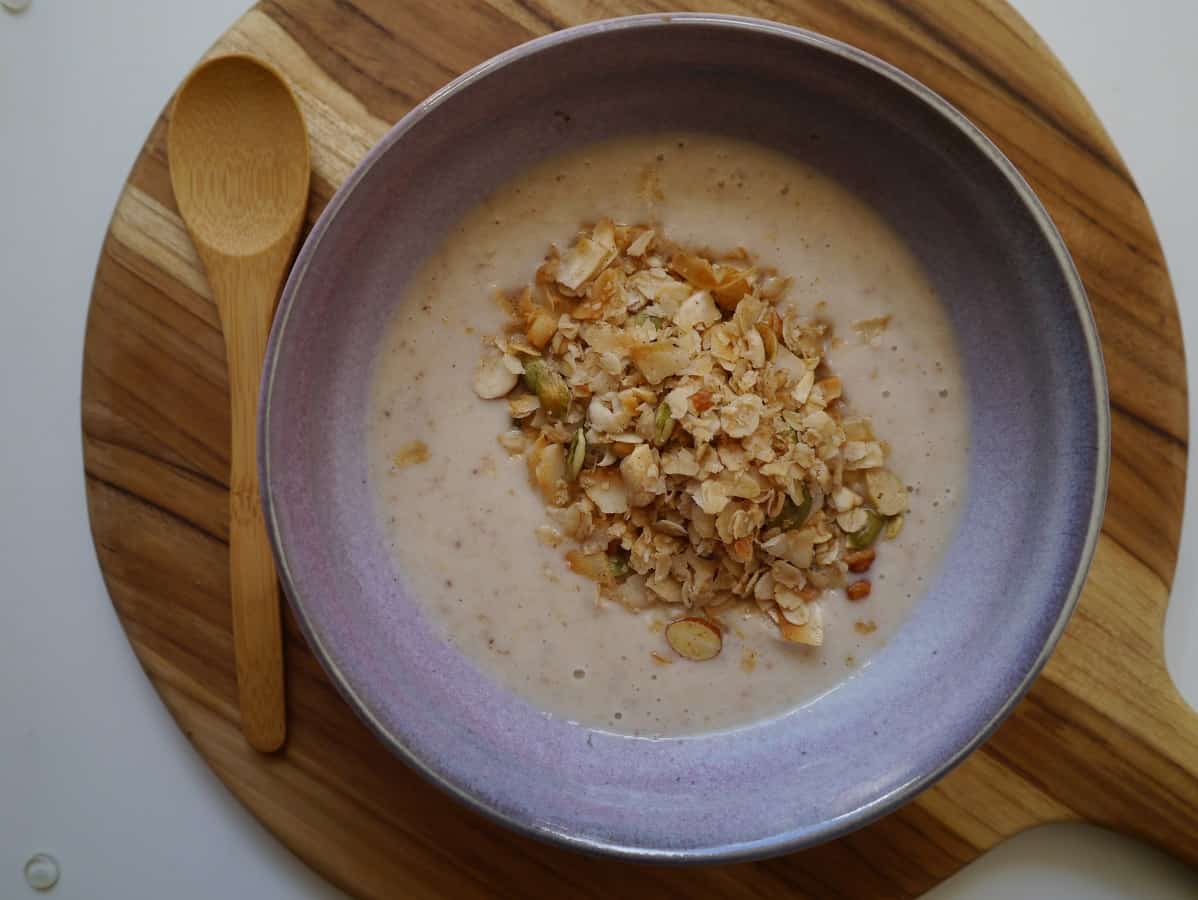
This delicious breakfast was made using half a banana blended with half a cup of cashew nut milk to form the base, and topped with half a cup of muesli. I like doing things by halves, it seems!

[leadpages_leadbox leadbox_id=1429a0746639c5] [/leadpages_leadbox]

Zero-waste kitchen

After my recent blog post on trying to make my own tahini, which was motivated by my desire to use less packaging, I thought I’d write about my quest for a zero-waste kitchen. Let’s be clear, though. I do not have a zero-waste kitchen. It is something that I aspire to, something I’m working towards, but I am not there yet. I might never get there completely either, but it’s something to strive for.

This is my journey so far.

My zero-waste successes

I predominantly buy my groceries from bulk-buy stores. I have a few local stores to choose from that sell nuts, seeds, flours, grains, pulses, beans, herbs and spices in bulk, and I store everything in the pantry in glass jars. I can also buy some condiments in bulk, such as tamari and soy sauce, and cleaning products like dishwashing liquid.

bulkRather than use the bags supplied by the stores, I take my own. I re-use old paper bags (I once read that a paper bag takes three times more energy to make than a plastic bag, so my goal is to use each bag at least 3 times), and also have reuseable washable cloth and netting bags. If reusing paper bags, it’s worth checking what was in there last time. Cinnamon-flavoured brazil nuts are a pleasant surprise, chilli-flavoured sugar is less delightful! I also have a rule that I can’t take any new paper bags from the shop – if I don’t have enough then I have to go without. It’s a good lesson in being more prepared next time!

bags

At my local farmers market there is an egg seller who takes back old egg cartons for re-using. I store my eggs in their boxes at home, so I have four of these so I can return the empty ones to swap with new ones without running out in between. We also have local olive oil producers at the market who sell oil in bulk and refill bottles.

eggs oilIt goes without saying that I only buy loose produce from the other stalls.

If I want to buy items from the deli counter or fishmongers, I take my own containers. When you do this, it’s worth making sure that the assistant weighs your container first – you don’t want to pay for the privilege!

As much as possible, I prepare my meals from scratch to save on packaging, because it tastes far better, saves money, is additive- and preservative-free and is FUN! As well as meals, that includes making my own bread, yoghurt, nut milk, dips… and I’m always interested in learning something new.

My Semi-Successes

We get most of our fruit and vegetables delivered via a local organic veg box scheme. The produce arrives predominantly packaging free, but usually there’s a paper bag in there with something inside. Typically the potatoes and carrots arrive bagged. This means that despite my refusal to pick up new bags at the bulk produce stores, I still seem to be gradually accumulating them. The company were very good about not putting any of my produce in plastic when I requested it – I wonder if I call and ask for no bags at all they will be able to accommodate me?

vegbox1finalThe boxes that the vegetables come in get returned each week for re-using.

I have struggled a little with pasta. I have found one shop that sell vermicelli nests in bulk, as it seems harder to find than rice and other grains. Maybe this is because it is bulky. Sometimes we are caught short, and this means we do buy pasta occasionally in cardboard packaging. We try to stick to spaghetti rather than bulky shapes because the packaging is smallest with this.

pasta(In the last month Barilla have been swept up in calls for a boycott after the Chairman said he would never feature gay families in his advertising, and if gay people didn’t like his message, they could eat another pasta. I’m on the fence about this. I like that they package their products in cardboard and support this, yet the idea of importing pasta to Australia from Italy does seem a little unnecessary. Really, I should make my own…or switch to eating potatoes.)

The first tip we picked up from taking part in Plastic Free July in 2012 was lining our bin with used newspapers. If you want to know how to line your bin, check my post about it here. With a zero waste kitchen we shouldn’t need a bin, but we have no composting facilities where we currently live and what we can’t feed to our worms (and what little plastic sneaks in) still goes to landfill.

We buy milk from a local producer called Sunnydale who take back the empty bottles for re-using. We get stuck with the lids (which we can’t return) but it’s pretty waste free. I have a friend who has goats for milking…maybe that is the next step!?

Things to Work On

There’s still things that we buy in glass jars and tins. I buy tinned tomatoes (I have had a go at canning my own once – it was time-consuming and messy, although successful – but I ended up with three jars. Mass production, I think, is the key. Maybe when tomatoes are in season this year I’ll buy a heap and try to can a shedload of them – not that I have a shed to store them in…). I buy coconut milk, and this is on my list of things to try to make. Tahini is another one!

We have just used up our last jar of olives and I want to start getting these from a deli in future, which should mean better quality as well as less packaging.

My boyfriend likes to drink the odd beer, and beer bottles (and occasionally wine bottles) end up in the recycling bin. These are not something we keep for re-using. On the list for the distant future (when we have the space), homebrew is something that I think he’d like to try.

What else? I recently bought some cocoa butter, which came in a plastic lined bag. I know that it is possible to buy this in bulk, but none of my local shops seem to sell it. I like to experiment in the kitchen, and I don’t want to compromise by going without trying new things. I try as much as possible to keep plastic-free and packaging free, but sometimes I get caught out. Unless I change my behaviour (or an amazing bulk produce store opens down the road) I will never be completely waste-free.

So I try to do as much as I can. I might not be able to achieve 100%, but I can get as close to that as possible. As we find a solution or an alternative for one thing, so I can focus on the next thing. Small steps, in the right direction.

[leadpages_leadbox leadbox_id=1429a0746639c5] [/leadpages_leadbox]

Worm Farms…Tips and Tricks

After writing my post yesterday on how to build a DIY worm farm, I thought it might be useful to write another post explaining how to look after your worms, and also provide some reasons why you might consider worm farming in the first place.

In their National Waste Policy fact sheet, the Australian Government estimate that two-thirds of waste sent to landfill is organic. If you’re not sure what I mean by organic, it’s the waste that originally came from plants and animals which can be broken down. As well as the obvious grass clippings, food scraps and bones, this includes cardboard, paper and wood. In 2006-2007, Australians landfilled almost 14 million TONNES of organic waste. A full garbage truck holds 10 tonnes. Sending all that organic waste to landfill meant an extra 1.4 million garbage trucks on our roads. Even if you think Australia’s got the space, that’s a lot of unnecessary heavy road traffic, not to mention fossil fuel burning and airborne pollutants via vehicle emissions.

Next up, soil quality. Australia has some of the oldest land masses on Earth, and consequently they are nutrient-poor and with little organic matter. Perth has some of the worst agricultural soils in the world. (Someone once told me that it was officially the poorest soil in the world, but I can’t find anything that confirms it. However, ask anyone who ever tried to grow anything in the soil in Perth, and they’ll confirm it for you!) The sandy soil repels water and also nutrients. If you want to grow plants in Australia, you need to improve your soil by adding organic matter. And this is where the worms come in!

Image

Worms and their castings. Castings are the product created when worms break down organic matter, and contain nutrients that plants can uptake easily.

Worms eat organic waste and break into down into a product called castings. These castings contain beneficial nutrients that can easily be absorbed by plants. Their texture also enables them to retain water and so they are great for improving soil structure. And they won’t burn plants, as some chemical fertilizers do. Castings are also suitable for seedlings. Worms also produce a liquid that needs to be drained – worm wee! (Or more technically, leachate.) Some tips on using worm wee are provided below.

And keeping worms is fun! It’s free, they require very little maintenance, meaning you can go on holiday for weeks and they will still be alive on your return – how many pets can you say that about?

Tips & Tricks

So I’ve made the case for reducing fossil fuels, reducing landfill, improving your garden and having fun…so what’s keeping you from getting your own worm farm? Is it any of these?

1. Worm Farms smell.

Actually, they don’t smell if you look after them properly. Castings have an organic smell similar to the earthly smell of soil. The main cause of smelliness is too much food. It can be tempting once you set up your worm farm to add every single scrap of food to it immediately, but worms only eat their body weight in food every day, so you need to start small and increase the food once the worm numbers build up.

2. I don’t have a garden.

Neither do I! The worm farm takes up only a very small amount of space, and it will take several months to fill up the worm farm with castings. You can use them with house plants or pot plants and even if you don’t garden, you are bound to know someone who does so just give them the box of castings once it is full.

3. I don’t have time.

Seriously, how much time do you think you need?! Once the worm farm is set up, all you do is empty your food scraps that you would have thrown in the bin into the worm farm. It helps to have the worm farm nearby – if it’s located at the bottom of the garden you are far less likely to make the trip.

Problem-Solving

This is by no means an exhaustive list, but hopefully covers some of the more common problems that you might encounter.

My worm farm smells

Likely cause: too much food

Solution: STOP ADDING FOOD! Give the worms a chance to eat what they already have. Anaerobic conditions (no oxygen) can also cause this so give the top layer a stir to aerate.

My worms are escaping

Likely cause: If it is only a couple of worms, there is probably not an issue. If there is a mass exodus, then there may be too much moisture or too much food.

Solution: Add newspaper to reduce the moisture levels, and stop feeding if there are large amounts of uneaten food.

I have other pesties in my worm farm

Likely cause: Not all insects in your worm farm are problems, and you should expect to find other creatures making their home here. But some pests indicate problems.

Solution: Burying food should keep unwanted pests at bay. Flies indicate there is too much food, so reduce the feeding. Ants indicate that the conditions are too dry, so add water.

Other Things to Know

  • You need to use composting worms for your worm farm – varieties such as red worms or tiger worms, as these are adapted to the conditions of a worm farm, whereas ordinary earthworms are not.
  • Worms prefer cooler conditions so on a very hot day, add an ice pack above the worm blanket to keep the inside of the worm farm cool. However, freezing will kill them! (This is not a problem we have here in Perth but may be an issue in cooler climates.) If you are expecting a frost, bring the worm farm indoors.
  • Worms do not have teeth, but suck in food. The smaller the food particles are, the more they can eat. Blending or chopping helps, but if you can’t be bothered, freezing the food then allowing to thaw will help break down the cell walls and make it easier for your worms. And if you can’t manage that, just try to bury your food so it doesn’t attract pests.
  • Worms don’t like acidic conditions and don’t like acidic food such an onions and citrus. Avoid giving these to your worms.

Worm Wee vs Worm Tea

You may come across references on the internet to both worm wee (leachate), and worm tea. The two names are often mistakenly used interchangeably, but they refer to different products. Leachate is what drains from the worm farm. Worm tea is a product made using castings, water and molasses, which are “brewed” for 24-48 hours. The main difference is that worm tea is aerobic, and so great for plants, whereas leachate can be anaerobic.

Leachate is fine to add to compost, but if your leachate is anaerobic it may harm your plants. I learnt this the hard way, diluting my leachate to a 1:10 ratio (1 part leachate for 10 parts water) and pouring on my seedlings, which caused them all to go yellow and die.

The way my worm farm is designed, my leachate does not have much contact with air and so will always be anaerobic. If your leachate drains freely into an open container it will probably be aerobic. You can try to aerate your leachate by diluting and exposing to air for a couple of days before using. However, always exercise caution when using on plants. Make sure you dilute 1:10 with water, and avoid using on seedlings, house plants or other temperamental plants.

[leadpages_leadbox leadbox_id=1429a0746639c5] [/leadpages_leadbox]

How to Build a DIY Worm Farm

One of the first things I noticed once I stopped buying plastic packaging was that my rubbish bin was now filled almost exclusively with organic waste – vegetable peelings, fruit skins and cores, leaves and the like. In the UK my local council had provided a brown bin for organic waste, which was industrially composted, but here in Perth Australia it was heading straight to landfill.

This meant someone was driving a truck to my flat, picking up my organic waste, driving it to a landfill site, dumping it into a hole in the ground and covering it with rocks. With fuel and machinery costs, wages, increased pollution from vehicle emissions, and the resulting contaminated land, it seemed like a lot of energy (and effort) was being wasted dealing with something I could potentially deal with at home.

And so I built a worm farm! I use the term ‘built’ loosely, as there was no actual building involved. In fact, it is dead simple. Additionally, I spent ZERO! Nothing! Zilch!

How to Build a Worm Farm

What you will need: two polystyrene boxes, a skewer, scissors, junk mail or shredded paper, some worms, an old towel

I salvaged two polystyrene boxes with lids from my local supermarket. (I just went to the Fruit & Veg section and asked a member of staff.) In Australia, vegetables such as broccoli and Brussels sprouts are delivered in these, and once emptied of stock, they are simply thrown away.

The boxes need to be the same width and length, but the same depth is not necessary.

Image

Two insulated boxes, courtesy of the supermarket. The bottom box doesn’t need a lid as the other box sits directly on top.

The boxes will be stacked on top of one another, so if they are different depths, choose the shallowest to sit on the bottom.

The top box is for the worms, and so needs drainage holes. The bottom box will be used to collect liquid that drains from the other box, so no holes in this one! To pierce holes in the bottom of the box simply use a skewer, making the holes approximately an inch apart.

Image

Drainage holes allow liquid to drain away, and stop your worms from drowning. The liquid collects in the bottom box.

Place a layer of cardboard at the base of the top box so that the worms do not fall through the holes. Next, add some shredded paper to make bedding for the worms. This is a great way to get rid of those annoying supplements and catalogues that come in the newspapers, or in the mail.

Image

If you don’t have a shredder (I don’t) then you can make strips of paper for bedding by cutting slits in a newspaper at 1cm intervals along the spine, and then tearing.

Using a litre of water (ideally rain water of filtered water, if you have) pour carefully over the bedding to ensure it is wet. Any excess water will drain through to the bottom box.

And then…worms! I got mine from a friend but many community gardens offer them either free or for a small fee. You can also find them on gumtree or freecycle. If all else fails they can be purchased at the big DIY stores but be aware that these will have potentially been sitting on the shelf for a long period of time and may not be in very good health, so will take longer to get going.

Image

The worms in their new home : ) One fistful of worms needs one fistful of food per week. It’s important not to overfeed them as this means a stinky worm farm and can also attract other unwanted pesties who want in on the action.

Finally, cover the worms with an old towel, sack or carpet, or if you don’t have these to hand then use cardboard. This cover keeps the worms dark and damp, and keeps flies out. If you’ve used cardboard or something biodegradable you will eventually have to replace this as it will disintegrate over time.

Image

An old flour sack acting as a worm blanket, as I don’t have any old towels.

Lastly, replace the polystyrene box lid, after piercing a couple of holes for air, and place in a shaded spot. My worm farm lives on my balcony but it would be fine to keep indoors in a laundry or kitchen…if you wanted to!

Do not feed the worms for a few days to give them a chance to settle into their new home.

And there you have it – a DIY worm farm that didn’t cost you a penny!

[leadpages_leadbox leadbox_id=1429a0746639c5] [/leadpages_leadbox]