
How to… Make Your Own Natural Yoghurt
This is a recipe for dairy yoghurt. You’ll find my recipe for dairy-free coconut yoghurt here.
Ever since I went to a workshop, I have been meaning to make my own yoghurt. The workshop was in February. We’re creeping towards May. I needed to stop thinking about it and talking about it, and actually do it!
The delay was predominantly the result of my not having the right equipment, namely a thermos flask and a thermometer. Strictly speaking you don’t need either of these things, but it makes it easier. Plus they are both useful tools to have in the kitchen anyway, and I know I will use them.
After scouring Gumtree and eBay for two months I decided to bite the bullet and buy a new flask. A wide-neck one is more practical and there didn’t seem to be any available second-hand. I also bought a new thermometer. Both came with a few pieces of unnecessary plastic packaging (do I really need a carry strap for the flask, and even so, does the carry strap really need to be ‘protected’ by a plastic bag?!).
I don’t buy brand new things very often (see why here) but sometimes I have to admit defeat. At least now I can get on with my yoghurt-making!
(I have to confess I was slightly nervous about the end result of my first batch. I remember at school in biology class having to do an experiment where we filled test tubes with milk and a dollop of yoghurt and then incubated them at different temperatures for a few days. After waiting the few days, we ended up with…test tubes of milk and a dollop of yoghurt. Even the teacher was confused. But I needn’t have worried…)
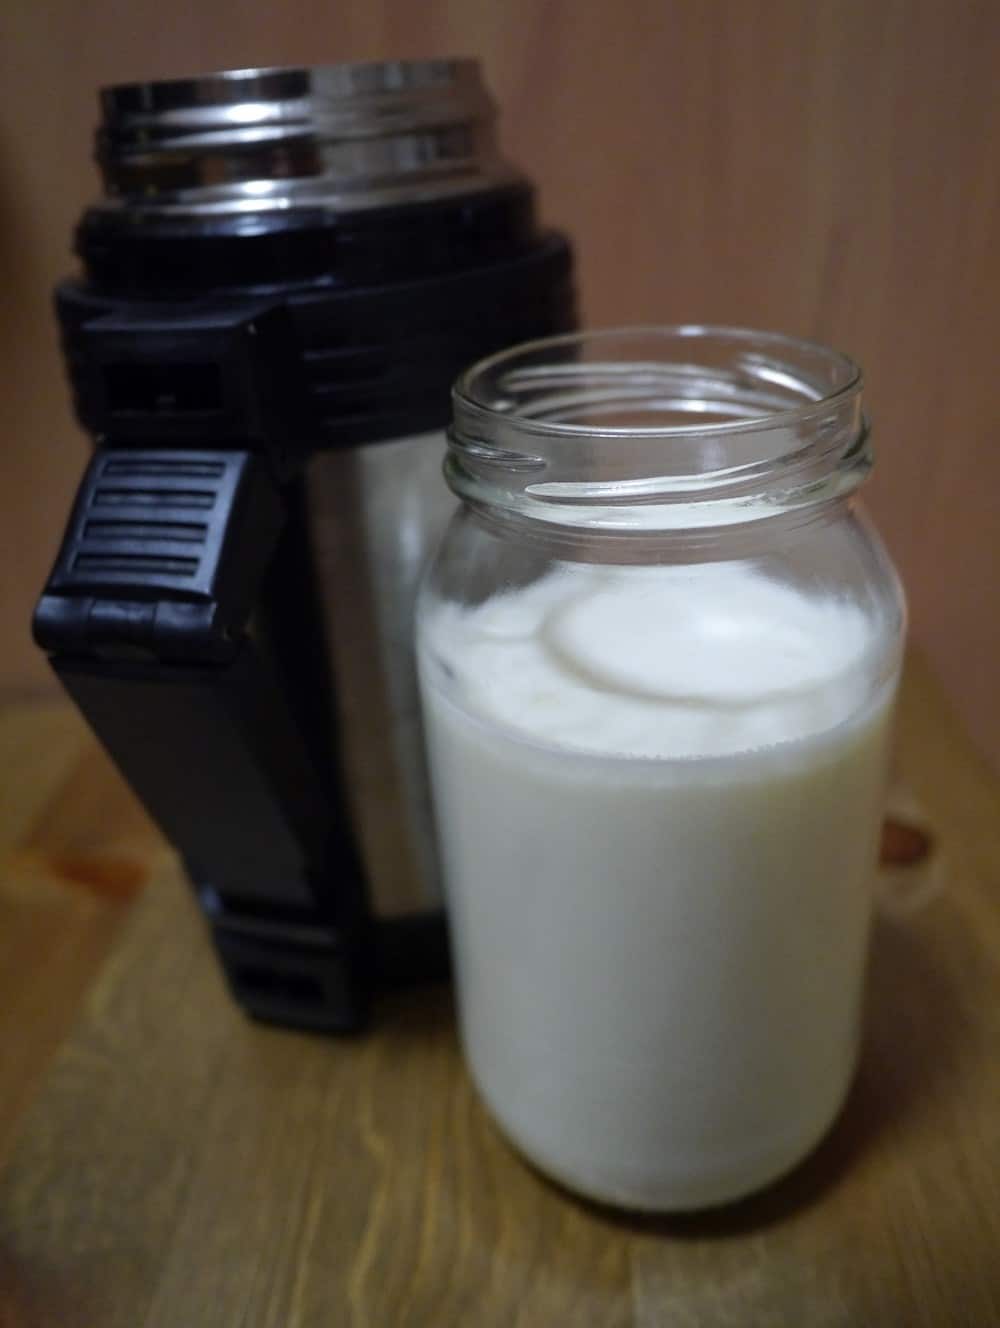
Making yoghurt is simple. You will need: fresh whole fat milk and live yoghurt (it will say ‘live’, ‘probiotic’ or ‘cultures’ on the label). 1 litre of milk requires 1 tablespoon of yoghurt, and should make 700ml yoghurt. As well as a flask and a thermometer, you will require a saucepan and a wooden spoon.


Pour the milk into a saucepan. Warm over a low heat, stirring occasionally, until the thermometer reaches 82oC. This heat treatment kills any bacteria that may be present in the milk. Turn off the heat and allow the milk temperate to drop to 45oC.


The milk needs to drop to 45oC so that when the yoghurt cultures are added they are not killed by the high temperature. Once the milk has cooled enough spoon the yoghurt culture into the flask (make sure the flask has been thoroughly cleaned with hot water beforehand) and add a small amount of the milk from the saucepan. Stir thoroughly before adding the rest of the milk into the flask.


Screw on the flask lid. Now you need to leave the flask for 8 hours to allow the yoghurt culture to do it’s thing – namely converting lactose (the natural sugar in milk) into lactic acid, which then causes the milk proteins to coagulate, which results in the thicker, creamier texture of yoghurt.
Ta-da! Fresh homemade probiotic natural yoghurt.
On opening up the flask, you should be looking at a container full of delicious probiotic yoghurt! It will need stirring to make sure there’s no lumps. (This is why a wide-necked flask is useful.) The yoghurt can then be poured into a glass jar and stored in the fridge. It should last several days.
[leadpages_leadbox leadbox_id=123a865e9839c5] [/leadpages_leadbox]


I had a failure my first time trying home-made yogurt. I think I will try your method this time.
Please let me know how it turns out!
Just wanted to let you know I started making my own yoghurt again inspired by you, and also to eliminate the plastic containers. I was perfectly happy with the yoghurt I bought, it was just the plastic that bothered me.
I even made the labne, and quite enjoyed it. But I was finding the yoghurt too runny even after straining. I tend to eat my yoghurt on toast with a bit of fruit, so I like it thickish. I was despairing of this and had decided to go back to buying my favourite brand again, when quite by serendipity I was listening to the (ABC) radio in the car (the only time I really do listen to the radio), and there was an interview with a woman who wrote a book about wild grains. The topic of chia came up, and it was actually the presenter who offered her use of chia. That is, she mixes it with yoghurt and leaves overnight for it to swell. I tried this with my runny yoghurt, and had a great result. Firstly a creamy nutty thick yoghurt a bit like creamed rice. And then the extra benefits of eating chia seeds! A delightful discovery.
What ratio of chia seeds to natural yoghurt did you use?
where did you get a wide-necked flask. I live in Cape Town and I cannot find one anywhere?
I got it from a shop in the UK called John Lewis, but I’m pretty sure Thermos make them too. You could try on eBay maybe?
It’s actually even easier than this! You don’t really need the flask and the thermometre. Heat the milk until it starts to bubble and then let it cool down until it isn’t steaming anymore. Never failed me! I just poor the whole thing straight into the container I want to keep it in, wrap it in a blanket and then leaving it overnight, put it in the fridge and stir the whole thing when I eat my first bowl from the batch. Saves a lot of dishes compared to using a flask ;-)
I’d read about the tea towel wrapped around a glass jar method but when I began I didn’t trust myself! Ditto with the thermometer. Even now, there’s the tiniest bit of fear/excitement at wondering if it actually worked when I unscrew the lid after waiting for the magic to happen! But it’s good to know it works for you, and I love the idea of less dishes… : )
It seems you also didn’t use these cultures, but only milk, didn’t you or did you add it? Cause i have trouble that these cultures are still sold in plastic bags..
Would this work with other milk types – goat/sheep milk?
Hi Michaela, yes, it will! Or at least, it should do. It won’t work with vegan or nut milks but other animal milks will be fine : )
Hello! I gave this a go after your suggestion on cutting back on plastics in a previous post (still can’t give up my cheese ) and it worked really well!
Had a couple of questions with it, 1) any way to not burn the pot? I had it on very low and heated slowly but somehow it still stuck to the bottom and took a two time soak with bi carb & a hard scrub to get it off. Could also be my cheap pots, they aren’t non stick (someone was throwing them out so I took them!) but just wondering if you experienced this?
2) how long do your live yogurt cultures live for? I used the last of our purchased yogurt for the live cultures. And with my newly made yogurt, I scooped some out and placed in a seperate jar (so I wouldn’t accidentally eat it) in prep for future yogurt making. Do those live cultures only last as long as the yogurt smells fresh? Just wondering if this means I have to have a constant supply of yogurt on the go to avoid purchasing more plastic.
Thanks for your help! :)
Hurrah! Glad you gave it a go! :) Hmm, my solution to not burning the bottom of the pot is to stir constantly! I haven’t had that problem, but I do have quite heavy based saucepans. But stirring should work otherwise.
They should last 3-4 weeks. If you separating some out, keep it in the smallest jar you can find. It will be more likely to go bad if it’s in a big jar.
Hope that helps!
Try rubbing an ice cube around your pan before you put in the milk and heat it.
And if you like thicker yogurt you can then strain it through a nutmilk (or similar) bag – the whey will drain off which is useful for all kinds of baking, fermenting, smoothies, feeding to chickens (& our latest batch is becoming part of our puppy food :)) and you are left with yummy thick greek style yogurt – just strain until its your desired thickness – leave it too long & you get more of a labne type cheese product.
If you are using pasteurised milk do you still need to heat the milk to 82 degrees?
Hi Alice, yes you do – you’re killing any bad bacteria to give the good guys the best chance of making yoghurt.
What about ultrapasturized milk. Still need to heat to 82?
No way! I can’t believe this is that easy. I have a flask, and I have a thermometer, so what am I waiting for? Will definitely try as soon as I got the grocery shop and pick up some some milk! I’m very tired of yogurt in plastic tubs.
I know right, Cathy?! I can’t believe I bought premade yoghurt for over a decade! :/
Just tried your recipe and it worked beautifully! So exciting to lift the lid on the flask and find thick delicious yoghurt! I’ve started buying whole non-homogenised organic milk from our local farmer’s market as a way to reduce plastic and packaging waste and it is completely different to the old brand we used to get – I’m sure this has helped make the yoghurt better. I’m going to try making sour cream and ricotta next. Thanks for sharing your recipe
Hi Kate, hurrah! It’s like magic, opening the lid and seeing the transformation! Good luck with the next lot. I’ve made ricotta (I think I used the whey from making halloumi). Oh, if you want an easy cheese recipe, halloumi takes about 3 hours to make and is pretty simple! I haven’t written a blog post about it but I made it a bit before I went dairy-free and it’s super easy and fun :)
Hi Lindsay I am just wondering if you buy fresh cultures each time you make a batch of yoghurt (noticed in your picture you have a jar of yoghurt for live cultures) or do you save a spoonful from the batch you make to add to the next?
Hi Ruth! No need to buy new yoghurt each time, you just use the end of the previous batch when making a new version. So yes, just save a spoonful!
On my zero waste quest too, and was debating buying a yoghurt maker then dithered. Your article inspired me so am getting hold of a wide mouthed thermos flask. I picnic and camp so the flask will get lots of use! Have seen a YouTube recipe making yoghurt with powdered milk too, which my local new zero waste shop sells. Will let you know how I get on!
I worried about adding to the waste gadget pile too, so I looked on Facebook Marketplace and got a brand new yoghurt maker for free. I’m in love with it. The yoghurt is fabulous and soooo easy!
Total newbie here….(a) what is the purpose of a “flask” in this instance and (b) are these “live cultures” sold separately and labeled as such OR are you just taking an existing, specialized kind of yogurt (looks like the plastic container we are trying to avoid!) and just grabbing a bit of that. Is one better, more concentrated, or whatever than the other? (c) I am terrified of flubbing the “kill bacteria” step and giving my family an illness. How easy is that step to screw up? :-)
I did this yesterday and it was so easy. I bought a pot of organic natural yogurt at my supermarket and some whole (full fat) milk. I have a jam thermometer and I used that to check when the milk was at the required temperatures. Don’t worry too much though as most milk in supermarkets is pasteurised anyway and you won’t kill anyone, just your yoghurt might not be as good. It was very simple – noon in pan, heat low and slow stiring with wooden spoon occasionally. Get to correct temperature, take off heat and leave to cool, then mix it with the natural yogurt you bought as directed and leave. The flask is to keep the yoghurt at around 45 degrees c. long enough for the cultures to do their work as they need heat. People say you can do the same with a large jar wrapped in a towel, there are also electric yoghurt makers out there that do the same, like an incubator. It was really easy to do and nice to have the know how to make natural yogurt without plastic.
Just made this – so happy it worked and couldn’t have been easier, fingers crossed it wasn’t just beginners luck. Very interested in comment above about how easy making Halloumi is…do you have a recipe for this?
Hi there, also new to this whole “zero waste” business.. I am just a little concerned that every time I make my own yoghurt, I am going to be wasting a litre bottle from the milk – how is this any better than wasting a container from bought yoghurt? I am still struggling to find anywhere in my area that ‘refills’ milk bottles (honestly, does anywhere actually do this?), and glass waste is just as bad for the environment.. It’s almost like every time I save one amount of waste, I waste another one, just in a different way than I did before! This is so deterring..
Hi Prue,
My understanding is that plastic is much worse than glass. Maybe both are as bad in a landfill, but glass is very much recyclable and plastic is not actually very recyclable at all. The very few kinds that are, are usually turned into plastic bags, jackets, etc and not turned into a new plastic container for instance. This is called downcycling and much less desirable than true recycling.
Check out How to Save a Planet’s episode called “Recycling! Is it BS?” from Jan 21 and also the documentary called The Story of Plastic for a more in depth explanation.
Another consideration is that plastic milk jugs are usually made from LDPE #2 (at least in the USA) which can be used to downcycle. Yogurt containers are made from PP #5 which is completely useless and definitely trash. So a plastic milk jug could still be a better option than the yogurt container if you haven’t been able to find milk sold in glass yet. I haven’t been able to find it in my area either. Hoping a glass option will come soon! Good luck!
Thank you so much for taking the time to reply Stephanie, that actually helps a lot. I was reading a horrible article about the ocean and river dredging that occurs in order for us to be able to come up with the amount of sand we need to create the glass we churn through. So I think I was just feeling a little down-trodden!! Sometimes it honestly just feels like we are replacing one issue with another, and I wish Australia would do more to re-fill!! I will definitely give this yoghurt a go – I am feeling a little more optimistic today!
Can you find milk sold in returnable glass bottles that just get washed and reused? We get ours from village shop (Devon UK). Will def try yoghurt recipe thanks.