Zero Waste (+ Plastic-Free) Gardening

I may have got to grips with plastic-free living and the zero waste lifestyle when it comes to inside the home, but when it comes to the garden, I’m a plastic-free newbie. Having lived in an upstairs apartment with little more than a balcony for the last four years, I haven’t really needed to think about it.

Now we’ve moved and I finally have the garden space I’ve been dreaming about all that time, I’m really keen to keep up with the plastic-free lifestyle and avoid using plastic in the garden where I can. (Spoiler alert – there have been compromises!)

Of course, paving or wood chip mulch would solve the waste problem straightaway, but I’m keen to grow as much food as I can, so no easy options for me!

Starting from scratch with anything can be daunting, and the hardware stores seem to have more plastic packaging in them than the supermarkets! I do not have all the answers – we have only been living here for three months, after all – but I’m beginning to find zero waste solutions and plastic-free alternatives that work for me.

No doubt in another three months I’ll have far more answers (and if you have any tips of your own, please share them!) but I thought I’d share my plastic-free and zero waste gardening solutions so far.
Starting with the Soil

We were lucky enough that when we moved, the four garden beds were pre-filled with soil (and pre-planted with seedings). However, there is still plenty of space for planting additional things, and empty pots need soil to fill them. Perth doesn’t have soil: it is a city build on grey sand, with no nutrient content or water-holding capacity whatsoever. I

t’s not possible to scoop up some soil from the ground and put it in a pot. You have to source it from somewhere.

We’d been given some potting mix in 25 litre plastic bags (the only size available where I live) but the bags seemed so wasteful that I didn’t want to buy any myself. Instead I found a compromise: coconut coir.

It’s a waste product from coconut growing areas. It comes as a dry, lightweight block wrapped in a very thin plastic layer. Once added to water it expands: this block will make enough to fill a wheelbarrow (90 litres).

To buy this much potting mix would require four bags, and heaps more plastic.
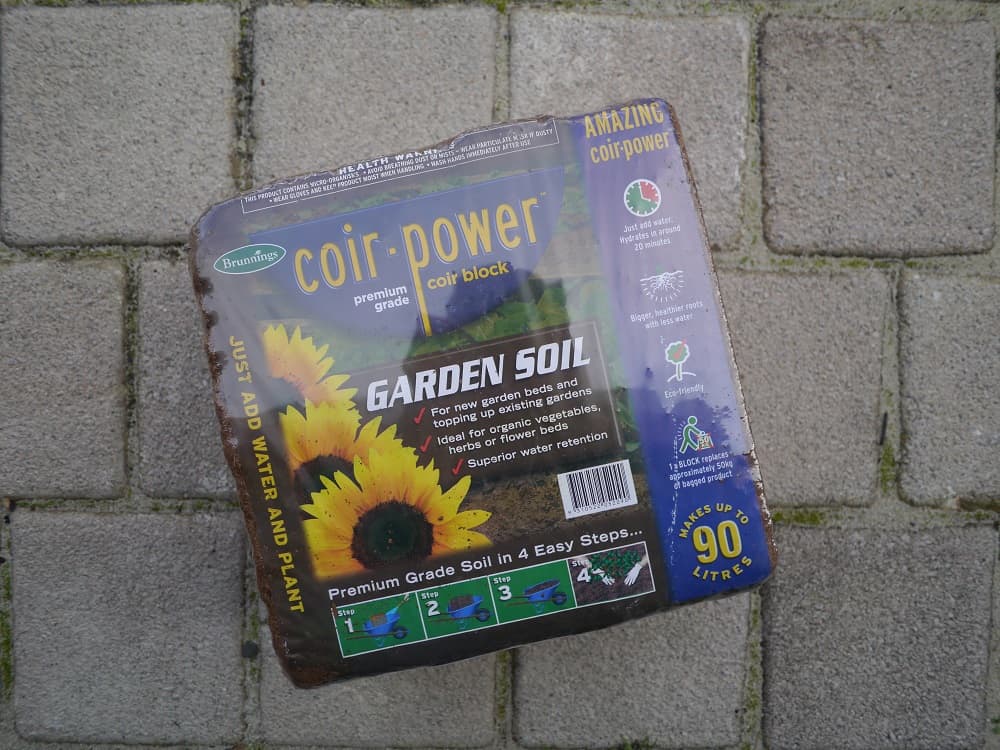
Peat-free potting mix made from a waste product: coconut coir.

Peat-free potting mix made from a waste product: coconut coir.

Coconut coir itself does not have any nutritional value, but can be mixed with worm castings, compost or other fertilisers to add nutrients.
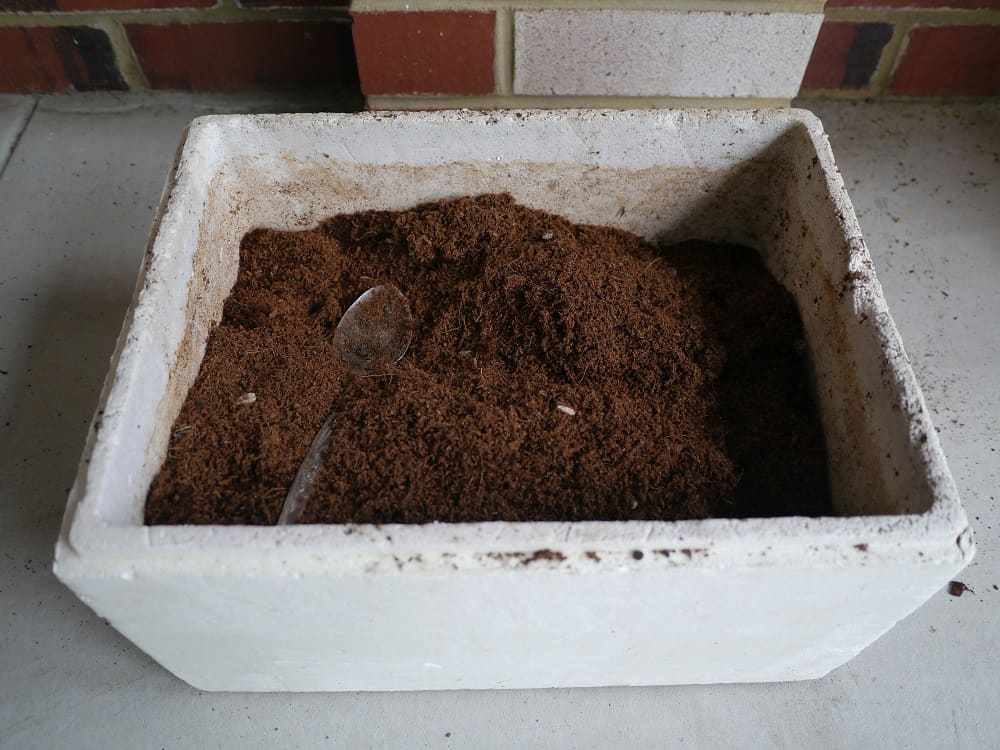
Repurposed Polystyrene Box Plastic Free Gardening Zero Waste Gardening

Coconut coir once water has been added. This old polystyrene box is our old worm farm. Despite hating plastic and especially polystyrene, I couldn’t throw it out knowing it still had (some) use. It’s good for mixing up potting mix and saves me from buying a new container.

Coconut coir is great for raising seedlings, but to top up the garden beds (and create new garden beds) we needed soil. After a couple of phone calls, I found a local soil company that could deliver a trailer load of soil to us. This tiny looking pile is half a cubic litre (500l), which is the equivalent of 40 bags.

Whilst we didn’t need it all, we have been able to store what we didn’t use in our wheelie bin (we don’t use it for rubbish, after all) until we can use it.
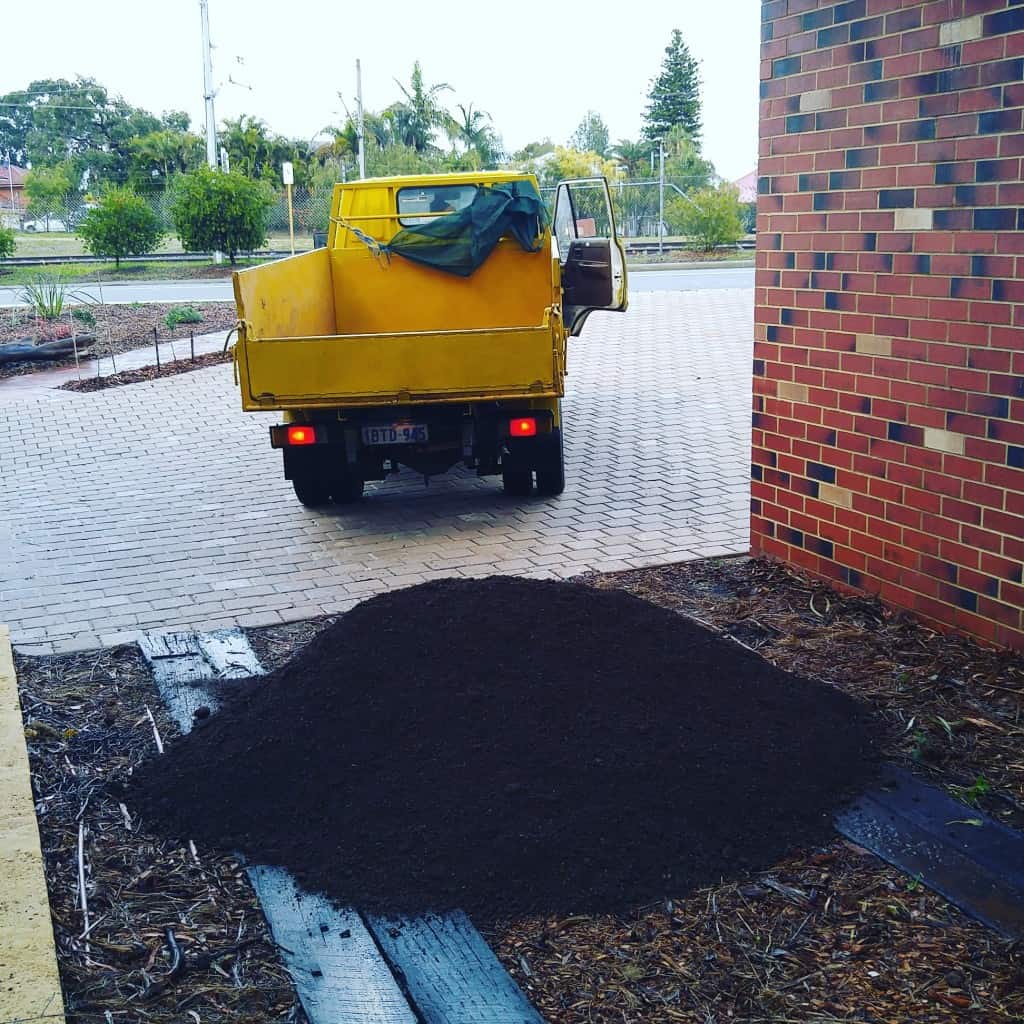
Plastic Free Zero Waste Bulk Soil Delivery Treading My Own Path

Plastic-free zero waste soil delivery.

Compost, Worm Castings and Manure

In the beginning, we decided to buy a few bags (in plastic – shudder) of mushroom compost and animal manure, to get things started. We have two compost bins, but they are yet to crank out any compost. In future I hope to make all of our compost at home. (We also plan to get more bins.)

Zero Waste Plastic Free Gardening Homemade Compost Treading My Own Path

Our two compost bins. We hope to get more so that we can produce all of our own compost at home.

Clearly, if we plan to produce all of our own compost at home we will need more plant matter and food waste to compost! We’ve probably got enough weeds on the verge to provide all the nitrogen we could ever want, but compost needs both carbon and nitrogen. Our solution is to collect excess coffee grounds from the local cafe. We’ll also go leaf collecting to gather some extra carbon for the pot.
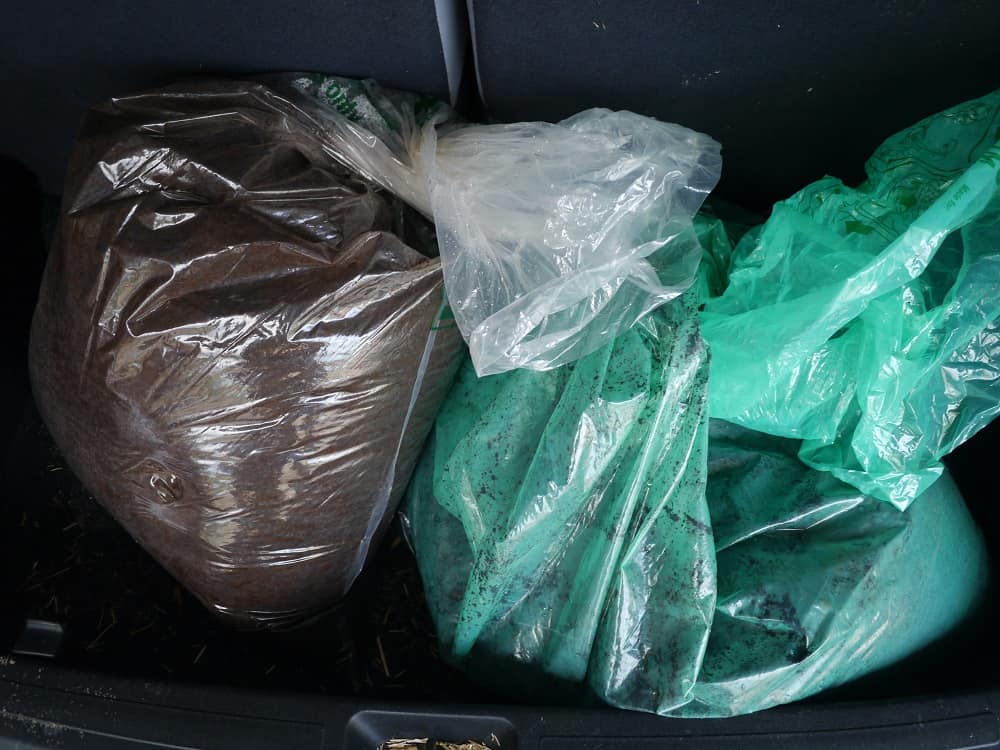
Repurposing Cafe Coffee Grounds Zero Waste Gardening Treading My Own Path

Coffee grounds from a local cafe (they were pre-packaged in plastic). We may have been a little over-eager… I could not lift these bags, they were so heavy! Coffee grounds are a great compost additive though, and we could never drink this much coffee!

Our solution for animal manure was simple. Our friends own a cow, and offered us their “spare” manure! We can provide our own containers and fill them up. Sounds stinky, but it’s plastic-free at least!

On top of this, we still have our worm farm, and can use the castings to enrich the soil.

Adding Nutrients to the Soil

We’d rather not buy plastic bottles of plant food because aside from the waste, we prefer to feed our plants natural ingredients and these pre-packaged feeds are high in salts and urea. The most natural options recommended seem to be kelp, soy bean meal (an alternative to blood and bone), blood and bone, rock dust, fish hydrolysate and pelletized chicken manure.

The soil company who delivered our soil also sell these in bulk, so we can refill our own containers when we need to.

Another, more cost-effective place to source these products is a stock feed place. We didn’t need the huge quantities, but a local lady purchased some and split the bags into smaller amounts for us. If that hadn’t been an option, these ingredients all have a long shelf life.
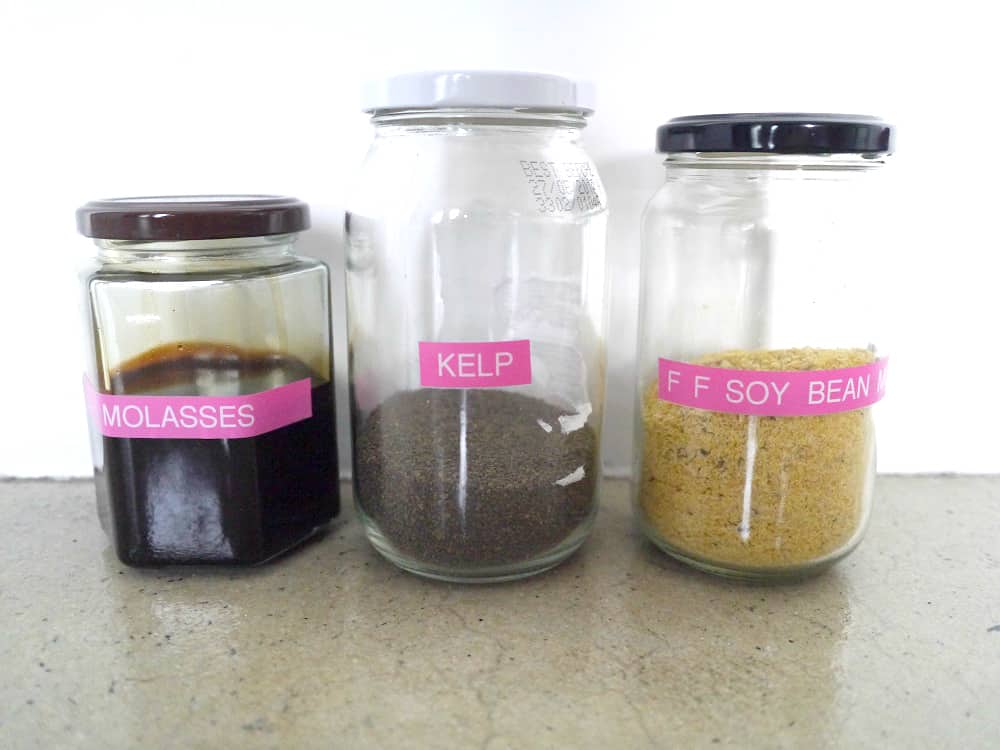
Zero Waste Gardening Kelp Soybean Meal Molasses Treading My Own Path

A local lady purchased these in bulk, and split into containers for a group of us. (She added the plastic jar labels – it’s not something I would have done!)

Seedlings and Seeds

To start with, we purchased a few seedling punnets. I’ve begun to plant seeds in the repurposed punnets and hope that I will be able to grow everything from seed in the future. Even seed packets sometimes contain tiny little ziplock bags.

Much further down the track I hope to be able to save my own seeds. Right now we are at the beginning of our journey. I need to learn what grows well and what we like to eat before I even think about saving seeds! I’m not worrying about the tiny little ziplock bags – for now ; )

We have swapped seeds with our neighbours which has worked well, as most seed packs seem to expire before all the seeds have been planted. This way we double our selection (and they do too) and the seeds are fresher – hopefully meaning that more germinate!
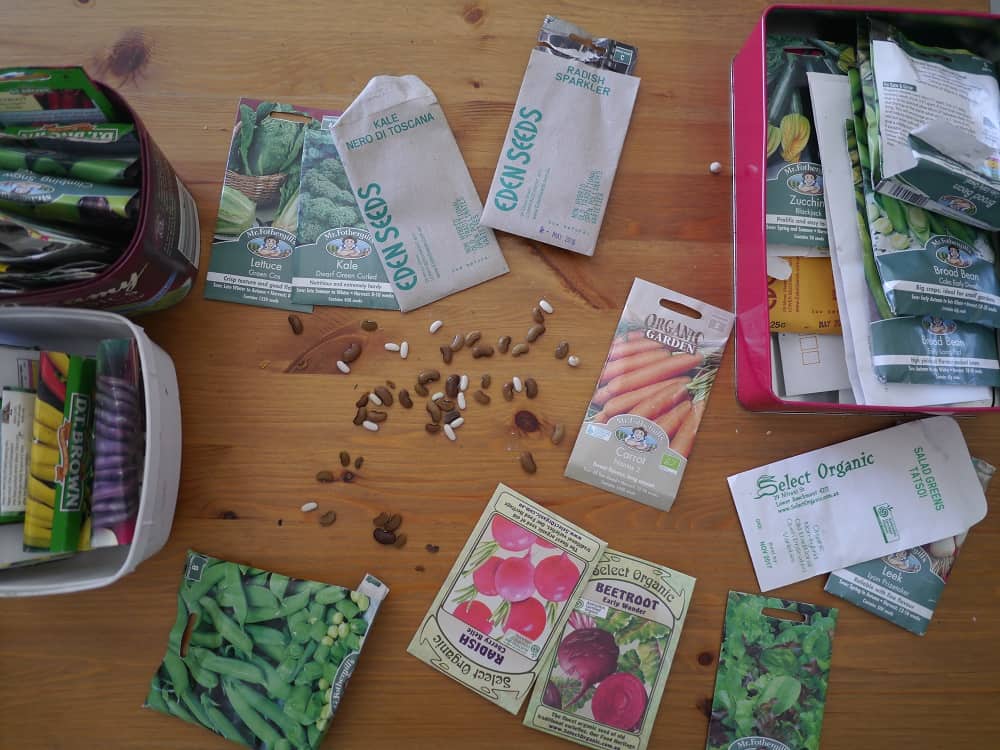
Seed Saving and Seed Sharing Zero Waste Gardening Treading My Own Path

Seeds on the left are our neighbours’; seeds on the right are ours. Seeds in the middle are saved from the beans that were growing in the garden. No idea what the different types are, though!

Repurposing

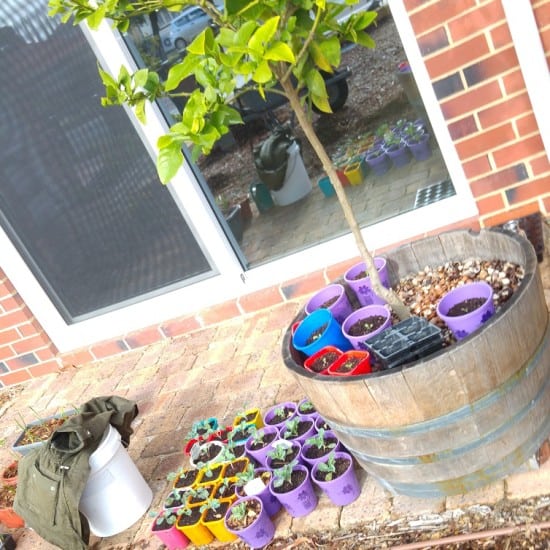
We’ve been able to find heaps of plant pots for free on the verge, which has been great for growing seedlings. Alongside the few seedling punnets we’ve bought, we now have enough to pot on our seedlings to beef them up before they go in the beds.
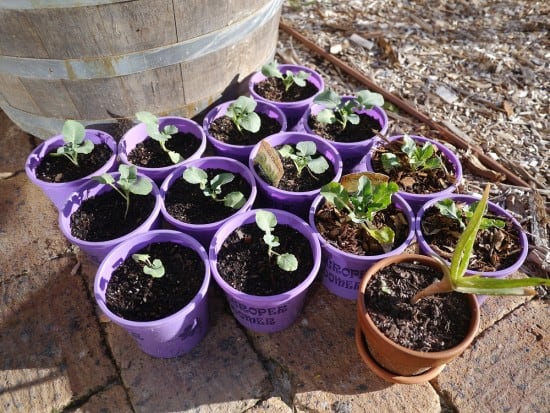
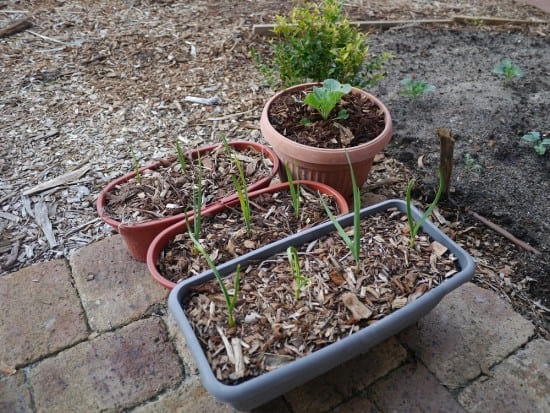
Reusing old plastic plant pots zero waste gardening Treading My Own Path

Gardening in containers Zero Waste Gardening Treading My Own Path

Plastic Plant Pots Zero Waste Gardening Treading My Own Path

Repurposing Plastic Plant Pots Zero Waste Gardening Treading My Own Path

What about the plastic so far?

There is no way I’m throwing any of the plastic we’ve used so far in the bin. Not a chance! But clearly, plastic bags that contained sheep manure and compost are not suitable for recycling as they are. They need to be clean. Such is my dedication that I cleaned them!

I would have just put them all in the washing machine out of laziness but my husband would have killed me (and I didn’t really want to wreck the washing machine). So I washed them all off as best I could outside (in a tub of water which I used in the garden), and then brought them in and scrubbed them in the shower with an old brush.
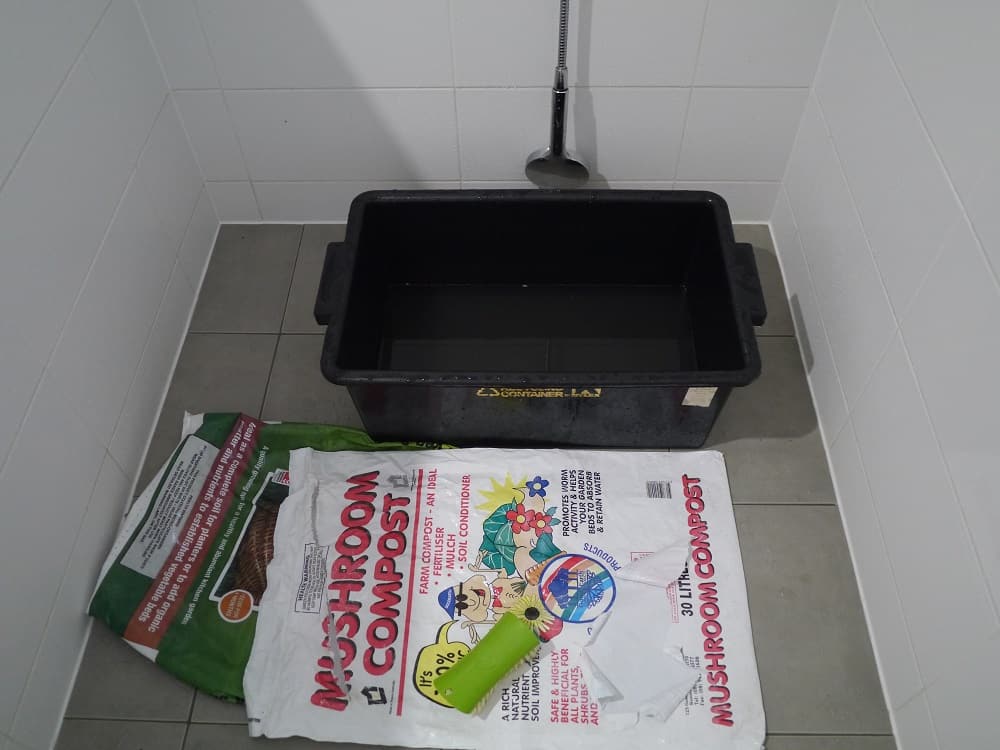
Cleaning old plastic bags Zero Waste Gardening Treading My Own Path

True story. I washed out my soil bags so I could recycle them properly.
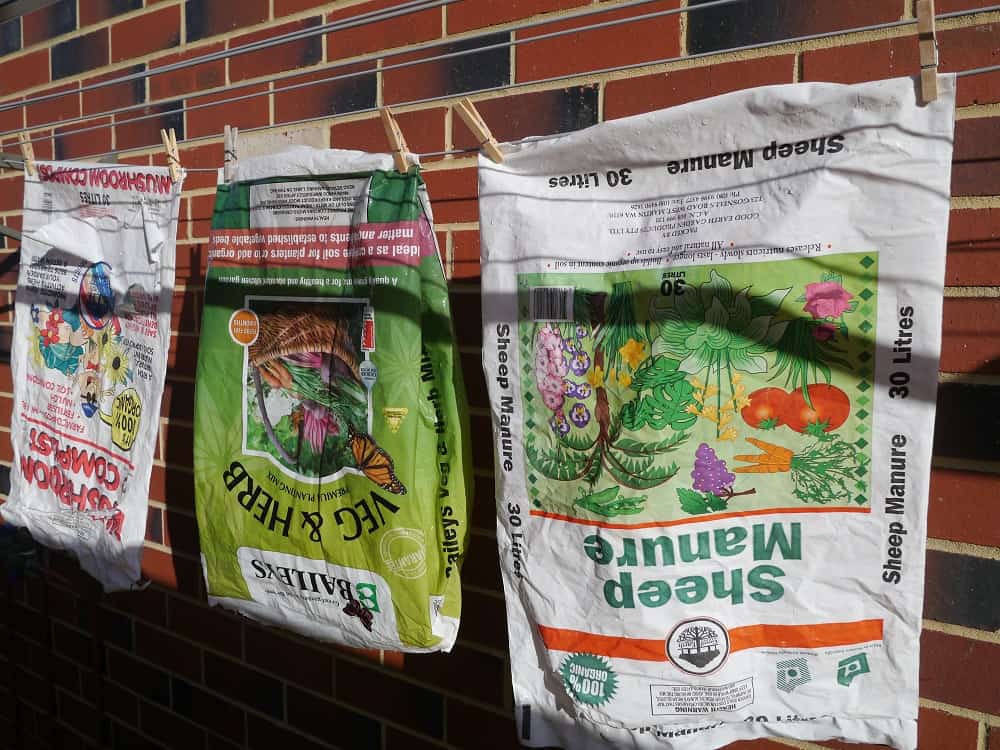
Cleaning plastic potting mix bags Treading My Own Path

Hanging on the washing line to dry.

The only real waste item we’ve generated so far is the plastic labels that come attached to the seedling punnets. Most of them are currently in the garden reminding us what is planted where, but when the season is finished we may not have another use for them. Still, if we can reduce our garden waste to just a few seedling labels then I will be very happy!

Lindsay Miles Treading My Own Path Zero Waste Gardening

Plastic-free zero waste gardening in action : )

Now I’d love to hear from you! Do you have a garden? Do you have any tips for reducing waste and cutting down on plastic? Do you have any suggestions for how I might improve things further, or notice anything I’ll need to think about in the future? Is there anything you’ve struggled with? Do these struggles remain or have you managed to overcome them? Are there any compromises you make that you think are worthwhile? Are you put off gardening because of all the plastic packaging and chemicals? I’d really like to hear your thoughts so please leave me a comment below!

[leadpages_leadbox leadbox_id=1429a0746639c5] [/leadpages_leadbox]

Zero Waste Living: What about Recycling?

The idea behind zero waste is creating no waste, and sending nothing to landfill. That does not mean buying everything in recyclable packaging and simply recycling it, however! Recycling is not a perfect solution, and still uses huge amounts of resources and energy.

Many products (including all plastics) are not truly recycled either, but downcycled, meaning they become an inferior product of lesser quality. These are further downcycled, and eventually downcycled products will end up in landfill.

So no, the zero waste movement is not about recycling. Recycling is a last resort.

However, to create zero landfill waste and zero recycling would be a mean feat indeed, and I have not heard of a zero waster who does not recycle at least a little. We all do our best, and aim to recycle as little as possible, but it is extremely hard to produce no waste at all! (And yes, I do see recycling as waste.)

Whilst people living zero waste lifestyles often share pictures of their landfill trash (or lack of it!), sharing recycling is less common. It is, however, something that I (and I’m sure it’s the same for other zero wasters) get asked about a lot.

How much recycling do I produce in a month? Good question. I always say it’s the equivalent of a couple of waste paper baskets, but what does that actually look like – and what type of recycling waste does our household produce?

Well, let there be no doubts or misunderstandings! This is our entire recycling waste produced in one month – from 1st to the 30th April. We didn’t do anything differently; we didn’t set ourselves any challenges – although our observations did change our behaviour slightly, as you’ll see!

How Much Recycling Does a Zero Waste Home Produce in a Month?

As I said, I do not know how this compares to others, and I’m not particularly interested in comparisons. I want to do the best I can, and I’m always trying to improve. I’m definitely not perfect!

Days 1 – 10:

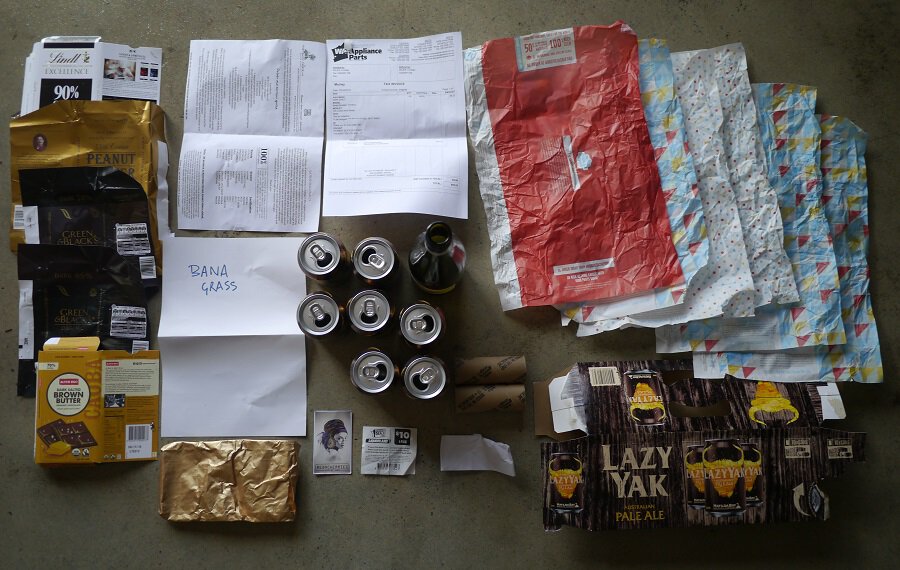
Zero Waste Home Recycling Days 1 to 10 Treading My Own Path Lindsay Miles

Zero Waste Home: Recycling Days 1 – 10

Looking at this you’d think all we consumed was beer, chocolate and toilet paper, wouldn’t you?! I feel I must defend myself. Except there is no defence!

  • Yes, my husband and I did actually eat all 5 of those chocolate bars in 10 days (plus some bulk chocolate too, I’m pretty sure).
  • The beer (which my husband drinks; I don’t like it) is a work in progress. There is a great little shop really close by that sells beer refills, and my husband does go there, but he still has a tendency to buy beer in packaging. Whenever I question him about it, he points out that he didn’t sign up for zero waste living, only the plastic-free part! One of his favourite brands has recently been made available in aluminium cans, which is great from a recycling point-of-view (all glass in WA is crushed into road base rather than being made into new bottles). However, lots of cans are BPA-lined, so the health aspect isn’t great. Although that could be said for drinking beer…
  • No, we didn’t actually use that much loo roll in 10 days! I keep the paper for other uses, but my husband had a clearout of the cupboard. The two cardboard tubes are a more accurate! (I tend to keep these for planting seedlings, not sure why these are here.)
  • The rest is a couple of invoices, a business card (nowadays I hand these straight back so this must be an old one) and a couple of scrappy bits of paper. The gold paper is from one of the chocolate bars (the others had aluminium foil, which I’ll come back to later).

Days 11 – 20:

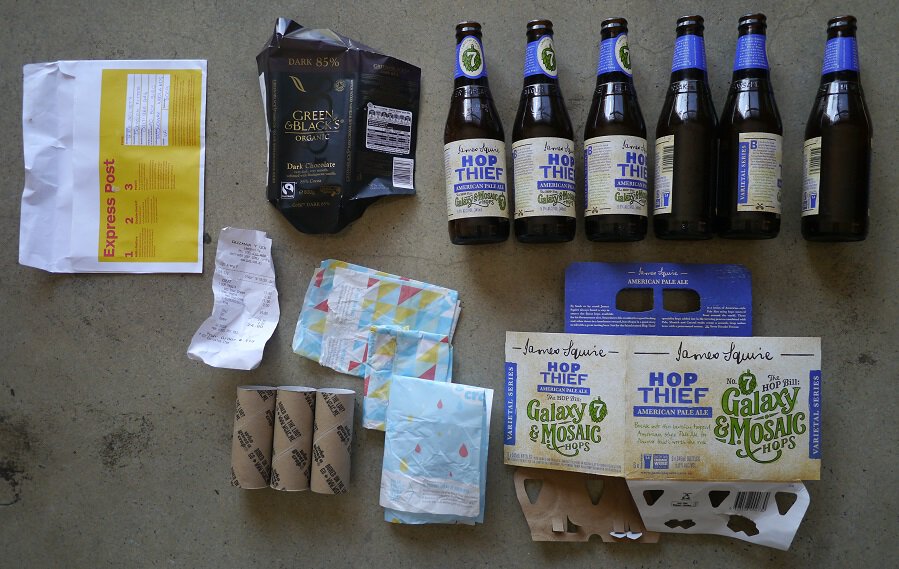
Zero Waste Home Recycling Days 11 to 20 Treading My Own Path Lindsay Miles

Zero Waste Home Recycling: Days 11 – 20

This period is better! I’ve controlled my chocolate consumption (I was a little shocked at the previous picture).

  • Three rolls of toilet paper and their wrappers. Some zero wasters use “cloth” which means reusable fabric; my husband and I don’t – and there is no way I’d ever be able to persuade him to make the switch! (I’ve talked about this decision on more detail here.)
  • More beer – this time in glass. The glass will get crushed and turned into road base which is a little depressing.
  • One chocolate wrapper, one envelope that came in the mail and a receipt.

Days 21 – 30:

Zero Waste Home Recycling Days 21 to 30 Treading My Own Path Lindsay Miles

Zero Waste Home Recycling: Days 21 – 30

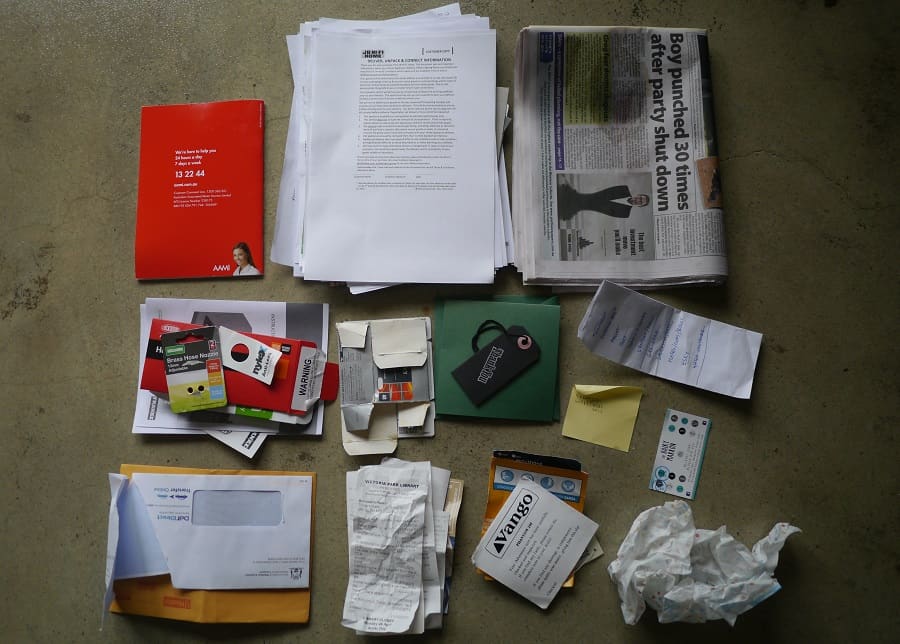
This looks like a lot (and it is).

  • The big stack of papers on the top row in the middle are the result of my going through all of our folders. I do this every 6 months or so to remove all the unnecessary stuff. The pile is about an inch thick and contains old statements, letters, documents, notes, papers from some workshops that I ran, and receipts/invoices.
  • The local newspaper – no idea where this came from but my husband is a fan of the community newspaper, so I guess he picked it up to read.
  • An insurance brochure – uncovered whilst going through our folders.
  • Random bits of cardboard packaging and instructions from when we moved in to our new home, including the packet the keys were in and instructions on how a draining board works. Useful stuff!
  • A very old ibuprofen packet.
  • A “Thank You” card that I didn’t have the heart to give back.
  • A list, a post-it note and a loyalty card for somewhere we haven’t been since forever.
  • Another toilet paper wrapper.
  • The labels from my tent which were still attached to the bag – and I bought this in 2003!
  • A small handful of receipts. I generally decline receipts but sometimes we need them and sometimes they sneak in.
  • Two envelopes from mail that we received.

So that’s it – how much recycling we produced in 30 days. Except that’s not quite it. This is the stuff that was put into our bin for kerbside collection. There’s a little more that wasn’t… yet.

Aluminium Foil:

Zero Waste Home Aluminium Recycling Treading My Own Path Lindsay Miles

Zero Waste Home Aluminium Recycling from February to May

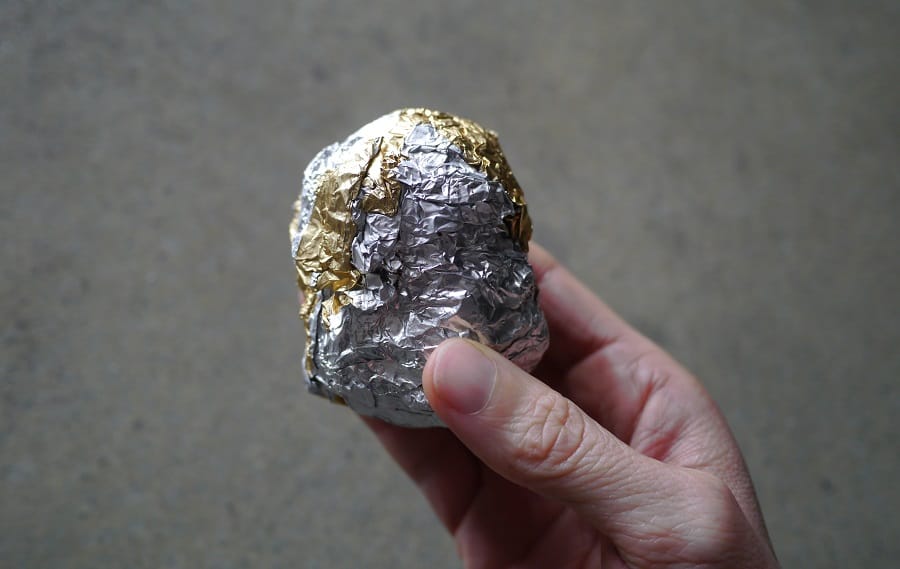
You may have noticed that I do have a small chocolate bar habit, and with each bar comes an aluminum wrapper. Aluminium can be recycled but single wrappers are a bit small for the machinery.

I save mine up until it’s a ball about the size of an Easter egg, and then I place that ball in the recycling. This is all the foil we’ve collected in 3 months (Feb – May). Once the ball is big enough it will go out for recycling.

Steel bottle tops:

Zero Waste Home Steel Bottle Tops for Recycling Treading My Own Path Lindsay Miles

Zero Waste Home Steel Bottle Tops in April

Because my husband is switching to cans we have less of these. They can be recycled, but are so small that a single one will slip through the process. To recycle, collect in a tin can, and once the tin can is half full squish it in the middle to stop the bottle tops falling out. The can can then be put in the recycling and the tops should be recycled.

Soft and noisy plastic:

Zero Waste Home Soft Plastic Recycling Treading My Own Path Lindsay Miles

Soft and noisy plastic recycling Feb – May

Soft and noisy plastics can be recycled (or rather, downcycled into garden furniture) but they are often not recycled by kerbside collection systems. In Australia there are bins inside Coles supermarkets where these can be deposited.

I dislike plastic with a passion and try to avoid buying any, but the odd piece comes my way. I save it all up and then take it to the supermarket – usually a couple of times a year.

This is what I’ve collected since February (so 3 months) – it weighs 54g. It’s more than usual because when we moved in to our new home, the draining board, draining rack and chopping board were all wrapped in plastic.

What I’ve landfilled:

Zero Waste Home Landfill Waste Treading My Own Path Lindsay Miles

Two months of landfill waste

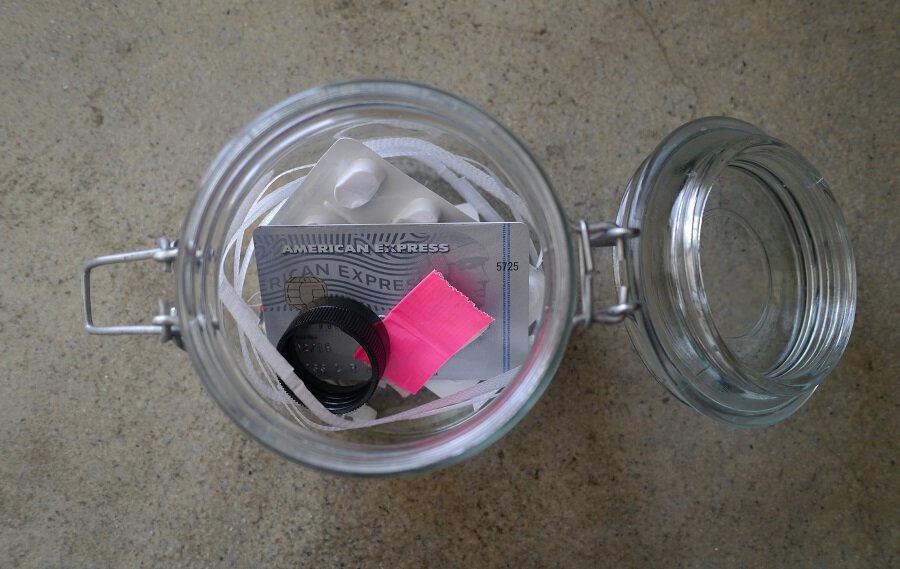
For completeness, I thought I’d add a picture of my landfill waste. I’ve been collecting it since March 1st this year. Previously I was reluctant to as I thought it was really gimmicky – but then I realised that it would be a useful visual prop when I give talks.

So this is two months worth of landfill. It contains: the backing from a sticker, a piece of pink tape (that was used to seal the thank-you card above), an old phone SIM card, an elastic band entwined with nylon fibre, an ibuprofen blister pack, an old credit card, two plastic bottle lids that have broken and some packing plastic binding.

There you have it – my complete recycling waste and landfill waste from my zero waste home for the last 30 days.

I’m not perfect, and I don’t claim to be.

If you can do better that’s great – and I’d love to hear your tips! On the other hand, if you think this looks impossibly inachievable, remember that I began my journey four years ago.

It’s taken me 4 years to reduce my waste to what I’ve shown you here. Personally, I’m pleased with how far I’ve come, and I hope that in the future I can reduce my waste even further.

Now I’d love to hear from you! Tell me – what did you think? Do you have any ideas how I could reduce my waste further? Can you spot any glaringly obvious areas for improvement? (Please don’t say “eat less chocolate” – I’ve already figured that one out!) Do you have any ideas where I can recycle the things in my landfill jar – particularly credit cards and sim cards as I suspect I’ll have more in the future? What do you think about the idea of people sharing their waste? Do you find it motivating or disheartening? Do you share your own waste progress (if so, tell me the link so I can have a look and maybe learn something new)? Any other thoughts? I really love hearing your thoughts so please leave a comment below!

[leadpages_leadbox leadbox_id=1429a0746639c5] [/leadpages_leadbox]
A Guide to Zero Waste Camping

Last weekend my husband and I went camping together for the first time (yes, despite being together almost 5 years, this was a first for us). We’d both been camping many times in our past lives, and we both enjoy it. Why it took us 5 years to get around to it together I’m not quite sure, but it did.

I suspect it has something to do with all the “stuff” required. We didn’t want to buy a whole heap of new (new for us, at least) stuff and we had nowhere to store it anyway.

Eventually it was a friend of ours who prompted us into action. She initiated the trip, and came up with a list of all the stuff we’d need (for some reason I’d put the idea of making a list in the “too hard” basket). What we didn’t own (we own a small tent, one sleeping bag and one roll mat – not the stuff that comfortable two-person camping trips are made of) we needed to borrow.

Aside from never camping with my husband before, there was one other big change to the camping of years ago. Back in those days, I wasn’t zero waste. I wasn’t even plastic-free. (I did always bring my recyclables home for recycling, at least.)

How would we manage?

Well, I like a challenge, and I don’t like to admit defeat. The suggestion from my husband that I possibly entertain the idea of bringing a tin of tomatoes on the trip almost ended in divorce (okay, I exaggerate, but there was heated discussion from both sides).

I’m pleased to say, despite the doubt, that zero waste camping is not nearly as hard as you might think. We had a great time, with only one mishap (which I’ll tell you about at the end). I suspect this will be the first of many trips!

What I Learned from our Zero Waste Camping Trip

Before I start, I want to point out that this was a regular camping trip, and we had a car for transport. We were in a National Park with no facilities, so we did have to bring all of our own food and water. We weren’t backpacking, however, and we didn’t have to carry anything very far.

What you don’t have, you can borrow.

There was a lot of equipment that we didn’t own, and I wasn’t sure how easy it would be to borrow. In the end, we had far more offers than we needed. Our friends and family were more than willing to lend us their gear.

I wonder if it’s because people who go camping really love camping, and want others to experience that same enjoyment; or whether it’s because camping equipment doesn’t get used terribly often and people like to maximize the value by letting others use it too.

Either way, it saved us having to source a heap of things we might have only used once. Now we know we’ll go again, we will probably invest in a couple of things – a second sleeping bag would be good!

We’re also clear on what things weren’t useful and would be a waste to purchase.

You need to be (slightly more) organized.

Camping always tests organization skills, particularly when you have to supply all of your food and water. Zero waste definitely adds another element to that, because there is no easy solution to add packets of “convenience foods” as reserve.

That doesn’t mean to say it’s complicated. In fact, all it took was a little bit of meal planning. Thinking about the kinds of foods that were easy to cook in a pan on a stove (pasta, rice, couscous) and what could accompany them (vegetables and condiments). Thinking about what could be eaten without cooking (crackers, fruit, avocado). And of course, thinking about zero waste snacks (nuts, chocolate).

Rather than the tin of tomatoes, I made a jar of pesto to take with us and we used that to make pasta sauce. Crisis (and waste) averted!

You will eat real food (which is far more satisfying anyway, and much better for you)

I’m referring to the point above. The trouble with bringing all that pre-packaged processed food for emergencies is that “I-can’t-actually-be-bothered-to turn-on-the-stove” becomes the emergency, and all the packets of goodness-knows-what are opened in lieu of eating proper actual food. Zero waste camping eliminates this.

Because there is more planning, there is actual food to eat, and even extra actual food for emergencies. Ultimately this means better meals and infinitely better nourishment – which makes the whole trip far more enjoyable. It’s not like we’re too busy doing other stuff to cook anyway – we’re in a forest in the middle of nowhere!

You will pack (a little) more stuff

That’s always the trade-off with zero waste versus minimalism: you need (slightly more) stuff. No disposable anything meant more containers. Because everything needed to be sealed and airtight, this meant tins, glass jars and Pyrex, which is far more bulky than disposable plastic packaging.

Still, we had a car, we didn’t have to carry anything and it created no waste, so it was worth it.

You’ll be bringing everything home with you

Everything we took with us, except the food we actually ate, came home with us. When we were packing the car it was a bit of a mission to get everything to fit, and we were thinking at least there will be less on the way home – but actually, there wasn’t much difference. Containers don’t collapse or reduce in size when they are empty like packets do.

Actually, this doesn’t matter at all – how many times did I opt for the single-use convenience option in the past, I wonder? It’s ironic that  heading out to spend time in nature is often accompanied by unsustainable and environmentally damaging choices.

I’m glad that I make better choices now. The only rubbish we generated was food waste, which we collected and composted at home.

There were plenty of other highlights, of course. Spending time in nature, the fresh air, the exercise and the mindfulness of it all. Discovering that my husband and I are completely compatible at camping – hurrah (tinned tomatoes aside)! Realising that 5 years is way to long (we’ve already planned two more trips).

The mishap that I referred to earlier? The last afternoon, it began to rain… and it didn’t stop until we left. It didn’t spoil our day – there was a camp kitchen area with shelter, so we used that. The tent roof didn’t let a drop of water in (which was a relief since it’s been unused for so long).

In fact, on the final morning when we woke up, my husband and I were marvelling at our tent’s ability to stay dry, when my husband put his hand on the tent floor – to discover that there was a flood directly underneath the tent. We were sitting in 2 inches of water, separated only by a thin layer of tent, and anything in contact with the floor was wet (luckily, our roll mats protected us)!

Needless to say we were up, packed and heading back home remarkably quickly that morning (and thankful that we had remained dry and warm throughout)! Ah, the joys of camping ; )

Now I’d love to hear from you! Do you go camping, and if so, what are your essentials? What have you learned to do without? How do you try to minimize your waste when you take trips? Does the idea of zero waste camping seem like too much of a struggle? Does the thought of all the equipment and organization required put you off? Or are you a pro at packing – in which case, do you have any tips to share? What’s your best camping mishap story?! Please tell me your thoughts (and stories) in the comments below!

[leadpages_leadbox leadbox_id=1429a0746639c5] [/leadpages_leadbox]
DIY Sourdough Starter + Zero Waste Crackers

Making a sourdough starter from scratch is one of the easiest things you can do, and it doesn’t need any special ingredients. Literally all that is required is flour, water, a bowl, a spoon, and a little bit of patience. Even if you’re not sure you want to start baking sourdough every week (although I assure you, once you start, you won’t want to stop!) the sourdough starter can be used to make sourdough crackers.

Crackers are far quicker and simpler to make than sourdough bread, but equally delicious… plus crackers are one of those things that are impossible to find zero waste or plastic-free in my experience. Homemade, simple, delicious, waste-free… what’s not to love?!

To make a sourdough starter from scratch, we utilize the natural yeasts and lactic acid bacteria present on the flour. Another term for it is wild fermentation – how cool does that sound?! That’s how people made bread and other fermented products for thousands of years, before commercial yeasts were available. They harnessed the power of nature.

If we’re going to use the natural yeasts and bacteria present on the flour, then I recommend buying the best flour that you can find. Once your sourdough culture is established you can relax a little, although I’d always recommend buying the best ingredients that you can afford. If your tap water is chlorinated, fill a bottle and leave at room temperature or in a sunny place for a few hours to let the chlorine gas dissipate – you don’t want to kill the starter before it’s started!

How to Start your Sourdough Starter

Mix together 50g flour with 50g water in a bowl (1 gram of water is the same as 1 ml water). You can use more but don’t use too much less as it will be much harder to work with. However much you use, you want the flour:water ratio to be 1:1.

At this point it will look like a dough, and it will smell like wet flour. Cover the bowl with a tea towel and leave on the side at room temperature (if you’re home is cold or it is winter, a warmer place will help get it going faster). Stir every few hours. If a skin forms on top, simply stir it in.

It may not seem like much is happening at the start, but if you pay attention to the smell you will notice that it starts to smell less like flour and has developed a sour smell. This is a sign that it is working. Hurrah! Look out for bubbles forming in the dough. In the beginning there will only be a couple, but it’s another sign that your starter is beginning to do its thing.

After a couple of days of stirring, you will need to feed your starter. Even if you’re only noticing a couple of bubbles, the starter will dry out over time, and as it sticks to the side of the bowl and hardens the volume tends to decrease, so feeding helps refresh it. Take another bowl, add 10g of your starter to it, and then add 50g flour and 50g water to this (you can use other volumes, but the ratio should be 1:5:5 starter:flour:water). Stir thoroughly, and cover with the tea towel.

Leave the remaining leftover starter in the original bowl, cover with a plate and store in the fridge. This will be used for making the sourdough crackers later.

Keep stirring the new starter every few hours (this doesn’t need to be exact, just whenever you remember). You should notice that the bubbles are becoming more frequent (you may not see a lot, but more than you saw at the start). Depending on how active your starter is getting, you can either feed again in 24 hours, or leave for a couple of days.

To feed, repeat as before. Take 10g of your active starter and add to a new bowl with 50g flour and 50g water, and stir well. Any leftover starter can be poured into that bowl sitting in the fridge with the original starter.

Each time you feed, you should notice your starter getting a little more active. You’ll want to feed it at least 5 times, once a day (timing is not that important) before it’s ready – and by ready, I mean active.

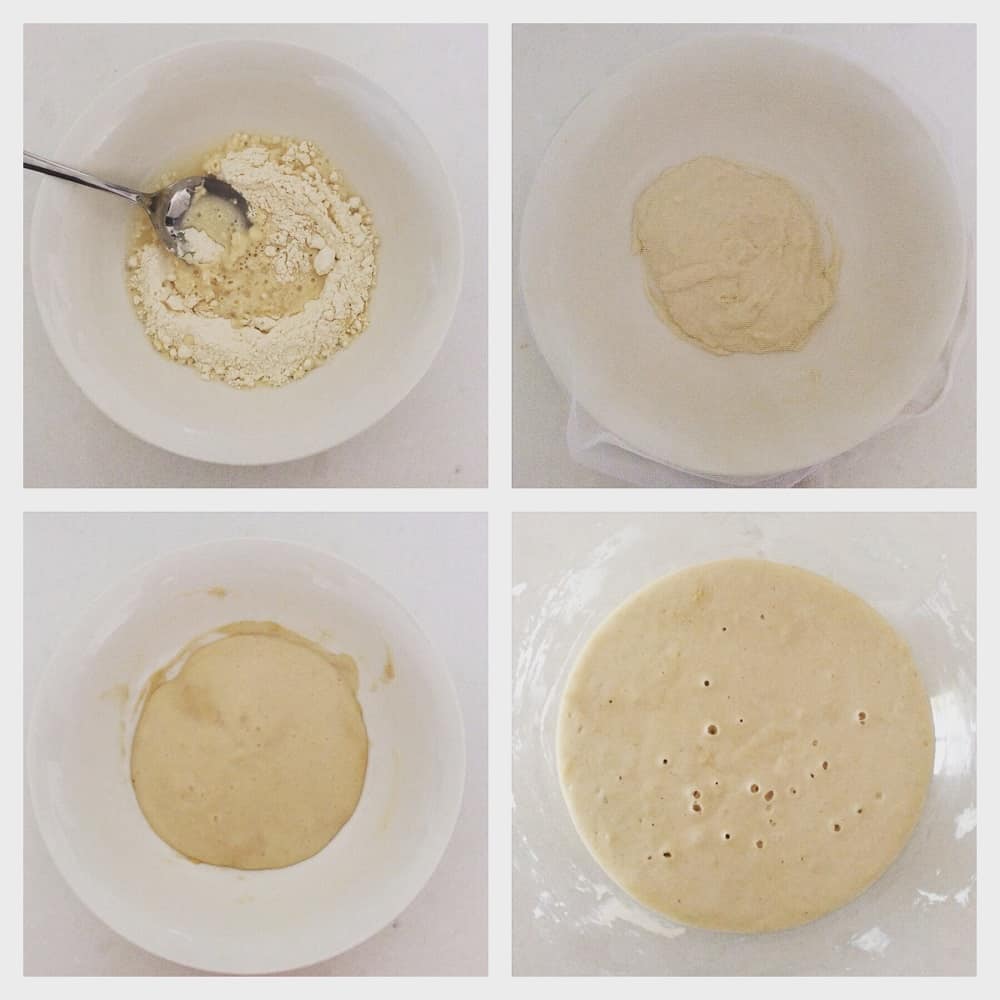
Sourdough Starter from Scratch Treading My Own Path

The four stages of starting your own sourdough starter from scratch. Stage 1: mix flour with water. Stage 2: cover with a tea towel or gauze – you want air to get in, but nothing nasty! You will need to stir every few hours. Stage 3: you will notice bubbles begin to appear. Your starter will begin to dry out a little. Stir the drier parts in, but as it gets drier you’ll need to feed it. That means taking a small part of this and mixing with fresh water and fresh flour (save the discard to make crackers). Step 4: after a week and a few feeds, your starter should be bubbling away quite happily.

Maintaining Your Sourdough Starter

Once your sourdough starter is ready, you can either store on the kitchen counter, or in the fridge. Store in a jar with a loose-fitting lid, or with a fabric circle secured with an elastic band. You want air to get in, but no creepy-crawlies. If you keep it on the kitchen counter you’ll need to feed it every day. If you keep it in the fridge you can feed every 1-3 weeks (once a week is best, but it will be fine if you feed it every three or so). I keep mine in the fridge.

When you want to feed your starter,  allow to return to room temperature if it has been in the fridge. Keep the ratio the same 1:5:5. Keep the discard in the fridge until you are ready to make crackers.

Zero Waste Sourdough Crackers

Sourdough Crackers Treading My Own Path

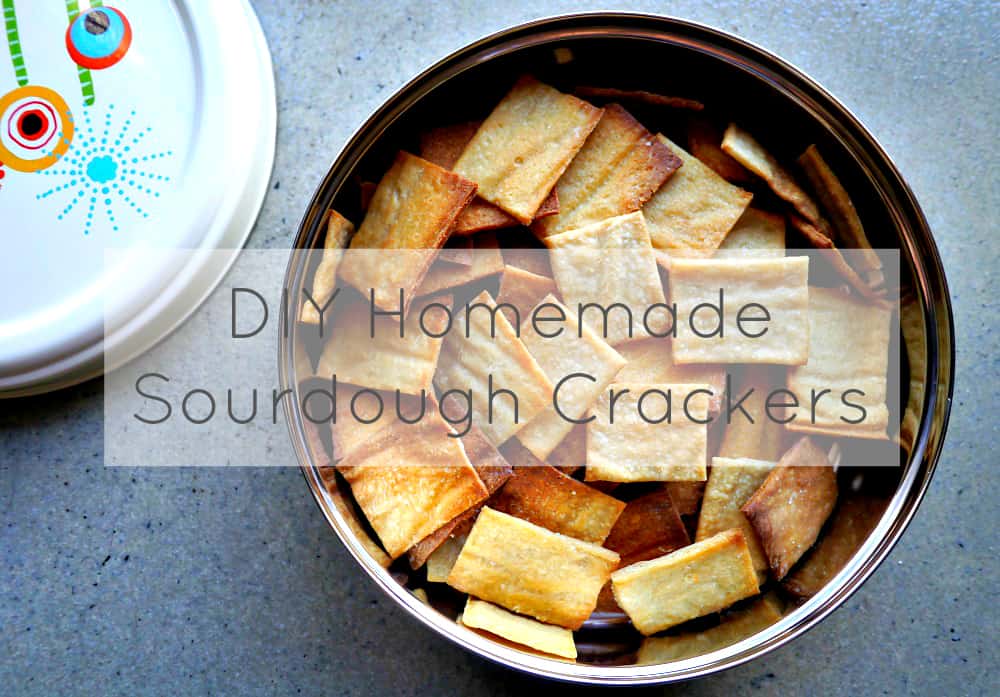
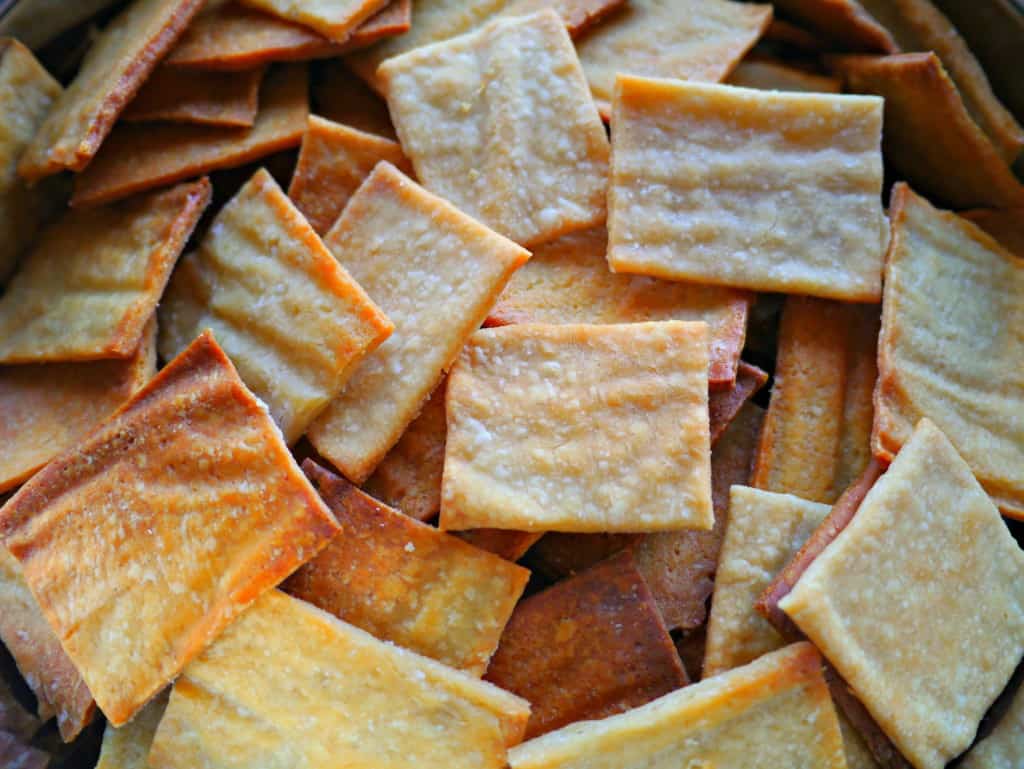
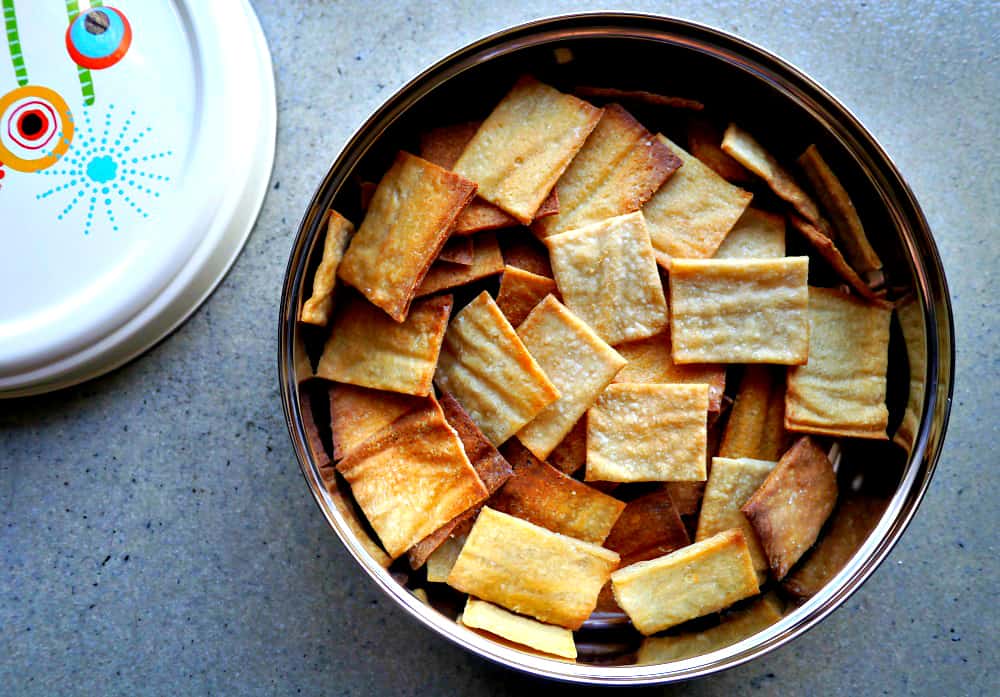
Homemade sourdough crackers – simple to make, zero waste, plastic-free and no nasty additives. What’s not to love?!

Once you’ve made your sourdough starter you should have a bowl of discarded starter sitting in your fridge, waiting to be made into crackers. I have to thank the Zero Waste Chef for this idea, as previously when I had excess sourdough starter I’d throw it away. It felt so wrong, but that’s what all the recipes tell you to do. Turns out, they are all wrong! Throw nothing away, and make crackers instead. Thanks Anne-Marie!

This recipe is a combination of the one by the Zero Waste Chef, and also some notes I have from a Plastic Free July workshop back in 2012 which has no references except a comment that the writer was called Katie.

Ingredients:

215g discarded sourdough starter
3 tbsp olive oil (30g)
100g plain flour
1/2 tsp salt
1/4 tsp bicarb soda

Extra olive oil and salt to top.

I found that when I made a starter from scratch, feeding every day for 5 days left me with 215g starter. But you change change the quantities of flour to starter, they don’t need to be exact – just remember it’s approximately twice the starter to flour. You want to make a dough, so if it is too sticky add more flour.

The moisture in the starter also varies depending on how fresh it is. If you need to add more flour, do so!

Method:

Mix the olive oil with the starter and stir until combined. Add the dry ingredients to the starter / oil mix and combine first with a spoon, and then with your hands. If it is still sticky, add flour in small quantities until you have a dough. Knead to ensure it is smooth.

Place in a glass bowl, cover with a tea towel or a plate (or both!) and leave to rest at room temperature for 8 hours (or overnight). This allows the dough to sour and develop flavour.

After 8 hours, divide the dough into 4. One at a time, roll the ball out onto a baking sheet lined with baking paper using a rolling pin (yes, my zero waste kitchen contains baking paper. I re-use each piece several times. You can read more here). The reason for the paper? After waiting 8 hours, I don’t want to take the risk that my crackers will stick to the metal tray and burn.

Roll the dough out to between 3 – 5mm thickness, trying to ensure it is even. Trim the edges, and cut into rectangles with  sharp knife.

Brush with olive oil, and then sprinkle salt on the top.

Bake in an oven at 150°C (350°F) for 8 minutes, then turn over and bake for another 8 minutes. You will find that the crackers on the edge cook a lot faster than those in the middle, so if you want to remove those sooner you’ll avoid them over-cooking. You want them to look golden but not too brown.

Cool on a wire rack and store in an airtight container.

TIPS:

  • 8 hours in the ideal, but this recipe is really flexible. You can make the crackers after only leaving the dough for 30 minutes (but longer is better). If you forget and leave them longer, you will still have good crackers.
  • The dough can be frozen or refrigerated if you want to make a big batch of dough and keep some for later.
  • I would guess they would last a week, but I’ve never been able to find out as they all get eaten long before! They don’t lose their crunch after storing so they are definitely something that can be made ahead.
Sourdough Zero Waste Crackers FINAL

Zero Waste Sourdough Crackers

As always, I’d love to hear from you! Do you make your own sourdough, and have I tempted you to give it a go? Do you already make your own crackers? Do you have any recipes and tips you’d like to share? What toppings and flavours do you think would work best? Please tell me your thought in the comments below!

[leadpages_leadbox leadbox_id=123a865e9839c5] [/leadpages_leadbox]

My Chemical-Free, Natural (and edible) Skincare Regime

My husband remembers the time, way back in our very early days of dating, when we took a holiday together and almost half of my luggage consisted of toiletries. I would like to tell you he remembers this fondly, but rather he shakes his head at the memory and tells me he was thinking: “who is this girl?!” Such was his despair (although I didn’t know it at the time) that it’s probably a miracle our relationship made it beyond the holiday…

The skincare and body products I use today are such a far cry from back then that now I find it hard to believe myself. In those days, I bought into plenty of the marketing ploys. I figured expensive products were better for me. I reasoned that beautiful celebrities endorsing a product was a reason for me to buy it. I trusted the assistants that told me I needed several different products to do the same job. What this really meant: I gave big multinational pharmaceutical companies my money (far too much of my money) in order to purchase (mostly) unnecessary products with questionable ingredients. I consumed a lot of wasteful packaging, and my bathroom was always cluttered. I was locked into a cycle of buying and stockpiling products.

Today, I’ve reduced what I use to the essentials. I’ve simplified. Mostly I use ingredients, and I can find almost all of them at the grocery store, and at bulk stores. I tend not to buy pre-made products: nothing I use has more than a handful of ingredients that I mix together as I need. There’s no pressure. Ingredients are rarely on sale or marketed cleverly in an attempt to make me buy more, so I do not buy more than I need.

My Chemical-Free (Edible) Skincare Routine: Then vs Now

When I talk about chemicals, I’m referring to man-made, synthetic and petroleum-derived products. For me, chemical-free means natural and safe. Not everything that occurs in nature is safe, of course. My rule is: if it’s edible, then I use it. If it’s not, then I don’t.

Skincare: Face

THEN: Back in my pre- plastic-free and pre- zero-waste days, I used eye cream, a day moisturiser and night moisturiser, usually purchased from one of those fancy counters in the shopping malls. I used cleanser and toner. Occasionally I would be persuaded to buy some other nonsense product by the sales assistant like skin brightener, or serum, or whatever they were trying to plug that month. I often had random packets of “free sample” cluttering my space that I rarely used. I used a face scrub to exfoliate, usually purchased from a chemist or supermarket. I purchased lip gloss, but rarely used it.

NOW: I replaced all of the moisturizers with a single product: oil. Moisturisers are made with oil, water and emulsifier to bind them together, whereas oil is just that – one ingredient. Water-based products like moisturisers need preservatives to stop them going bad, whereas oils are fairly stable and do not. Almond oil is my staple. If I’m away from home, or I have run out of almond oil, I will use olive oil or coconut oil.

To clean, I use bar soap. I don’t make my own, I buy from a local lady who specialises in natural skincare. It’s made from a blend of coconut oil and olive oil and doesn’t dry my skin out. I don’t use a product to exfoliate, I use a flannel. It works much better, I find.

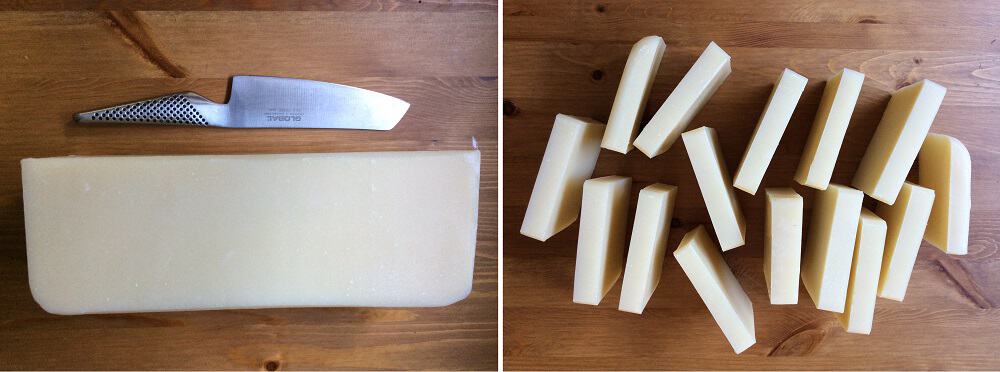
Bulk Soap Chopped Into Bars Zero Waste Natural Beauty Treading My Own Path

I buy soap in 2kg blocks because this way it is packaging free and I can cut the bars myself to a size I like. All you need is a knife: soap is very easy to cut.

Bodycare:

THEN: I used store-bought deodorant, body moisturiser or lotion, a razor with refillable blades and shaving foam. I used handwash to wash my hands, and shower gel to wash in the shower. I had a separate hand & nail moisturiser. I used store-bought toothpaste to clean my teeth.

NOW: I make my own deodorant using bicarb, corn flour, coconut oil and essential oil (you can find the recipe I use here). I never had much luck with store-bought chemical-free brands but this stuff actually works! (Added bonus: I can buy all the products packaging-free.)

I no longer have a separate body lotion or hand lotion and use almond oil. Ditto with the shaving foam. I use an epilator mostly which is used on dry skin, but if I use a razor blade then I use almond oil. I use a body brush to exfoliate rather than products with “exfoliating properties” (usually plastic microbeads).

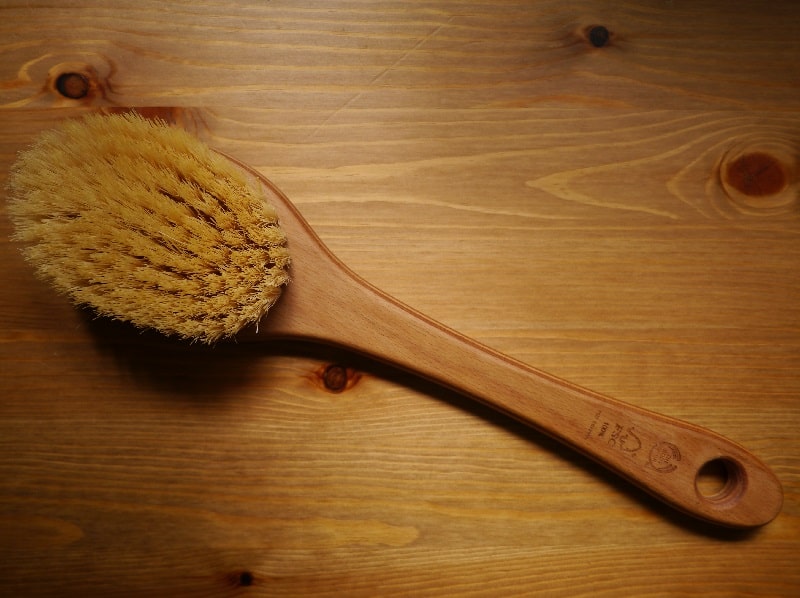
Dry Body Brush

A body brush replaces the need for exfoliating products. This one is made of FSC wood with natural bristles. I’ve had it for almost four years and it still looks (almost) like new.

I use bar soap (the same as I use to wash my face) to wash my hands and body.

I make my own toothpaste using very similar ingredients to those in the deodorant (you can find the recipe I use here, and it has been approved by my dentist). When I first made it I used peppermint essential oil, as I do with the toothpaste, but I’d get confused which container was which, and I didn’t enjoy smelling like toothpaste, so now I use a different one.

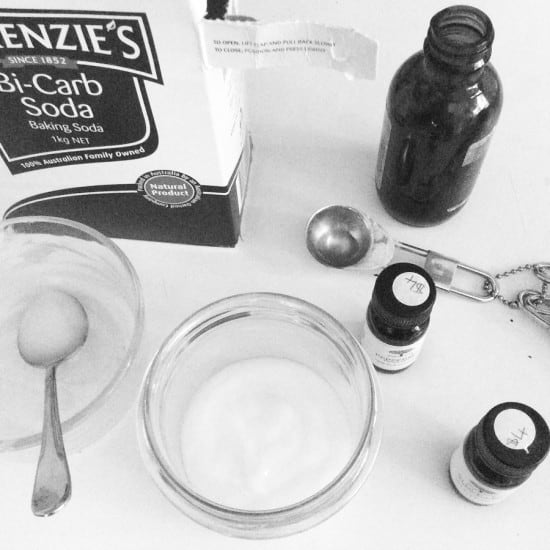
DIY Homemade Toothpaste Zero Waste Plastic Free Treading My Own Path

I used to make toothpaste with glycerine, but now I use coconut oil as I couldn’t find glyerin in bottles without a plastic lid, and I already use coconut oil for many other things. This kilo of bicarb has lasted a couple of years, but I can now buy in bulk so won’t need the box – or to buy a kilo at once! The essential oil bottles I get refilled.

Hair Care:

THEN: I used Herbal Essences shampoo and Herbal Essences conditioner (the one in the yellow bottle). They changed the packaging and then tried to discontinue the product at one point, and I remember trawling all of the discount chemist stores in a mild panic trying to stock up on these two products. I used a hair serum that was a salon-owned brand only available in the UK and only at the salons, so getting it was a real pain. When I moved to Australia I purchased 6 bottles to bring with me, and when my sister came to visit she brought some with her too (this was all pre-Plastic Free July 2012). My haircare routine caused me so much stress, but I was terrified that my curly hair would be unmanageable without these products. I did use Frizz-Ease serum on special occasions, too. I guess you’d say their marketing campaigns were very effective on me!

NOW: I wash my hair with rye flour, and I use white vinegar as a conditioner. It makes my hair soft, shiny and manageable, without the need to apply any other products. I have used bicarb soda in the past but I prefer rye flour – it’s plant-based (bicarb is mined), has a gentler pH, is easier to make a paste in my hand, and makes my hair shinier than bicarb. If rye flour is not available, I switch to bicarb. I prefer white vinegar to rinse my hair over apple cider vinegar. The smell dissipates far more quickly, and my hair feels and looks better. White vinegar has a lower pH than apple cider vinegar (meaning it is more acidic) so I dilute white vinegar with water more than I would dilute apple cider vinegar with water before using.

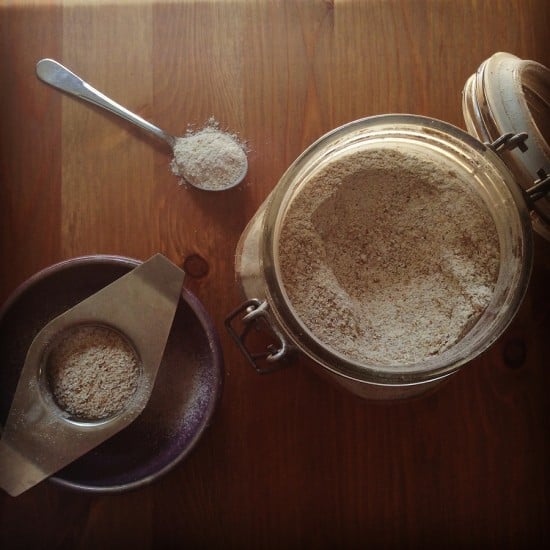
Rye Flour Shampoo Zero Waste Treading My Own Path

I buy rye flour from the bulk store, and I sieve with a tea strainer before using in my hair to remove any big flakes. I also find towel drying my hair removes excess flour. When it’s dry, I give my hair a good shake to remove any flour that might remain.

I don’t use any hair serums or gels. I find the vinegar does a good job on its own. If my hair was particularly frizzy I would just rub a little almond oil in my hands and run my hands through my hair.

A summary of all the ingredients I use now:

Skincare Regime Zero Waste Bathroom Products Treading My Own Path

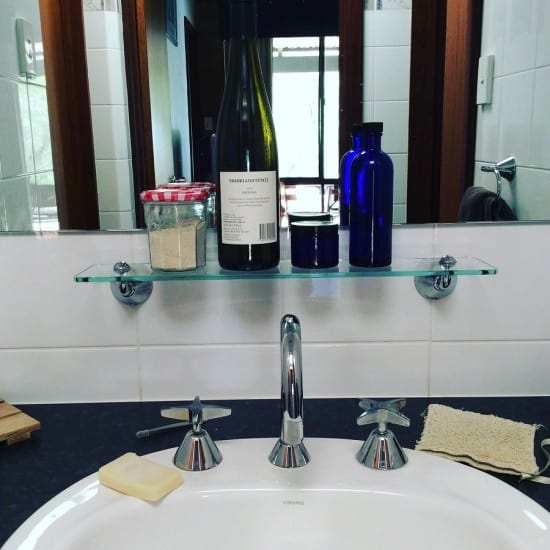
Some of the products I use in the bathroom. From left to right: a jar of rye flour (for shampoo), white vinegar (refilled using an empty wine bottle), homemade deodorant and almond oil. Below left: a bar of soap. Below right: a towelling pocket I use when the soap is too small to pick up. I pop the scraps in here and use as a flannel to ensure none of the soap is wasted.

The products I use in my bathroom are: rye flour, sodium bicarbonate, white vinegar, corn flour, essential oil, coconut oil, almond oil and bar soap. Just a handful of ingredients (8, in fact) that do the jobs of a much bigger handful (or small suitcase-full) of products, all with many ingredients of their own. Most ingredients I use live in the kitchen, where they are also utilized, and my first stop when I run out of something in the bathroom is always my own pantry.

And the benefits? I could tell you about not using chemicals, about supporting the local economy rather than the big multinational pharmaceuticals, about stepping off the consumer treadmill and no longer being sucked into the marketing campaigns. I could talk about no longer buying more than I need, and the reduction in clutter in my bathroom. I’m going to tell you the most surprising benefit of all: simplicity and freedom. When I first gave up plastic and began looking for alternatives, I thought I’d have to learn how to make my own shampoo and moisturiser. I thought it would be difficult, and time-consuming. Rethinking what I was using, and why, and then looking for suitable alternatives made me realise it was only as complicated as I made it. Ditching all the products that were unnecessary, and choosing the simplest options for what remained was all I needed to do.

Now I’d love to hear from you! Do you have a natural and chemical free skincare routine? Can you eat your beauty products? Do you make any of your own products and would you like to share the recipe(s)? Have you had any dismal DIY fails or bad experiences along the way and want to share the lessons you learned?! Do you find it hard to let go of those store-bought products? Is there a particular product you struggle with replacing? Tell us your experiences and please leave a comment below!

[leadpages_leadbox leadbox_id=1429a0746639c5] [/leadpages_leadbox]

I Saw it in the Stars (A Guide to Energy Efficiency)

With new houses comes the need for new appliances. At least, in our case it has. The last thing I wanted to do was rush out and buy a whole heap of new stuff for our new home, but we did need a new fridge and a new washing machine.

…Our old fridge (purchased in 2002 by my in-laws) was wildly inefficient. It was far too big for the two of us and guzzled energy like it was going out of fashion. Despite this, we would have (reluctantly) put it in storage for two months until our new home was ready. However, our kitchen has been designed (somewhat cunningly, with energy efficiency in mind) to only fit a smaller fridge, and our old one was far too wide. We sold it to some students in a four-person house share – a better use for a fridge this size.

…Our old washing machine (purchased second-hand via Gumtree in 2012) was life-expired. It left dirty marks on our clean laundry. The seal was covered in black slime which did not come clean no matter how much vinegar or bicarb I used, nor how many 95°C washes I ran – and a replacement was the price we paid for the machine. I’d have happily paid if it was just the seal (I’d rather repair than replace), but in addition the tubing needed replacing, the electrics didn’t work properly, it had developed a small leak and it’s possible the bearings were going (hence the dirty clothes). Our ex-neighbour is looking after it until I take it to pieces and recycle the parts – I’m particularly keen on doing something fun with the stainless steel drum.

I was keen to get second-hand appliances, but my husband wanted new and energy efficient ones. He argued our old washing machine was a good example of how second-hand doesn’t always work out. There were very few fridges of the size we need available on Gumtree. We could choose the most energy efficient options and look after them properly.

In the end, my husband won. I did feel guilty that we bought new, but choosing quality and energy efficiency means they should last a long time and use less power overall. Whether this was the best choice, only time will tell. I must confess, being able to do a load of laundry that actually comes out clean has also dissipated some guilt.

Choosing an Energy-Efficient Fridge

I found it very confusing that no matter how big the fridge was, the energy star rating was around 3.5 stars. Fridge sizes began at 250 litres, and went all the way up to 850 litres, and yet the stars were practically the same. How could that be?

It turns out that under the star system, fridges are compared with other fridges of a similar size. They do not compare all fridges with one another. Crazy, right? This means the star rating is fairly meaningless on its own. What is far more important when choosing a fridge (or any electronic appliance) is to look at the actual energy rating. All appliances should state their energy use in kWh (which stands for kilowatt hours) over a year.

(If you have an old fridge and want to work out how much energy it uses, you can use an energy monitor. I’ve written about how you can use an energy monitor to work out consumption and cost in a previous post, when I found out that my previous fridge used 639 kWh a year. That is a huge amount!)

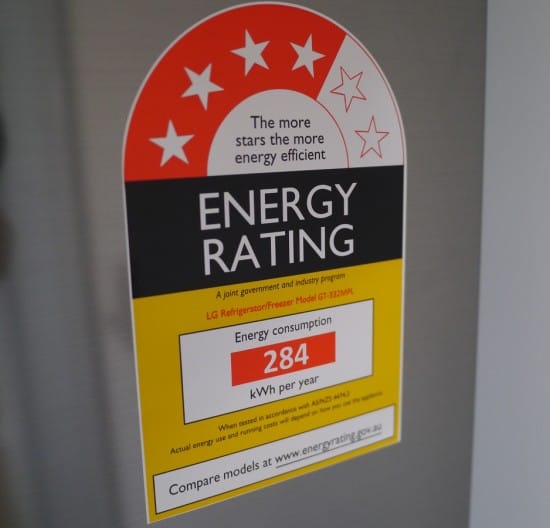
The most energy efficient fridge we could find that was big enough for the two of us but fit the space (600mm wide) has an energy rating of 284 kWh per year. That’s 225% less energy than our previous fridge. Interestingly, it wasn’t the smallest fridge on display but one of the newest models. Most models in the size range were 300 – 350 kWh, and some were as high as 450 kWh.

At 284kWh per year, our new fridge will use 0.78kWh per day.

Fridge Energy Efficency Star Rating Treading My Own Path

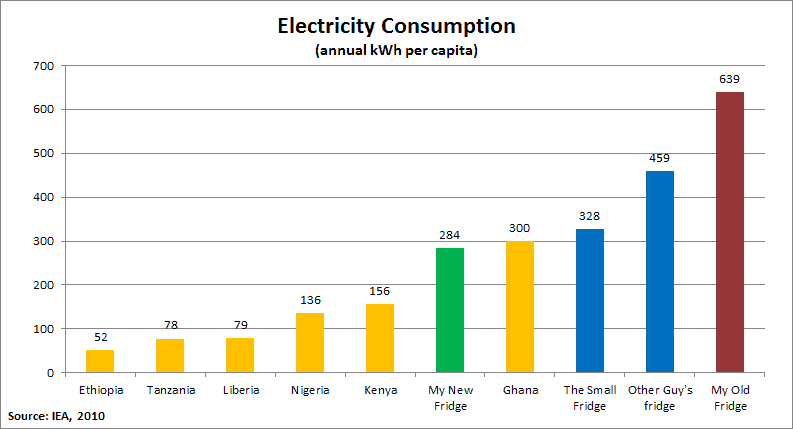
In 2014 I learned that most domestic fridges in wealthy nations use more energy than the total energy consumption of an average citizen in many African nations. It inspired me to find out the energy consumption of my fridge and write the post My Fridge vs the People of Africa. I made a graph showing the energy consumption of citizens of various African nations, and the energy use of my fridge and the fridge of the guy whose article prompted me to investigate. I’ve updated the graph to show where our new fridge sits in the graph:

My Fridge vs the People of Africa Updated 2016

My old fridge is the red column, and my new fridge is the green column. The six yellow columns represent the total electricity consumption of an average citizen in each of 6 African nations in 2010. (The two blue columns relate to the 2014 post which I’ve linked to above.)

Choosing a Waterwise and Energy-Efficient Washing Machine

Washing machines have two differentials to consider: electricity use and water use. They are easier to compare than fridges because they are all relatively the same size, but rather than looking at stars, it is still better to look at the numbers.

Energy consumption is listed per year, in kWh and it makes assumptions about the frequency and type of wash that will be used. To aid comparison, all machines compare regular 40º C cycles and assume they will be used once a day. We  run our machine about 3 times a week, usually on a cold or 30ºC setting, so we would expect our energy consumption to be less than the quoted amount. If you use your washing machine every day and run hotter washes, the energy consumption would be higher.

Water consumption is quoted per wash for a regular program, not per year.

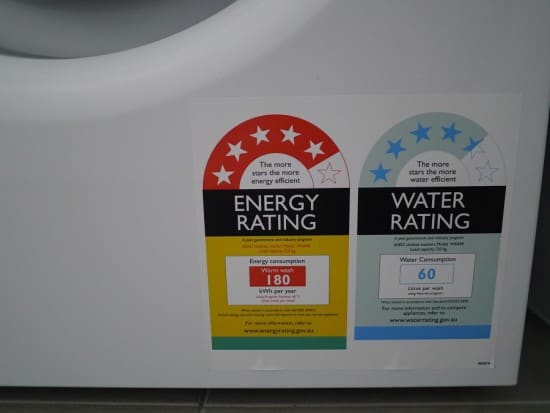
Washing Machine Star Energy Ratings

The machine we chose had high energy efficiency and low water use, but it was expensive. It was double the price of the next best performing brand. It uses 180kWh per year, and 60 litres per wash (compared to 265kWh per annum and 72 litres per wash for the cheaper brand). I confess, this was not actually the best performing machine on sale, it was second-best. The same brand had a better model that only used 50 litres per wash, but cost an extra $300 and our budget simply didn’t stretch that far.

It wasn’t just the energy and water efficiency that convinced us to switch, it was the design. Having had various issues with our previous model we were keen to choose something that would last. The brand we chose has a great reputation for long-lasting machines, and a service centre close by. It uses minimal electronics (an issue with our previous model) and it has a stainless steel rim rather than a rubber seal around the door. Rubber seals always accumulate grime and dirt, they are tricky to clean and expensive to replace (and you need to know what you are doing).

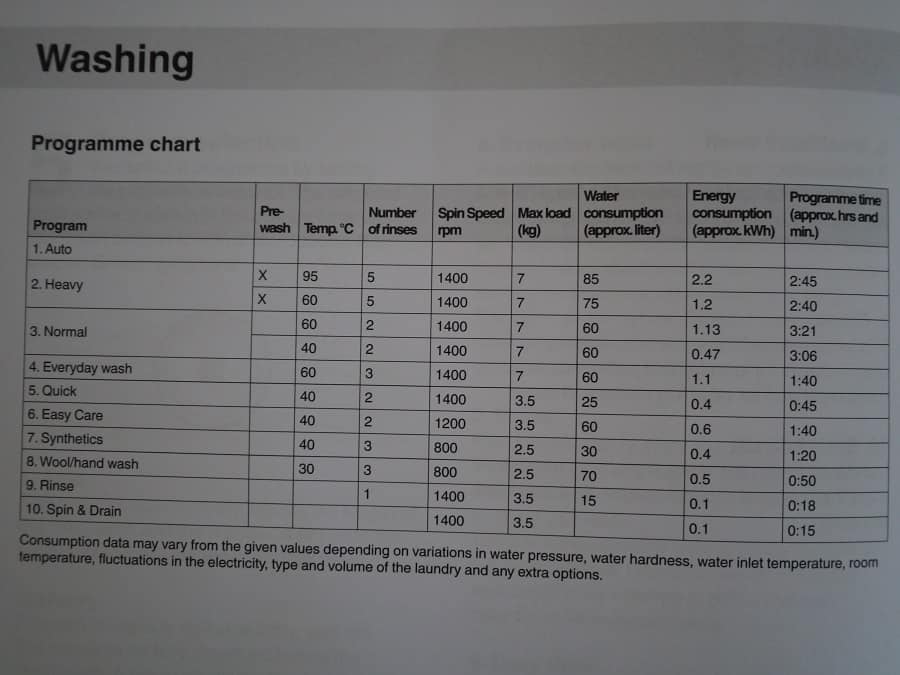
Having read the manual thoroughly (because believe me, this machine is going to be maintained well and will last a lifetime!) I discovered there is a helpful table which tells the user exactly how much energy and water each wash uses. The quick wash uses the least amount of energy and water and cleans surprisingly well. I did not realise that Wool + Hand Wash settings use so much water!

Washing Program Energy and Water Use Guidelines

I don’t know if all washing machine instruction manuals contain this kind of information, but it is so useful that I hope they do! Some longer programs use less energy than shorter ones (which I wouldn’t have guessed) and hand washing uses far more water than I imagined too.

Choosing a Waterwise and Energy-Efficient Dishwasher

Fans of dishwashers often state that dishwashers are very water efficient and use less water than washing the dishes by hand. Having spent a weekend looking at appliances, I can tell you that the most water efficient models use less than 15 litres per wash. It is estimated we use around 30 litres washing up in the kitchen sink, so yes, dishwashers do appear to use less water.

However they also use energy, and they are not particularly energy efficient. A dishwasher with a current 3.5 energy star rating will use around 0.75kWh per wash. Run it every day, and that’s around 275kWh per year. Then there’s the noise, and the biggest one of all – the energy needed to mine / refine / manufacture / transport the appliance – plus it’s another appliance to dispose of at the end of its life.

Despite my husband’s wishes, we won’t be getting a dishwasher. It’s an appliance we simply don’t need. We will be practicing mindfulness and doing the dishes. Well, I say we, but I suspect it will be me. I’m okay with that ; )

Now I’d love to hear from you! Would you have chosen new or second-hand? What factors influence your decisions? If you’re part of a more-than-one-person household, how do you find consensus with differing opinions? Have you any great experiences of buying second-hand, terrible experiences of buying new – or vice versa? Any stories or wisdom to share? What’s your record for the longest-running appliance you’ve owned or used? Please tell me your thoughts in the comments below!

[leadpages_leadbox leadbox_id=1429a0746639c5] [/leadpages_leadbox]
From Near-O to Zero: How I Got Rid of My Bin

We are moving out of our flat this week, and our rubbish bin won’t be coming with us. We won’t be replacing it either. The reason? We simply don’t create enough rubbish to fill it.

I realised a few months ago that I was spending more time taking things out of the rubbish bin than putting things in it. The odd tissue. Sweepings from the kitchen floor. Onion peelings and spent corn-on-the-cobs (we had an incident with the bokashi bin where we ran out of bran, and it grew moldy and very smelly, and my husband was afraid to take the lid off. With reason – it stank).

All of these things could go in the worm farm, but it was almost a reflex to empty the dustpan or drop things into the bin. (Hence then having to take them back out.) There was also the odd non-recycable thing of course, but not enough to justify keeping a bin in our fairly small kitchen.

As a test, we moved the bin outside onto the balcony to see if we missed it.

We didn’t.

This is a long way to come since 2012, when I first heard of Plastic Free July and began my plastic-free living adventure. Back then I thought I was being a responsible consumer by purchasing eco-friendly washing-up liquid in a recyclable plastic bottle (and then recycling it), and taking my own bags to the shops. I thought that filling my recycling bin up to the brim every week was a good thing.

Little did I realise that this was just the beginning of what I could be doing.

I’d never heard of zero waste back then, or even being plastic-free, yet something about the idea of giving up plastic for a month stirred my consciousness….and my conscience! Deep down, I knew that plastic was a problem. I knew there was too much of it in our environment; I knew a lot of it was completely unnecessary; I knew it was a waste of resources.

Yet somehow I’d never made the connection that I was part of the problem. I was directly contributing to these issues by the way I shopped and the packaging I bought; I was also supporting this system and saying “this is okay”.

I was part of the problem, and I could be part of the solution. I could do things a different way. I could ditch the disposables, reuse what I had and refuse new plastic altogether. I decided then, in June 2012, that I wasn’t just giving up plastic for a month.

I was giving up plastic forever.

With no real idea of what to do, but with complete conviction in my heart that this was the right path to be following, and all the enthusiasm and determination that comes with embracing a new challenge, I set out changing my habits.

First up, I started switching my packaging to paper, card and glass. Most fruits and vegetables were easy to find loose, and those that only came in plastic, I simply didn’t buy. I found pasta in cardboard, chocolate in foil and paper, and toiletries in glass bottles.

Not having a car, I carried my shopping home. I noticed how heavy my shopping had become now I wasn’t buying plastic. I also noticed how bulky the glass jars were, and the cardboard boxes. I became aware of packaging – how much of it I was using – for the first time. When everything was in plastic, I hadn’t noticed. It was so light and stealthy!

Around the same time, about two months in to my plastic-free living adventure, I discovered glass isn’t even recyclable in the state we lived in. It has to be trucked to the next state, some 1500km away. Not all glass collected from recycling bins is trucked there either; some is sent to landfill as it is more cost-effective. Some glass was crushed and used as road base – not quite the virtuous cycle we’re sold!

This discovery totally shattered my presumption that glass was a responsible alternative to plastic. It felt just as wasteful as using plastic. I decided that no packaging at all was the best option, and began to work towards that.

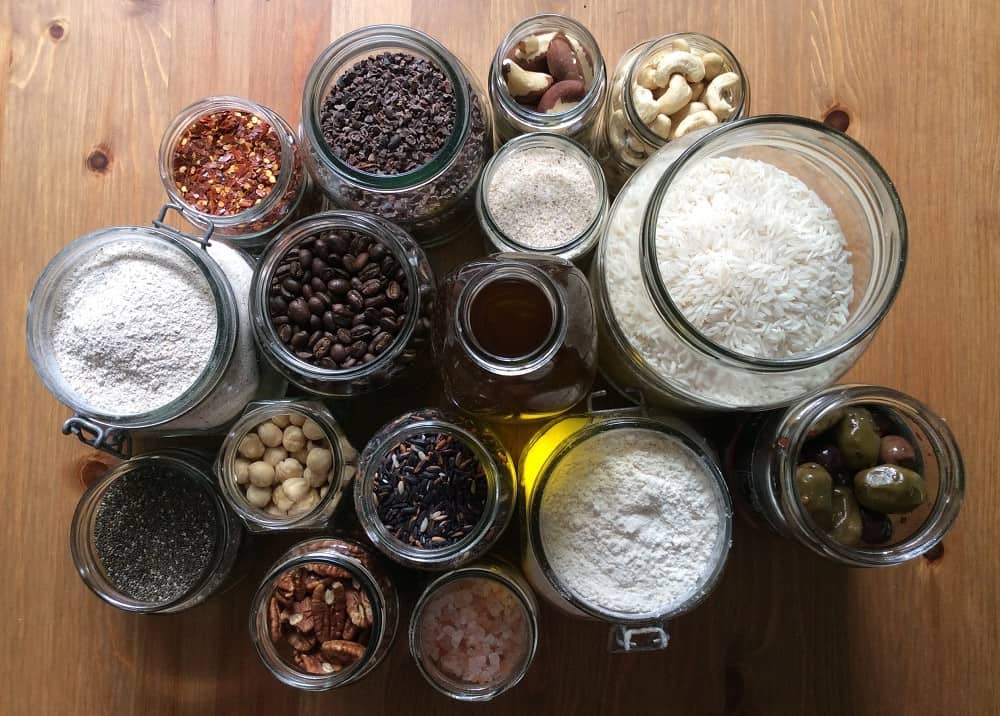
Bulk Produce in Glass Jars

I reconnected with Farmers Markets, and tracked down the local bulk stores to buy my groceries without packaging. I found soap and liquid cleaning products in bulk. I took my own containers to local delis and to my delight, found that they were accepted everywhere I went.

One ingredient or product at a time, I worked on finding a packaging free solution.

It wasn’t a quick process; it took me 18 months to eliminate most of the packaging from my home. I didn’t tackle everything at once – as things ran out I’d look to replace them.

Some things were stubbornly difficult to find, and so I learned to make my own, find an alternative…or simply go without. We looked beyond food and toiletries to other areas of the house, borrowing rather than buying, or shopping second-hand if we really needed something.

It’s surprising, but the less you have, the less you realise you need.

The hardest thing for me was figuring out what to do with all the food waste. Eating lots of vegetables and making lots of things from scratch left us with lots of compostable waste…but no compost bin. Living in an upstairs flat, there wasn’t anywhere to set up a compost bin, and we don’t have any local collection points. Without a car it wasn’t practical to drop it off anywhere.

We have two worm farms but they can’t eat everything that we produce. Eventually, after a couple of false starts, we finally embraced using a bokashi bin for all the food scraps that can’t go in the worm farm – onion peels, lemon skins, spent corn cobs and avocado skins, for example – and this reduced our throwaway food waste to zero.

As the contents of our bin dwindled more and more, I became more and more determined to eliminate the final bits and pieces – however small! We have a junk mail sticker on our mail box but the odd thing sneaks through – I became militant in returning to sender. No free plastic pens required here! We check the fruit and veg we buy doesn’t have plastic stickers on it before we get it home.

If we’re offered any packaging, we decline; if we’re given it, we hand it straight back. We refuse receipts. All little things, but little things add up.

Looking into Empty Bin again Lindsay Miles Looking Into Empty Bin Zero Waste Treading My Own Path

I’m not the first person to give up my rubbish bin (I’m pretty sure that was Bea Johnson, who started her zero waste journey way back in 2008). The great thing is, I know I won’t be the last, either.

Choosing a lifestyle that’s healthier, with food that’s fresh, natural and seasonal, that embraces community and supports local, that teaches new skills and encourages creativity, and that doesn’t harm the planet… what’s not to love? No wonder the zero waste movement is growing every day.

For me, getting rid of my bin means I’ve reached the tipping point. We are creating so little rubbish that it no longer makes sense to keep a container in the house specifically for storing it. Despite giving the bin up, I am sure I will still create waste in the future. I’m not perfect. I have things in my house that I purchased long before I began to think about what would happen to them at the end of their lives; things that aren’t recyclable, or compostable. Clothes that aren’t biodegradable. I choose to keep them until they are used up, life expired, but eventually I will need to dispose of them.

I intend to choose differently next time around. After all, we can’t worry abut or dwell on the choices we made in the past; but we can concentrate on making better choices in the future.

Now I’d love to hear from you! Have you embarked on a zero waste journey of your own? Are you planning on getting rid of your bin, or do you have another goal in mind? What have been your biggest challenges and greatest successes? Are you yet to try the plastic-free or zero waste path, and is the new year tempting you to give it a go? If not, what is holding you back?! What compromises have you had to make along the way? Please tell me your thoughts in the comments below!

[leadpages_leadbox leadbox_id=1429a0746639c5] [/leadpages_leadbox]
A Christmas Gift-Giving Guide for Minimalists…and their loved ones

Christmas always seems like the hardest time of year to explain to people that you have enough stuff, and you really don’t need any more. Family, friends, colleagues…for most of the year they seem to accept (or put up with, at least) our plastic-refusing, stuff-avoiding, minimalist and zero waste ways, but somehow, when it gets to Christmas time, the message seems to get lost.

“But it’s Christmas! How about I buy you some eco-friendly stuff? Some reusable bags? A book about decluttering?” We don’t really want or need any of this stuff, but it can be hard to say no, or to explain how whilst you may have loved gifts as a five-year-old, times have changed and so have you.

Of course, we don’t help ourselves either. In turn, we try to push our own agendas onto our loved ones. We buy them cards from charities letting them know that rather than a present, we’ve donated money on their behalf to a village in Africa. We give them the eco-friendly gifts we like to use, like reusable bags, in the hope they will embrace our zero-waste ways. Or we give them nothing, thinking they will understand because they know that we don’t value presents ourselves.

Except often, they don’t.

We end up with a bunch of stuff we don’t need and don’t want, our loved ones end up with something they don’t want or appreciate (or worse, nothing when they did expect something) – and everybody feels misunderstood and unappreciated.

The truth is, gift-giving is complex, because giving gifts mean different things to different people. It took me a while to understand this. I was constantly puzzled why I would receive gifts despite asking for no gift at all, and that my close relatives would be offended because I hadn’t bought them a gift.

I thought that acting in the way I wanted to be treated would help them understand, but really it only brought resentment. Likewise, I couldn’t understand why my requests were falling on deaf ears, and I was left feeling guilty, with all this stuff I didn’t need and didn’t want, most of which ended up being donated.

It was a book I read that made me change the way I thought about gift-giving. It suggested we connect emotionally with others in different ways, and we feel appreciated in different ways… and one of those ways is through gifts.

Most people appreciate gifts, sure, but the idea that gifts could be someone’s main emotional “love language” – that it was the main way they felt appreciated and understood – was actually somewhat of a surprise to me. I assumed it was something we could all just “do without”. As someone whose major love language is “quality time”, I enjoy the festive season for the chance to spend extended periods of time with family and friends, eat good food and have long conversations.

For me, presents don’t need to be a part of that; I’d assumed it was the same for everyone else. I didn’t realise that for some people, presents are genuinely a big part of Christmas.

Once I’d understood this, I began to realise why I was receiving gifts I didn’t need or want. If receiving presents is the main way a person feels loved and appreciated, then it makes sense that they would want to give gifts in return. To them, it’s more than a bunch of stuff; it’s an emotional currency.

I thought everyone liked sitting around after Christmas dinner chatting and setting the world to rights, because quality time is my emotional currency, but I’ve learned that others (my husband’s family, for example) don’t get the same pleasure out of this at all! It’s easy to assume that what works for us works for others, but it doesn’t always.

With this in mind, I’ve relented on my hard-line “no gifts for anyone” policy. Remember, gift-giving doesn’t have to mean “stuff”. Being respectful of others’ needs doesn’t mean you need to buy a bunch of things.

Gifts can be experiences: meals out in restaurants, tickets to shows or concerts, a day out at a museum, time spent together as a group. They can be homemade (I prefer to stick to edible gifts with this; not everyone will appreciate a tie-died hankie), or homegrown (vegetables and fruit, cut flowers and seedlings all apply). They can be in the form of favours and sharing of skills (an evening of babysitting, an afternoon gardening, walking the dog).

I try to keep bought gifts to an absolute minimum, but if I decide that a physical gift is more appropriate, I opt for second-hand: charity shops and also vintage and antique shops, or online auction and classified ad sites.

This doesn’t mean I’ve got it completely right…it’s been a process of learning and understanding over the last few years. After all, for many years I gave and received gifts willingly. This is still new territory for us and our families.

It has been somewhat of an adjustment for friends and family to learn to accept that when we say no gifts, we really mean it, and for me to understand that just because I don’t want anything, applying this rule to everyone else may result in offense being taken (learned the hard way).

Initially, I suspect that our families thought this way of living was a phase that wouldn’t last. We probably thought that we could bring them round to our way of thinking. Now we’re all learning to find a happy medium. Slowly they’ve become more sympathetic to our different values and needs. Whilst they may not agree, they have begun to accept. Likewise, so have we.

Now I’d love to hear from you! How have you dealt with conflicting ideals between loved ones at Christmas? Have you learned to compromise, or reached a mutual understanding? Is it a compromise you’re happy with, or do you still think there’s work to be done? Do you stubbornly refuse to back down – or do they?! Is gift-giving still a source of conflict during the festive season? Have you had good experiences, bad ones..or both? What lessons have you learned? I really want to hear your insights on this so please leave a comment below!

A Beginner’s Guide To Aquafaba

You know when you cook chickpeas (or other beans and pulses) from scratch? You boil them on the stove top for an hour or two, and then you drain off the cooking liquid? You gotta stop throwing that golden cooking liquid down the drain!

I’m serious. Yes, I’m talking about that stinky, kinda slimy, smells-a-bit-like-old-trainers liquid that disappears down the plughole when you strain your freshly cooked chickpeas. Because it is a magical ingredient. I kid you not.

It turns out that chickpea water (chickpea brine), which alternatively and rather more glamorously is also referred to as aquafaba, is a miracle ingredient… something that isn’t waste at all, but is actually very useful! You can whisk it up like egg whites and use it in baking to make cakes, icing, macaroons and meringues.

It’s taking the vegan world by storm because it’s making the impossible possible, but even if you’re not vegan and you eat eggs, the chance to use a waste product to make something edible and delicious can’t be scoffed at!

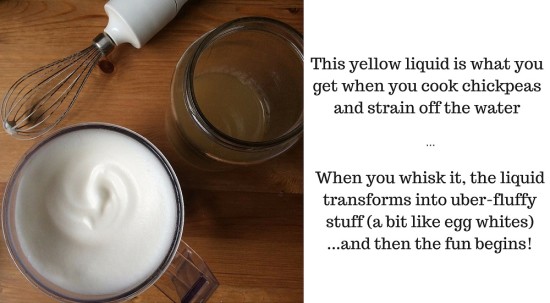
This yellow liquid is what you get when you cook chickpeas and strain (and keep) the water

I first heard about aquafaba when I posted a picture on Instagram of a big batch of chickpeas I’d cooked, and somebody asked if I was saving the liquid to make meringues. It sounded crazy (and unfortunately I’d just tipped 2 litres of it down the drain) but after seeing some pictures suggesting it could actually be done, and in spectacular style, I was sold.

There might be a lot of beautiful images out there showcasing the miraculous things that can be done with aquafaba, but as a beginner, I had absolutely no idea where to start. Lots of the recipes refer to using the aquafaba from tinned chickpeas, but I cook my own chickpeas, so I wanted to know how to use this kind of aquafaba.

Not being able to find this information on the internet, I spent an entire weekend whisking and testing this chickpea water (and eating far more meringues than I care to remember) and as a result, I think I’ve mastered the basics.

First Up – Cooking Your Chickpeas

If you’re still buying chickpeas (or other pulses) in tins, you are seriously missing a trick. Pulses are super cheap to buy, you can find them in bulk (so packaging free), they take up hardly any space in the pantry and they last forever. You can cook them up in bulk and they freeze really well. Cans are bulky, BPA-lined (meaning chemicals leaching from the plastic into your food), the brine often contain added salt and sugar, plus they are pretty resource-heavy being made from metal, and use a lot more fuel to transport than their dried counterparts. Make your own – it’s easy!

Ingredients: dry chickpeas, water

Soak your chickpeas in water, ensuring they are in a big bowl with enough water covering them as they will expand (depending on the variety, up to three times the original size). Soak for a minimum of 8 hours (overnight). I tend to soak mine for 24 hours or more (changing the water every 8 hours or so) until white bubbles appear in the water. Be sure to throw this water away – it is not the aquafaba!

To cook, place in a large pan and cover with fresh water. Bring to the boil and cook for 1.5 hours. You want to ensure the chickpeas remain covered (you can top up with a little extra water, and keeping a lid on the pan will stop as much evaporation) but try to ensure there isn’t too much extra water. As you cook, white scum will come to the surface. Scoop this off and discard.

After 1.5 hours, drain the chickpeas ensuring you keep the cooking liquid – this is the aquafaba!

I usually cook dry chickpeas 1.5 kg at a time, meaning I end up with about 4 kg cooked chickpeas, and this makes around 2 litres of aquafaba. Chickpeas freeze really well. Decant into glass jars and once completely cool pop into the freezer. Wait until completely frozen until sealing with lids. I use regular glass jars and I have never had one crack.

Aquafaba will keep in the fridge for up to a week so don’t feel like you have to use it straightaway. If you don’t want to use all the aquafaba at once, this freezes really well too. Pour into an ice cube tray and once completely frozen decant into a glass storage container and keep in the freezer.

Aquafaba: How to Turn the Yellow Liquid into White Fluffy Stuff

What you’ll need: a good whisk, and a big bowl…plus a little patience ; )

Pour the yellow chickpea liquid into a big bowl, and start whisking. The bowl needs to be big because as it fluffs up, it will expand to more than 5 times its original volume – so be prepared! You will also need a good whisk. A hand whisk isn’t going to cut it. Neither is a food processor or blender, even a high powered one (I tried). I have a stick blender with a 700W motor, 5 speeds and an additional turbo button, and this just about managed, although the motor did get uncomfortably hot. I would recommend a hand held whisk with two beaters, or a mixmaster or something with a little more power.

Whisking Aquafaba Some More

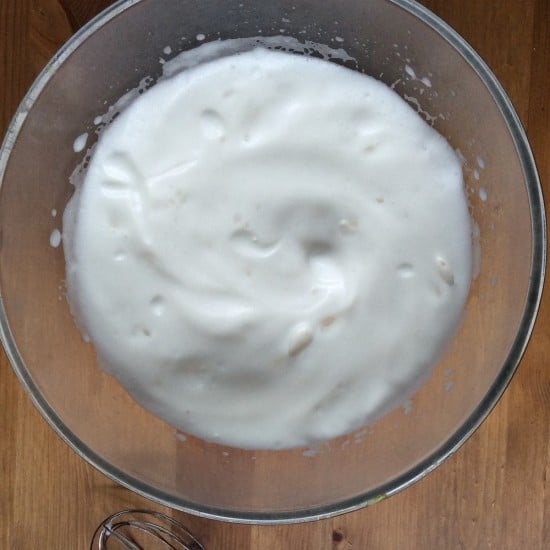
This is my aquafaba before adding cream of tartar. Because I don’t have a super powerful whisk, I found cream of tartar helped form the stiff peaks you need for meringues.

Chickpea water needs to be whisked for a long time. (Long being relative of course, but in the age of electric gadgets we expect instant results, so be warned!) You will need 10 – 15 minutes of constant whisking to get the aquafaba to full fluffiness and stiff peaks. On the plus side, you don’t seem to be able to overwhisk aquafaba like you can egg whites, and if you need a break from holding the hand whisk (or like me, are worried about burning out a stick blender), it seems fairly forgiving to stop-starting.

Lastly, don’t be too worried about how concentrated your chickpea water is. Remember, egg whites are fairly runny before you whisk them, and aquafaba is the same. If you think your liquid is really watery you can reduce it a little in a pan, but don’t be too worried about this. I reduced 2 cups of aquafaba to 1 cup in a saucepan by simmering, and then whisked, and actually found it fluffed ever so slightly less than the original non-reduced aquafaba. The main thing will be a good whisk, and enough time.

How to Make Aquafaba Meringues

I based my experiments on this basic aqaufaba meringue recipe. Far more meringues than I actually wanted to eat later, I think I’ve mastered the basics. My next challenge is to improve the shape – something I think I will achieve with a slightly better whisk, and probably a little more patience!

Ingredients: 1 cup aquafaba; 1.5 cups granulated sugar, ground into powdered sugar; 1 tsp vanilla essence and 1/2 tsp cream of tartar.

Whisk the aquafaba into stiff peaks. Ideally you want a mixture so stiff that if you turn the bowl upside down, the aquafaba won’t fall out, but my hand whisk isn’t up to beating quite that well. (If yours is, you may not need to cream of tartar.)

Once the peaks are as stiff as you can get them, add the cream of tartar, still whisking. This will help firm up the peaks. Next, add the sugar slowly. This is important… you don’t want to deflate the bubbles you’ve created. Add 1 tbsp powdered sugar at a time, whisking continuously to incorporate. Yes, it takes ages, but rush and you’ll flatten your meringues.

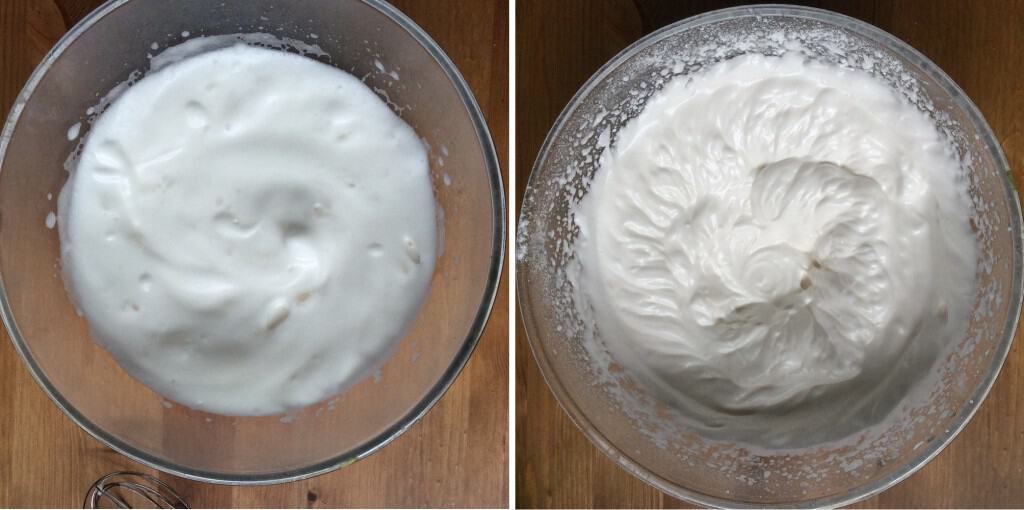
Whisking Aquafaba Before and After Adding Cream of Tartar and Sugar

The bowl on the right is the aquafaba once the cream of tartar and sugar have been added. The sugar gives a shiny gloss to the aquafaba.

When all the sugar is incorporated, add the vanilla essence.

Turn your oven on to the lowest temp. Recipes state the temperature needs to be between 80 – 110°C. My gas oven actually doesn’t go below 120°C but as it never seems to get to temperature anyway, it didn’t matter. Line baking trays with baking paper, and blob the meringue mix onto the paper (I used a soup spoon, and the blobs were about 4cm diameter).

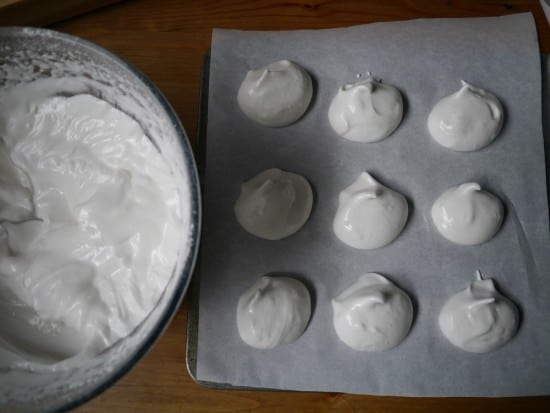
Aquafaba meringues

Aquafaba meringues about to go in the oven. I still haven’t mastered how to keep the shape once they go in the oven…that’s the next challenge!

Pop the meringues into the oven, and leave for 1.5 hours minimum. You aren’t actually trying to cook the meringues but dry them out. If they go brown, your oven is probably on too high.

To test if they are ready, see if you can remove one from the baking paper (ideally without taking the tray out of the oven). If it still sticks, leave in the oven. Keep testing until the meringues can be removed cleanly from the paper. When they are ready, turn the oven off, open the door slightly and leave to cool completely before removing. You’re better off leaving to cool in the oven overnight rather than putting them in a container whilst still slightly warm.

Store in an airtight container if not eating immediately.

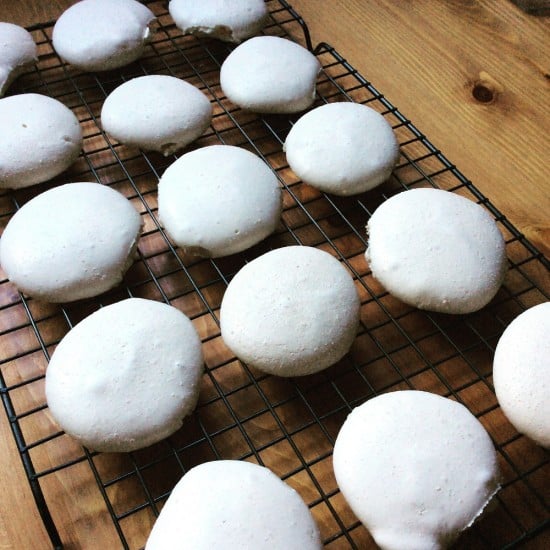
Aquafaba Meringues on a Cooling Rack via Instragram

What’s Next – Aquafaba in Baking

If you’re interested in seeing more amazing creations with aquafaba, there is a great Facebook group called Vegan Meringue – Hits and Misses with lots of recipes to try when you’ve mastered the basics. It’s also a great community and a brilliant source of inspiration!

I’m hoping to spend plenty more time in the kitchen experimenting with this stuff! I’ve already attempted making chocolate brownies using aquafaba and was really pleased with the result (especially as it was a first attempt), and with a few more tweaks I’m hoping to perfect this (update! Recipe for aquafaba chocolate brownies has now been added.).

I’m also keen to try macaroons. Playing with aquafaba is so much fun!

Aquafaba chocolate vegan brownie aerial view Aquafaba chocolate brownie slice Chocolate Vegan Brownie

Now it’s your turn to join in! Tell me, have you heard of aquafaba before? Are you tempted to give it a go, or is something holding you back? Have you already experimented with it? Have you created aquafaba masterpieces or struggled with a sticky mess? If you’re a pro, do you have any advice or tips?  Do you have any questions or need any beginners tips…especially in what NOT to do? (I’m no expert, but I’ve had my fair amount of failures in the last couple of weeks!) Or are you totally grossed out by the whole thing?! I’d love to hear your thoughts so please leave a comment below!

[leadpages_leadbox leadbox_id=123a865e9839c5] [/leadpages_leadbox]
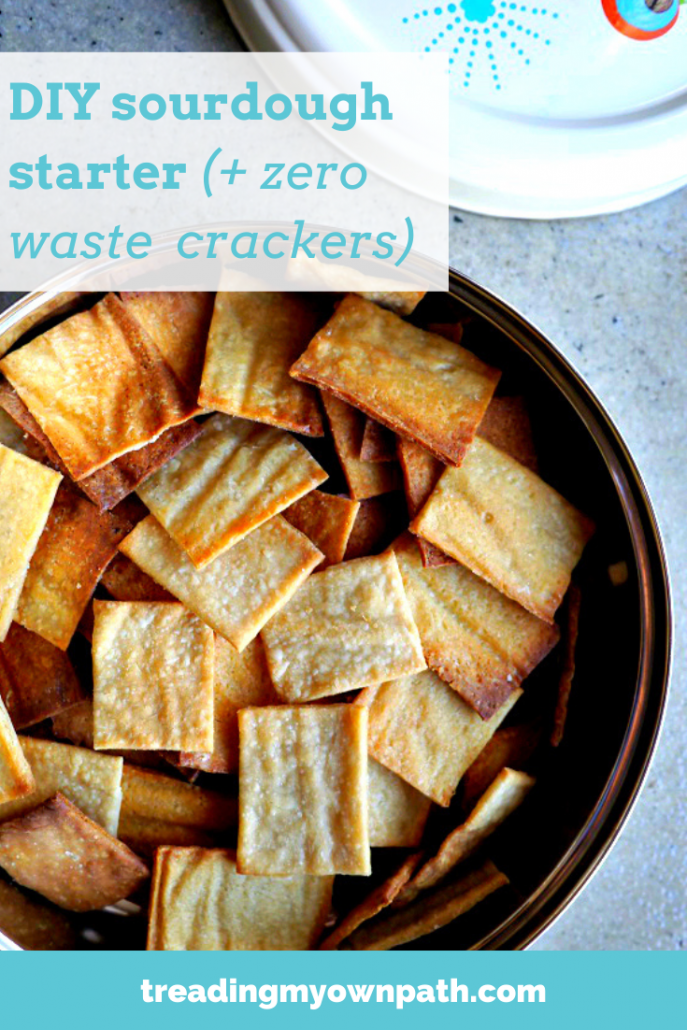
5 Decluttering Tips for Letting Go (What A Difference a Year Makes!)

This time last year I was back at my parents’ house in the UK, being forced to confront all the stuff I’d stored there for “safe keeping”. It was an interesting lesson in why hoarders shouldn’t get second chances, and I got rid of a lot of items, but I’m sorry to say, there were still several boxes remaining.

Everything that remains in storage

Everything that remained in storage at my parents’ house as of September last year. Yes, after the decluttering took place!

Fast forward a year and I’m back at my parents’ house (we went back to the UK for my brother’s wedding). My parents’ house is absolutely full to the brim with stuff, and as I’ve learned to let go of more and more, I find the amount of things they have more and more noticeable. It should be noted that whilst I always say that it’s far better to lead by example when trying to encourage change in others, and we shouldn’t preach or tell or instruct, I always fall down on this when it comes to my mum. Somehow the rules don’t apply! Maybe it’s because I only see her once a year, I feel I haven’t got the time to spend demonstrating change and waiting for it to catch on, and need to get right in there… or maybe it’s because I internalise all my preaching and bossy-ness and have to let it out somewhere! I hadn’t been back there two minutes and I was trying to persuade her to begin decluttering. (They tell me they like the clutter. Well, my dad does. I’m not completely convinced.)

Of course it wasn’t long before my parents pointed out that rather than declutter their stuff, I had a whole load of stuff of my stuff in their house that I should be focusing on. And they were right.

Well, what a difference a year makes! Sometimes it feels like we’re plodding away and not much is changing, but being put in exactly the same position a year later really made me realise how far I’ve come. Somewhere, in this past year, there’s been a shift. I didn’t notice it happen – maybe it was gradual there was nothing to notice – but it has happened. This time, when faced with decluttering, there was no internal struggle. There was very little debate. This time, I was ruthless.

Why was it so much easier this time round? Probably because decluttering is a skill I’ve been trying to master for a while, and I’ve learned a few lessons along the way.

1. Hoarders shouldn’t get second chances.

Anything that’s been in a box for a year (or really in my case, for almost 4 years) cannot be needed. Rather than opening boxes with the excitement of seeing what’s inside (it will cloud your judgement!), remember – you’ve long forgotten what’s inside. Instead, focus on the best way to pass these items to good homes. Stay detached. If you’re really brave, don’t open at all. Send straight to the charity shop!

2. If you’re passionate about zero waste, you can’t keep stuff in storage long-term (especially at someone else’s house).

Sometimes we find things in boxes that we like, that we remember fondly or we wish we had use for. That doesn’t mean we need them. If we liked them or needed them that much, they wouldn’t be sat in a box! If you really want your items to have value, give them to someone who needs them and will use them. Sell them on eBay or give them away on Freecycle or to the charity shop. Items sitting in storage gathering dust is just as much a waste of resources as sending something to landfill.

3. “Just in case” rarely happens.

Keeping items “just-in-case” is a waste of time (and space). Especially if the “just-in-case” items live in a box in storage. If you suddenly need the item, will you even remember where you put it? Let someone else get good use from your items. If you really need something you previously got rid of, you can borrow it, or buy another one second-hand when you need it. Chances are though, you won’t.

4. We live in the present, not the past.

Old photos of places we no longer remember, diaries and letters from years ago and other collected paraphernalia remind us of the people we were, but don’t necessarily represent the people we are now. If they bring up feelings of regret or sadness, are completely cringeworthy, or evoke no feelings at all, they have served their purpose. Let them go. We don’t need to be reminded of who we used to be! We live in the present, not the past. We should be creating new happy memories and living in the moment!

5. No matter how hard you find letting things go, if you keep trying you WILL succeed.

I was a natural hoarder. I’d collect, and accumulate, and hang on to things. It was how I was brought up, I’ve realised – there was always the option to store something if I wasn’t sure what to do about it. As a result, I never learned the art of decluttering or letting go. It’s been a hard lesson to learn. It takes time, and patience, and perseverance. But like all new habits, the more you practice the better you get. Keep flexing the decluttering muscle, and each time it gets a little stronger. I’m not perfect, not by any stretch of the imagination, but I’ve come a long way simply by not giving up.

So… what became of that pile of stuff? Most things went straight into boxes to the charity shop. A few (more specialist)  things went onto eBay…I felt there was more chance of connecting them with a better owner this way.  A couple of things came back to Perth with me (they may yet be decluttered). Those old diaries of my early teenage years?

Shredded Documents

Pages of paper filled with teenage angst are memories I’d rather forget! Those diaries served a purpose at the time, but their job is done. I felt rather excited that these pages will begin a new life as compost, and I will no longer be weighed down with awkward memories.

Shredded and added to the compost pile, and along with them a lot of teenage angst I’d rather forget!

With every item given away, sold, donated and shredded, I feel lighter. Stuff weighs you down. It’s a burden. Especially stuff spread across continents, and stored in other people’s houses.  It’s a relief to know next time I visit my parents for a holiday, I won’t be crawling through the storage space hunting down boxes to sort. I won’t be wasting time contemplating whether to keep things I’d already forgotten about. There will be no guilt at items left languishing.

It’s been a long road, this journey to a life with less stuff, and it’s been hard work, but I finally feel like I’m turning a corner, and that I’m seeing the benefits. Benefits like more time. More freedom. It makes me wonder… why did I ever think a bunch of stuff was more important than these?!

Now I’d love to hear from you! Confession time… do you have boxes languishing in storage, in your attic, garage, spare room, or worse – a relative’s house?! How many of them are filled with “just-in-case” items or stuff that you can’t even remember?! what is your biggest barrier to letting go? Or are your closets free of clutter? If so, what tips do you have for letting go of items? What has worked best for you? Anything else you’d like to add to the conversation? Please leave your thought in the comments below!

[leadpages_leadbox leadbox_id=1429a0746639c5] [/leadpages_leadbox]