Tag Archive for: energy efficiency

Seven ways I’m retrofitting my house for energy efficiency in a changing climate

Where I live, it’s getting hotter. This summer we’ve just seen a record-breaking heatwave of six days above 40°C. There’s been a few other records broken, too. Including, the highest number of days over 40°C between December and February – and we are not yet even through January.

Every year we seem to be* (*we are) breaking records.

The climate is changing. And even if we stop global warming in its tracks, the changes that have happened are here to stay, at least in our lifetimes. Zero net zero emissions isn’t going to reverse anything, just slow change down.

Yes, we can write to politicians and march and protest, and we can boycott and change our habits.

But we also need to adapt.

You might have heard talk about “climate resilience”, which is the ability to prepare for and recover from climate-related events such as extreme weather.

Climate resilience needs to happen at all levels, from international treaties to national policy, to local government laws and neighbourhoods and communities working together.

And on a micro level, we need to adapt to become more resilient, too. (Although what that looks like will be different for all of us.)
Retrofitting a 1970s house for energy efficiency (heating and cooling)

I don’t have the option to move to a different climate, and I don’t have the funds to build a Grand Designs style solar passive house. (Not that I’d want to, and anyways, new houses might be energy efficient but building them has a big carbon footprint.)

But I own where I live (well technically the bank does, until I repay the mortgage) which means I can make modifications that make my home more energy-efficient and more comfortable to live in.

The changes I’m talking about here are to the building itself, but if you’re a renter, don’t despair. You could ask your landlord if they’d consider making some improvements. If they say no, it’s worth keeping these in mind for your next move so you know what to look out for. Importantly, there are still modifications possible for renters too – I’ll talk about these in another post.

How houses lose and gain heat

Put simply, this is where an average home with no insulation gains/loses heat:

  • Ceiling: 25 – 35%
  • Floor: 10 – 20%
  • Air leaks and draughts: 5 – 15%
  • Walls: 10 – 20% loss in winter; 15 – 25% gain in summer
  • Windows: 10 – 20% loss in winter; 25 – 35% gain in summer

(Source: yourhome.gov.au )

West Australian houses are particularly leaky. They have little insulation, there are gaps in the door and window frames, they are rarely double or triple-glazed, and are not oriented or designed in a way that suits the climate. Which means they are freezing cold in winter and boiling in summer.

They tend not to have a central heating or cooling system either either. Many houses install split-systems, but usually where its easiest to install rather than where it would be most effective.

Plus, when a house is leaky, you’re paying to heat or cool air that just leaves as soon as it can. Which makes running them inefficient and expensive.

Retrofitting a 1970s house: where I started

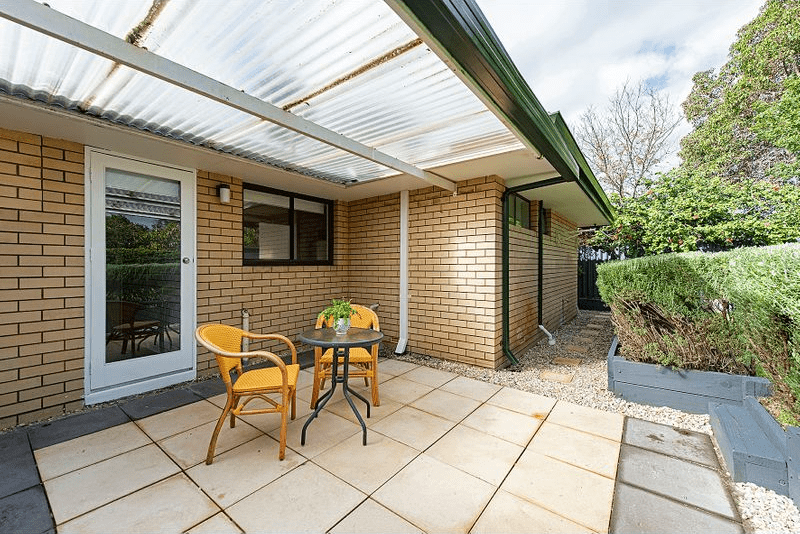
This is my home, as I bought it in 2019 (these are the real estate photos – the lawn is long gone!). The house faces north-west. In Perth, the hottest part of the the day is the afternoon (when the sun is to the west), and any windows and walls on the west side will get the hottest.

My house is a duplex (semi-detached) which means the western side is mostly insulated by the other dwelling – and this was a deliberate choice on my part. The one window I have on the north-west side is next to the front door, and is shaded by the garage and other house.
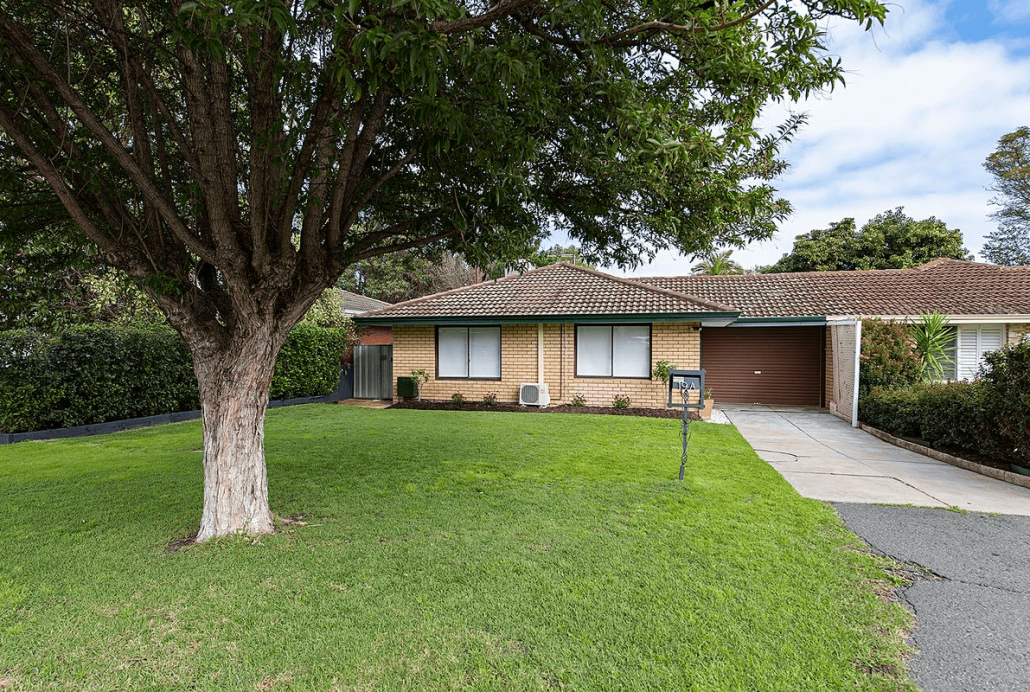
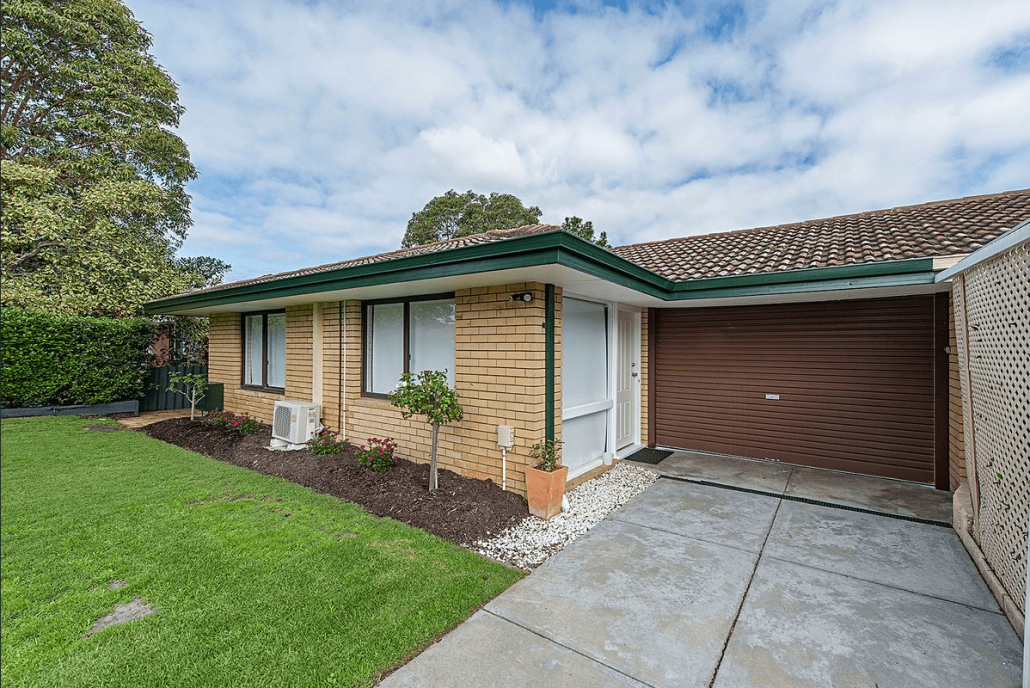
The less windows on the western side, the better.

The three on the south-west side (pictured above) are the kitchen window, which is protected by the patio roof, and the bathroom and toilet windows, which are both small (the less glass, the better).

All of the windows were single-glazed, and the brown frames are aluminium, which is a terrible material for window frames as it conducts heat. The metal gets hot in summer and cold in winter, and allows the heat to enter or leave.

You can’t tell from the picture, but the glass pane of the toilet window was only 3/4. Meaning, there was a gap of a few inches along the top with no glass at all. It’s fairly common in older houses here. This made the toilet freezing in winter and boiling in summer. In fact, that whole half of the house was pretty unbearable on the hottest and coldest days.

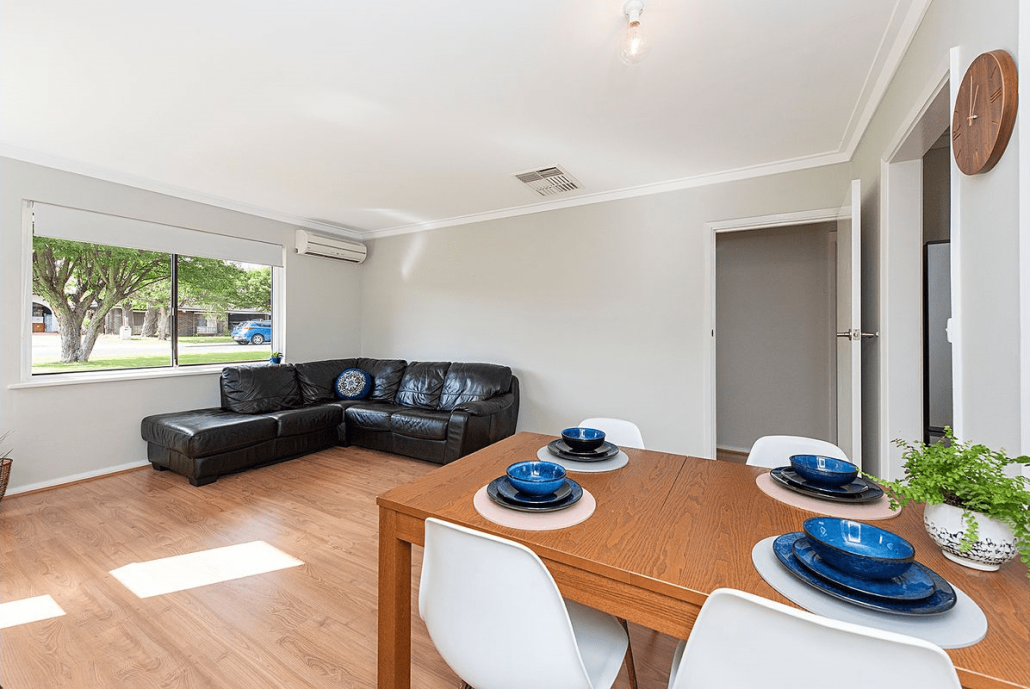
You can just make out in the first picture an old metal evaporative air conditioner on the roof. It had been disconnected from the electricity, but the ducting from the roof to the three rooms (living room and two bedrooms) remained.

In hot weather you could stand underneath the vents and feel the heat funnelling in from outside.

And in winter, the heat disappeared through these vents in the ceiling.
1. Installing solar panels

The very first thing I did when I moved in was install solar panels. And I mean literally: I got the keys on the Friday, and I was getting quotes on Monday morning. One month after I moved in, there were solar panels on the roof.

I’ve talked about installing solar before, so I won’t go into it again in detail, but I now have a 3kW system that faces north-west. My roof is too small for anything bigger, but I don’t really need anything bigger.

Although it’s not strictly retrofitting, I knew that my old house would be leaky (leaking heat) and I wanted solar as soon as possible, so I felt less guilty about using the air con and heating.

Solar panels also help insulate the roof by covering the tiles. It’s probably less useful with metal roofs as metal conducts heat, so the whole thing will heat up, but my tiles are concrete. They absorb heat during the day when exposed to the sun, and radiate it out at night. With solar panels, the tiles under the panels are shaded and protected.

2. Installing ceiling fans

The second thing I did was install ceiling fans in the living room and two bedrooms. My previous house had ceiling fans and they are such an underrated addition to a house – the air movement makes everything feel cooler even without any cooling. And when the windows are open at night or the air con is on, it helps spread the cool air throughout the house.

It’s also a fairly cheap thing to do. I had to pay an electrician to install them, and because there weren’t fans there originally he had to install supports in the roof, but it was a straightforward job. I opted for fans with lights, and just replaced the existing light fittings with the fans/lights so I didn’t end up with holes in the ceiling.
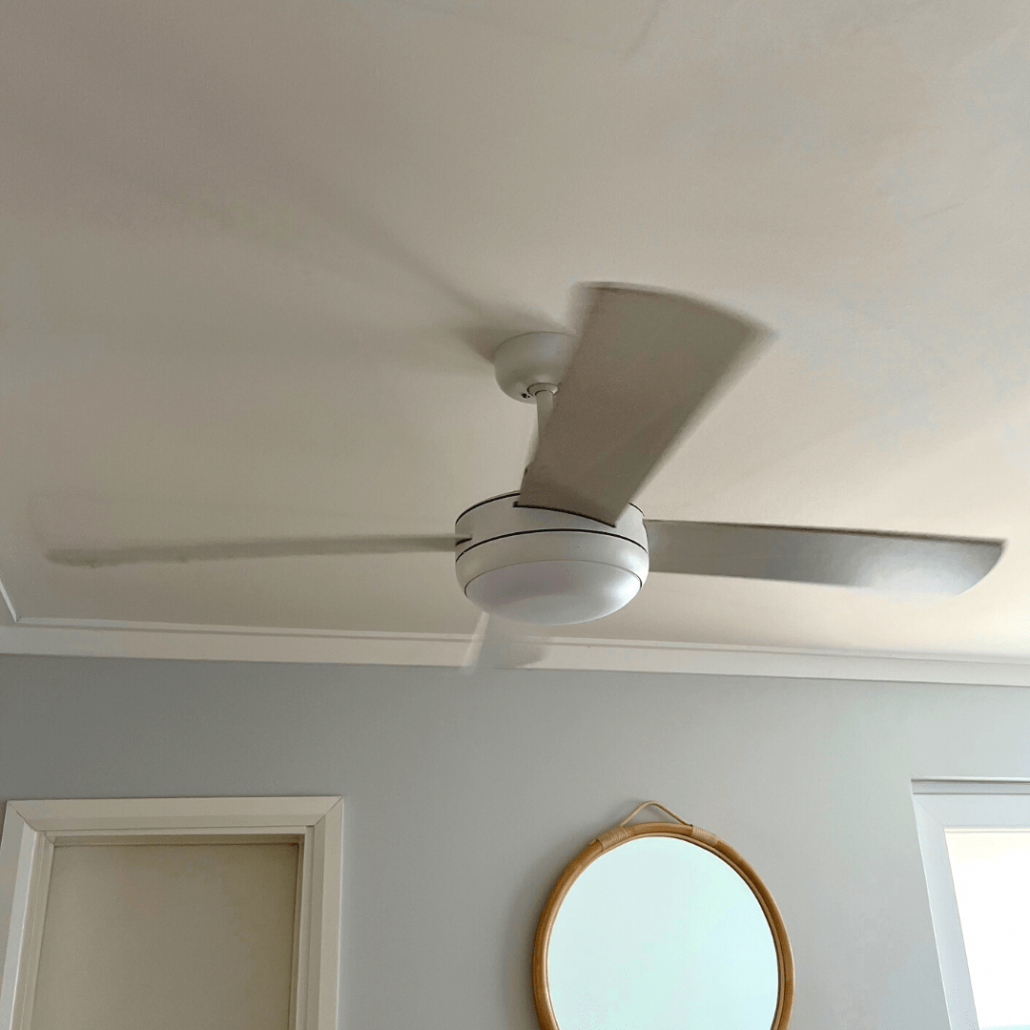
If you don’t have high ceilings (I don’t), just make sure you choose a fan with a shorter drop, as they vary and those few cm will make a difference.

And if you choose fans with lights, make sure you can replace the globes, as some have unchangeable globes – meaning if the bulb blows you need to replace the whole unit, and you will need an electrician to replace it for you. This is both wasteful and expensive!

Ceiling fans are also incredibly cheap to run, because they don’t actually heat or cool. A ceiling fan typically costs the same to run as a single light bulb.

3. Installing double glazing

This was the big one, both in terms of cost and the difference it made to the house. It was installed one year after we moved in, so I had one summer and one winter with the existing windows before the change.

In the summer prior, with both air con units running, it was manageable at the front, and unbearably hot at the back of the house (where the hot western sun beats in the afternoon, and where the toilet window with 3/4 glass and 1/4 gap was located).

In the winter, I had to use a portable heater in the bedroom at the back (the office).

The double glazing replaced all the existing windows except the one in the kitchen (which one day I’d like to knock through into a door – it is very frustrating having to walk through the laundry and around half the building to get to the patio in front of the kitchen window).

Both the external doors (the front door and the laundry door, which was rotten) were also replaced.

There is a door onto the patio from the garage, which has also been left for now.
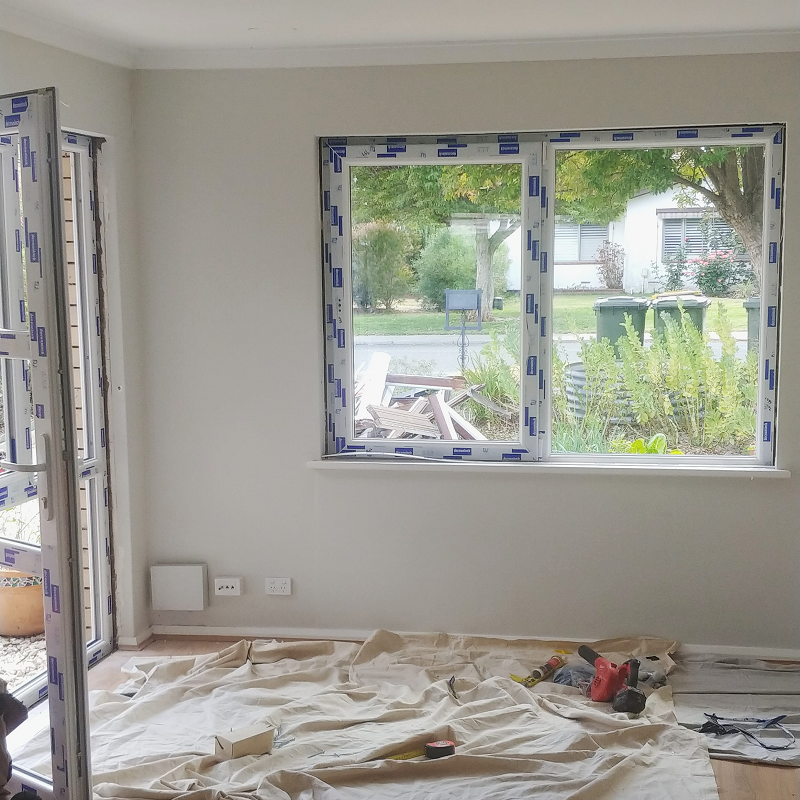
Whilst I’d have loved wooden frames, they don’t seem to be an option in Perth, so the frames I have are PVC. (There is no point choosing aluminium if you want energy efficiency as the frames conduct heat very well – either into or out of the house depending on what you don’t want.)

The glass is Low-E, meaning it’s coated to reduce the amount of infrared and ultraviolet light that enters and performs better than regular glass.

I was planning on triple glazing for the toilet and bathroom because they get so hot, but was talked out of it by the salesperson who said it makes more difference for noise and I wouldn’t need it.

She was right – the double glazing is enough.

With the double glazing installed, the change is amazing. Before, on a 40°C day I’d need the air con running for most of the day. Now, the cool (or in winter, the heat) doesn’t escape, so I can mostly restrict their use to when the solar panels are cranking.

4. Blocking up the ceiling vents

The double glazing stopped a lot of air leaks, which made those that were left all the more noticeable. In particular, the three ceiling vents from the disconnected evaporative cooling system were literal tunnels from the roof, and if you stood underneath them you would feel a blast of hot air coming down.

And of course in winter they let all the heat up and out into the sky.

Did I mention they were also broken, rusted and ugly?

A temporary fix would have been to put cardboard (or something more solid) inside the vents to block them up. The permanent solution was to block them with gyprock and remove the ducting.
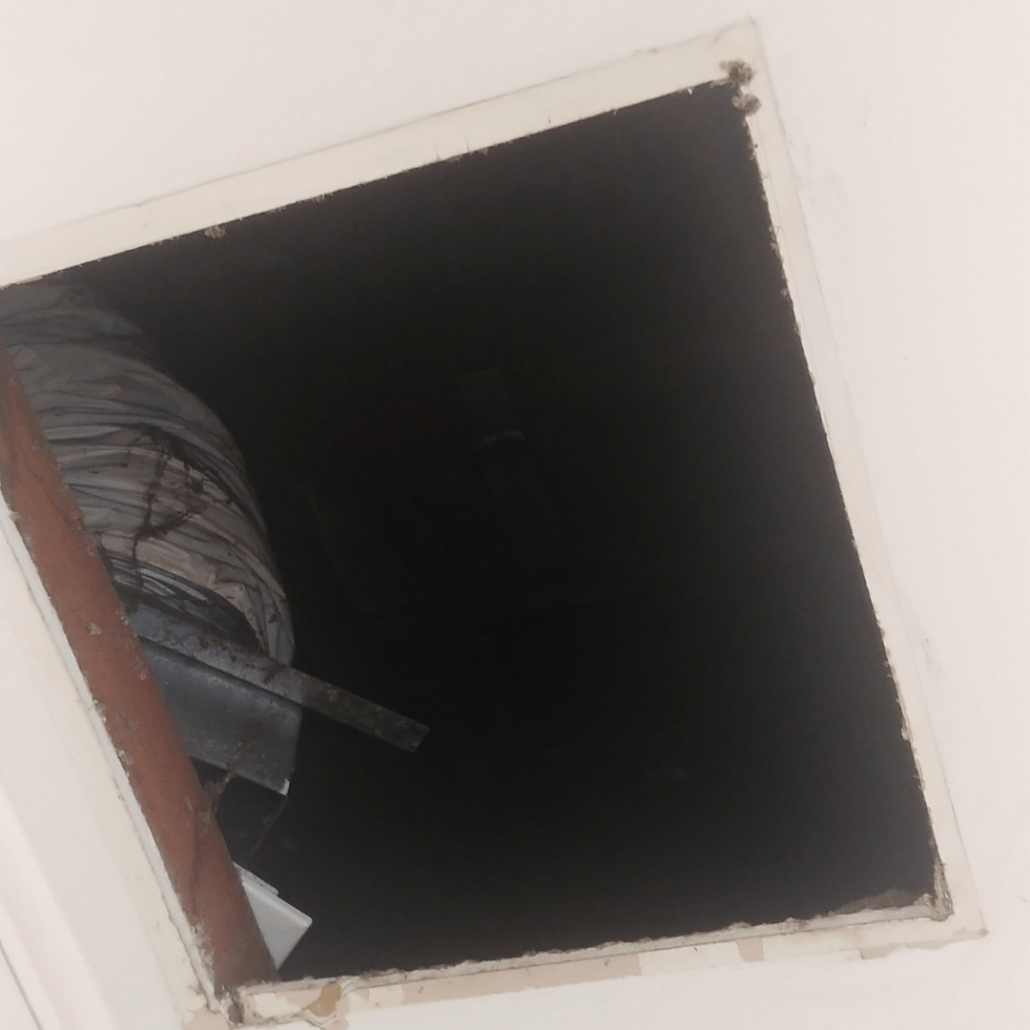
And then repaint the ceilings.

It’s hard to measure the difference this made, but for a fairly inexpensive job it was worth it.

5. Insulating the roof space

The first winter it was so cold in the house I assumed we didn’t actually have any insulation at all. Turns out we did, but it was old (probably 50 years old), and very thin and tired.

When I first moved in, insulation was on my to-do list, but I couldn’t find anyone willing to quote. It was 18 months later when I called some pest people in because I thought we had possums in the roof, that they suggested changing the insulation because it was soiled and to deter future rodents (by using a less nest-friendly material).

It was a service they offered, so I went with them.

The main decision with insulation is the R value rating, which is a measure of the ability to resist heat flow. (You also see it referenced with double glazing and window materials.) R values for insulation range from 1.5 to 7, with the higher number being better.

In Perth, Brisbane and NSW it’s recommended to use a minimum R4.0 in the ceiling.

In Melbourne, Sydney and Adelaide it’s recommended to use a minimum R6.0 in the ceiling.

The more Rs you use, the more material you use and the more expensive it is.

I went with R5.0. (I got a quote for 4.1 and 5.0, and the difference in price was smaller than I expected. I didn’t get a quote for R6.0, but I half wish I had.)
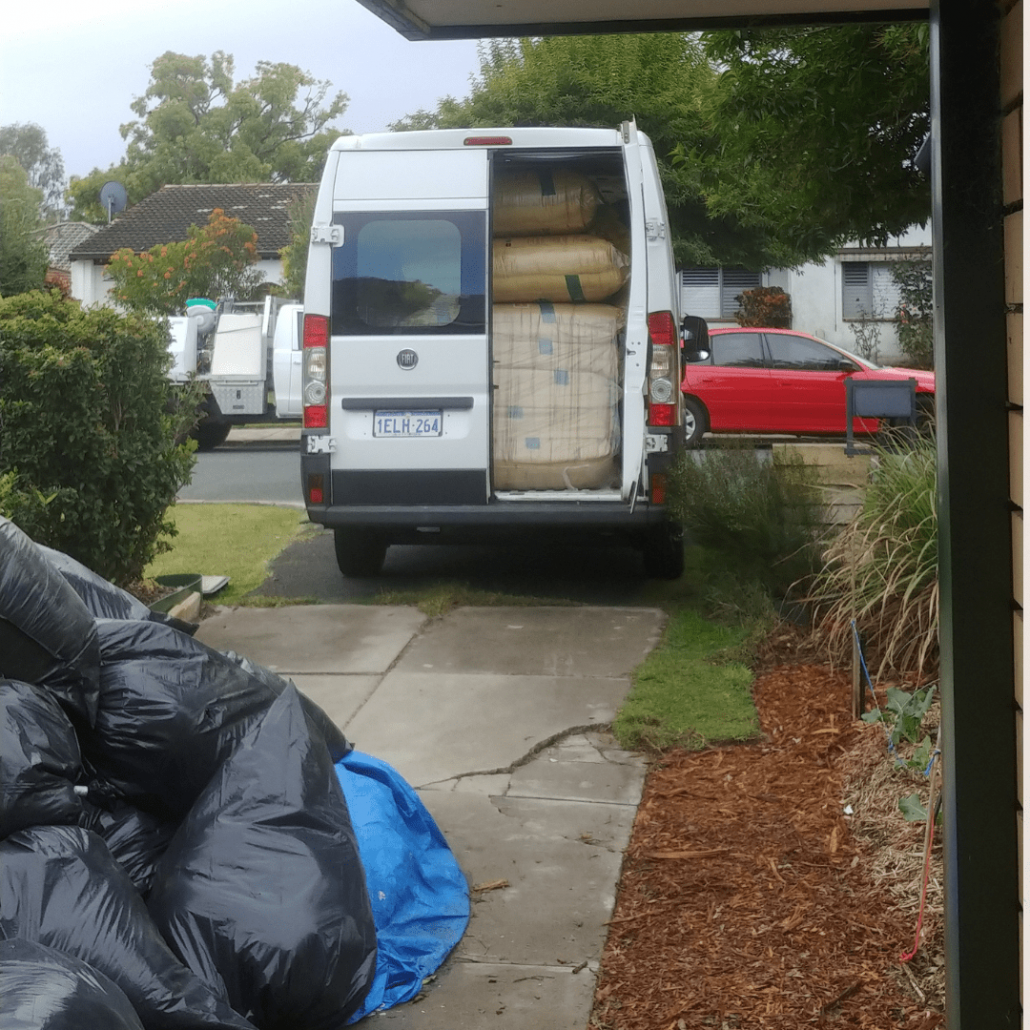
The installers did a great job, removing all the old stuff (and the old air con ducts), vacuuming the roof space and laying the new insulation. I have to say though, I was expecting a more noticeable difference in winter. However, it’s hard to compare as the first winter (with no double glazing or insulation) was fairly mild, and the recent winter (with double glazing and replaced insulation) was much colder and for much longer, so comparing bills isn’t especially useful.

I do wonder if I should have gone with R6.0….

Although I didn’t use the plug-in heater in the office the second year, despite the colder outside temperature, so there was definitely some benefit.

6. Painting the roof white

Both the colour and the material of a roof can affect the energy efficiency of a house.

My home had dark concrete roof tiles. Concrete absorbs heat, and the dark colour increases this. (Studies have shown that dark tiles can increase the air temperature of a roof space by 9°C compared to light tiles.) This means my roof space got very hot, particularly in the early evening as the heat is released into the house.

I can’t change the material the roof is made from (aside from the huge cost, my house is a duplex/semi-detached, so my neighbour would have to want to change her roof too).

But I can change the colour.

You can buy reflective paints for roofs, which are meant to reflect heat. My painter – who definitely had a few opinions on things – ranted that these were a big con and didn’t work and wouldn’t use them.

So I used regular external paint. I wanted to paint the roof white, but the painter suggested an off-white colour. I went with Taubmans ‘martini’, which in the brochure looked kind of beige, but on my roof appears pretty much white.

7. Installing a whirlybird

A whirlybird, also known as a turbine vent, is a cyclindrical dome that spins in the wind, which creates a vacuum that extracts warm air from the roof cavity. They don’t need a lot of wind to spin; even when it appears still outside, the whirlybird still whirls.

Because I have concrete roof tiles that absorb heat during the hot days and release it into my roof space in the evening, the house gets hotter even as the air outside cools. The whirlybird releases this heat outside. If I had a metal roof it would possibly be less effective than with tiles, as metal doesn’t hold heat in the same way.

They are best for hot climates as they also release heat from the roof space in winter. (With good insulation, hopefully the heat from the house is not escaping into the roof space, though.)

They are not expensive to buy (around $100 AUD) and are installed by just placing under the tiles, no special tools required.

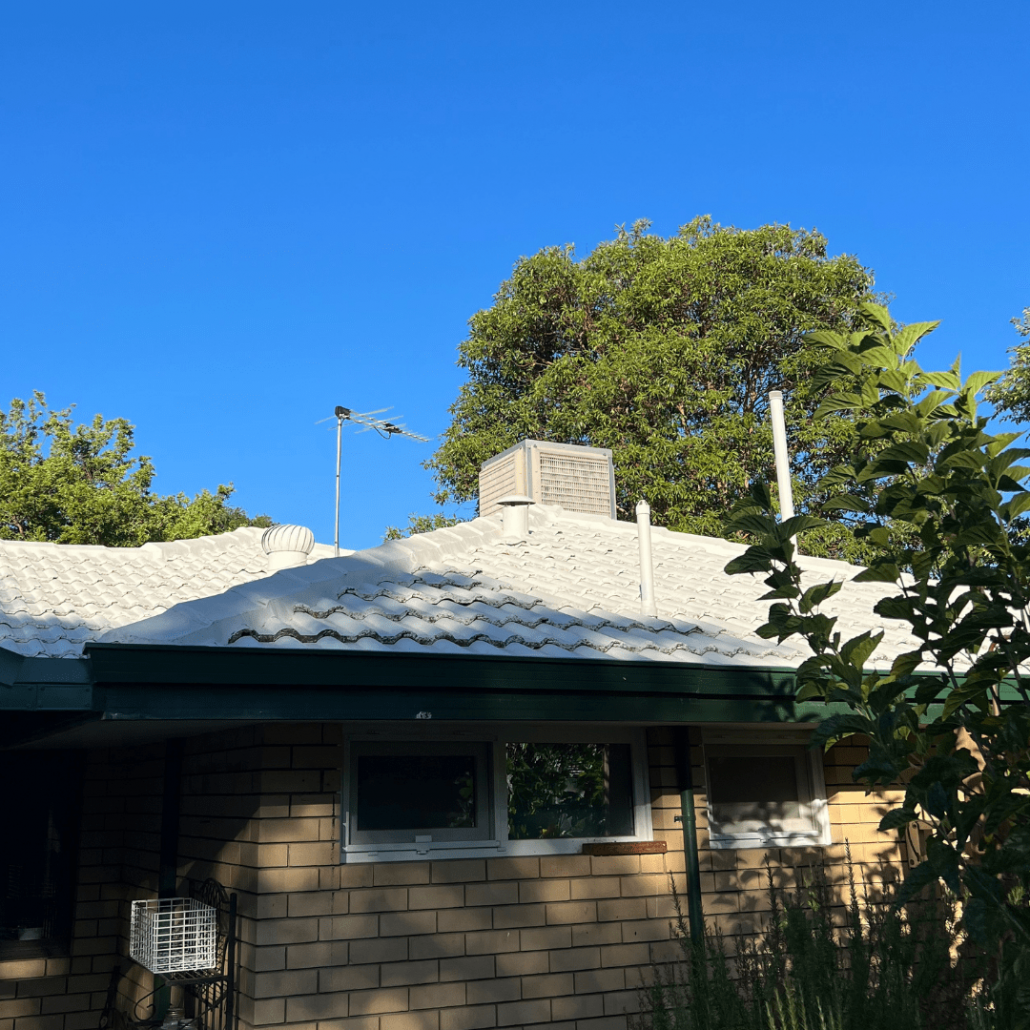
When I painted my roof, the painter also installed the whirlybird for me or no extra charge.

What’s next?

There are a few improvements still to be made, when I have the time and money:

Curtains. I have blinds on most of the windows, but I want to replace them with proper curtains that will do a much better job of keeping the heat in during the winter months.

The kitchen window. This is still the original single glazed glass with an aluminium frame. Knocking through a door into the garden (and renovating the original 1970s kitchen) will be a big and expensive job, so it’s not happening any time soon. But once it’s done it will really make a difference.

The kitchen skylight. The kitchen also has an original skylight that funnels heat in from outside, and it’s placed where the afternoon sun hits for extra heat.

The floors. Something I’m still thinking about, is changing the kitchen floor from laminate to tiles. Tiles have good thermal mass, so absorb heat, whereas laminate does nothing to assist with the room temperature. Thar’s why floors in hot countries are often finished with tiles.

Kitchen benchtop. I have a laminate benchtop, but switching this to stone or concrete will add more thermal mass to the room and help absorb the extra heat.

The garage. This was semi-converted to a room by the previous owners (by which I mean, they painted the walls and laid carpet). But it still has a single glazed glass door with an inch gap at the bottom, and the original metal garage door which incinerates the space in summer (and also has an inch gap at the bottom). I’m not sure what to do with the garage yet – whether to convert it properly into a room (which would be expensive and need planning approval), or simply change all the doors. But because there is an internal door from the garage into the house, the temperature of the garage influences the temperature of the house, so it will definitely need modifying in some way.

As for the costs, and the savings? That’s another whole conversation, which I’m saving for another day sometime soon. Plus I’ll talk about what you can do if you rent or are on a tight budget that doesn’t allow for big changes like double glazing. Trust me, you still have options!

As I said at the start, adapting will look different for all of us.

Now I’d love to hear from you! Is the climate changing where you live, and have you been able to make adaptions to better ‘weather’ it? Or do you have plans to do so? Perhaps you’d like to but not sure where to start? Any tips you’d like to add to this? Please share your thoughts in the comments below!

I Saw it in the Stars (A Guide to Energy Efficiency)

With new houses comes the need for new appliances. At least, in our case it has. The last thing I wanted to do was rush out and buy a whole heap of new stuff for our new home, but we did need a new fridge and a new washing machine.

…Our old fridge (purchased in 2002 by my in-laws) was wildly inefficient. It was far too big for the two of us and guzzled energy like it was going out of fashion. Despite this, we would have (reluctantly) put it in storage for two months until our new home was ready. However, our kitchen has been designed (somewhat cunningly, with energy efficiency in mind) to only fit a smaller fridge, and our old one was far too wide. We sold it to some students in a four-person house share – a better use for a fridge this size.

…Our old washing machine (purchased second-hand via Gumtree in 2012) was life-expired. It left dirty marks on our clean laundry. The seal was covered in black slime which did not come clean no matter how much vinegar or bicarb I used, nor how many 95°C washes I ran – and a replacement was the price we paid for the machine. I’d have happily paid if it was just the seal (I’d rather repair than replace), but in addition the tubing needed replacing, the electrics didn’t work properly, it had developed a small leak and it’s possible the bearings were going (hence the dirty clothes). Our ex-neighbour is looking after it until I take it to pieces and recycle the parts – I’m particularly keen on doing something fun with the stainless steel drum.

I was keen to get second-hand appliances, but my husband wanted new and energy efficient ones. He argued our old washing machine was a good example of how second-hand doesn’t always work out. There were very few fridges of the size we need available on Gumtree. We could choose the most energy efficient options and look after them properly.

In the end, my husband won. I did feel guilty that we bought new, but choosing quality and energy efficiency means they should last a long time and use less power overall. Whether this was the best choice, only time will tell. I must confess, being able to do a load of laundry that actually comes out clean has also dissipated some guilt.

Choosing an Energy-Efficient Fridge

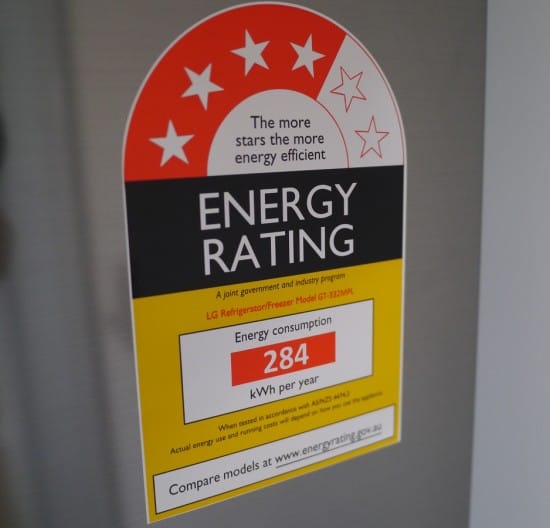
I found it very confusing that no matter how big the fridge was, the energy star rating was around 3.5 stars. Fridge sizes began at 250 litres, and went all the way up to 850 litres, and yet the stars were practically the same. How could that be?

It turns out that under the star system, fridges are compared with other fridges of a similar size. They do not compare all fridges with one another. Crazy, right? This means the star rating is fairly meaningless on its own. What is far more important when choosing a fridge (or any electronic appliance) is to look at the actual energy rating. All appliances should state their energy use in kWh (which stands for kilowatt hours) over a year.

(If you have an old fridge and want to work out how much energy it uses, you can use an energy monitor. I’ve written about how you can use an energy monitor to work out consumption and cost in a previous post, when I found out that my previous fridge used 639 kWh a year. That is a huge amount!)

The most energy efficient fridge we could find that was big enough for the two of us but fit the space (600mm wide) has an energy rating of 284 kWh per year. That’s 225% less energy than our previous fridge. Interestingly, it wasn’t the smallest fridge on display but one of the newest models. Most models in the size range were 300 – 350 kWh, and some were as high as 450 kWh.

At 284kWh per year, our new fridge will use 0.78kWh per day.

Fridge Energy Efficency Star Rating Treading My Own Path

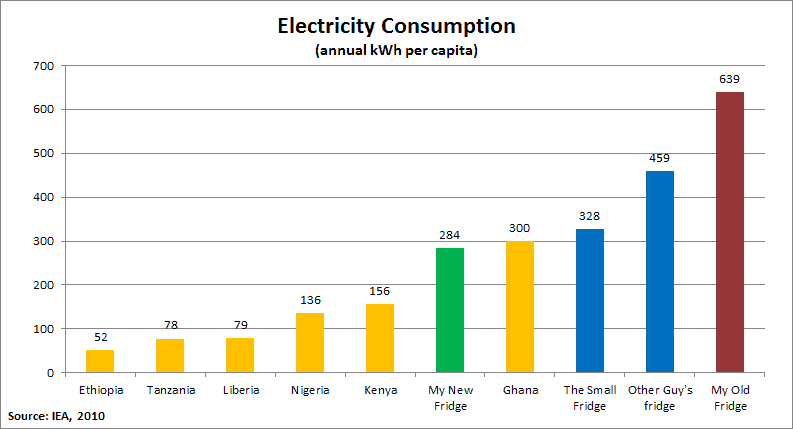
In 2014 I learned that most domestic fridges in wealthy nations use more energy than the total energy consumption of an average citizen in many African nations. It inspired me to find out the energy consumption of my fridge and write the post My Fridge vs the People of Africa. I made a graph showing the energy consumption of citizens of various African nations, and the energy use of my fridge and the fridge of the guy whose article prompted me to investigate. I’ve updated the graph to show where our new fridge sits in the graph:

My Fridge vs the People of Africa Updated 2016

My old fridge is the red column, and my new fridge is the green column. The six yellow columns represent the total electricity consumption of an average citizen in each of 6 African nations in 2010. (The two blue columns relate to the 2014 post which I’ve linked to above.)

Choosing a Waterwise and Energy-Efficient Washing Machine

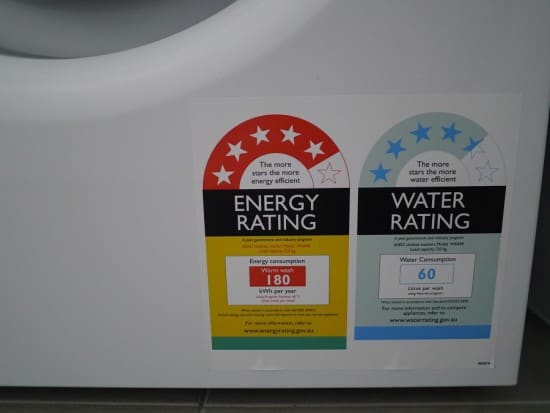
Washing machines have two differentials to consider: electricity use and water use. They are easier to compare than fridges because they are all relatively the same size, but rather than looking at stars, it is still better to look at the numbers.

Energy consumption is listed per year, in kWh and it makes assumptions about the frequency and type of wash that will be used. To aid comparison, all machines compare regular 40º C cycles and assume they will be used once a day. We  run our machine about 3 times a week, usually on a cold or 30ºC setting, so we would expect our energy consumption to be less than the quoted amount. If you use your washing machine every day and run hotter washes, the energy consumption would be higher.

Water consumption is quoted per wash for a regular program, not per year.

Washing Machine Star Energy Ratings

The machine we chose had high energy efficiency and low water use, but it was expensive. It was double the price of the next best performing brand. It uses 180kWh per year, and 60 litres per wash (compared to 265kWh per annum and 72 litres per wash for the cheaper brand). I confess, this was not actually the best performing machine on sale, it was second-best. The same brand had a better model that only used 50 litres per wash, but cost an extra $300 and our budget simply didn’t stretch that far.

It wasn’t just the energy and water efficiency that convinced us to switch, it was the design. Having had various issues with our previous model we were keen to choose something that would last. The brand we chose has a great reputation for long-lasting machines, and a service centre close by. It uses minimal electronics (an issue with our previous model) and it has a stainless steel rim rather than a rubber seal around the door. Rubber seals always accumulate grime and dirt, they are tricky to clean and expensive to replace (and you need to know what you are doing).

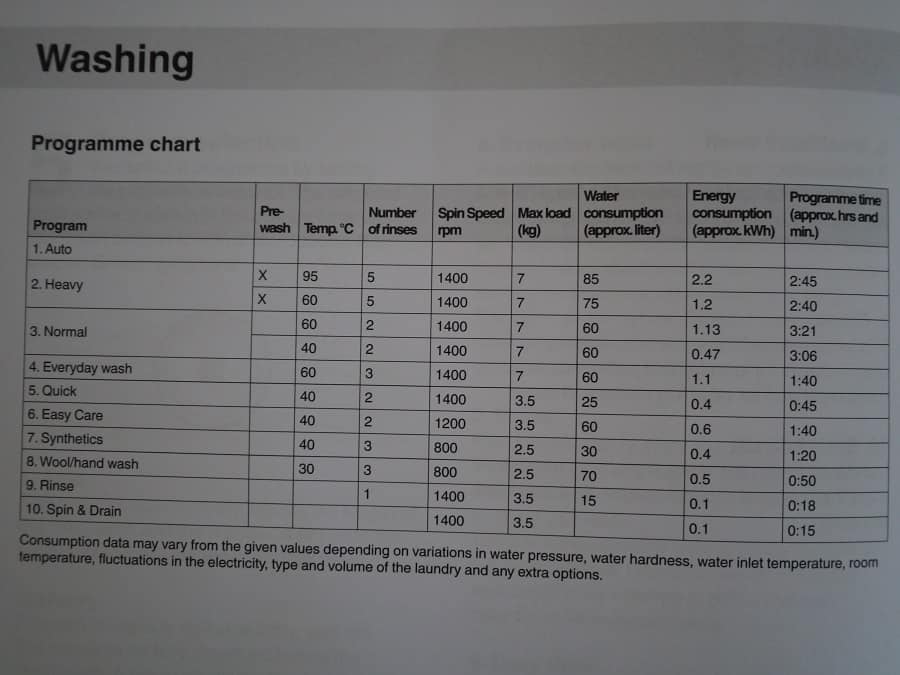
Having read the manual thoroughly (because believe me, this machine is going to be maintained well and will last a lifetime!) I discovered there is a helpful table which tells the user exactly how much energy and water each wash uses. The quick wash uses the least amount of energy and water and cleans surprisingly well. I did not realise that Wool + Hand Wash settings use so much water!

Washing Program Energy and Water Use Guidelines

I don’t know if all washing machine instruction manuals contain this kind of information, but it is so useful that I hope they do! Some longer programs use less energy than shorter ones (which I wouldn’t have guessed) and hand washing uses far more water than I imagined too.

Choosing a Waterwise and Energy-Efficient Dishwasher

Fans of dishwashers often state that dishwashers are very water efficient and use less water than washing the dishes by hand. Having spent a weekend looking at appliances, I can tell you that the most water efficient models use less than 15 litres per wash. It is estimated we use around 30 litres washing up in the kitchen sink, so yes, dishwashers do appear to use less water.

However they also use energy, and they are not particularly energy efficient. A dishwasher with a current 3.5 energy star rating will use around 0.75kWh per wash. Run it every day, and that’s around 275kWh per year. Then there’s the noise, and the biggest one of all – the energy needed to mine / refine / manufacture / transport the appliance – plus it’s another appliance to dispose of at the end of its life.

Despite my husband’s wishes, we won’t be getting a dishwasher. It’s an appliance we simply don’t need. We will be practicing mindfulness and doing the dishes. Well, I say we, but I suspect it will be me. I’m okay with that ; )

Now I’d love to hear from you! Would you have chosen new or second-hand? What factors influence your decisions? If you’re part of a more-than-one-person household, how do you find consensus with differing opinions? Have you any great experiences of buying second-hand, terrible experiences of buying new – or vice versa? Any stories or wisdom to share? What’s your record for the longest-running appliance you’ve owned or used? Please tell me your thoughts in the comments below!

[leadpages_leadbox leadbox_id=1429a0746639c5] [/leadpages_leadbox]

Fancy a Look Around My New (Sustainable) Home?

In case you missed the news, we’ve finally moved into our new home, and oh, it feels good! We have solar panels and solar hot water, a rainwater tank, solar passive design that means no air-con required even in our 40°C+ summers, and a veggie garden pre-planted with vegetables. We’re two minutes from the train station and there’s a newly opened bulk store within walking distance.

Plus we’re in the heart of a vibrant and engaged community and we can’t wait to join in!

I thought it might be fun to show you round, to explain some of the sustainability features and how they work and to highlight why we are so excited about our new home. Welcome to the tour!

Just to give you some background, my husband and I live in the city. Whilst we’d love to move to the country some day, buy a block of land and be completely self-sufficient, we don’t have the skills (yet) to do this. Not even close! Plus our work, friends and community are all based in this city and we’re not ready to leave.

We don’t have the money to buy a big block of our own within the city, and we don’t have the funds or know-how to renovate a doer-upper (is that even a word?). What we dreamed of was an apartment with solar panels that didn’t require additional heating or cooling, close proximity to amenities, space to grow our own food and a community feel. We’ve found it in this place and we feel really lucky.

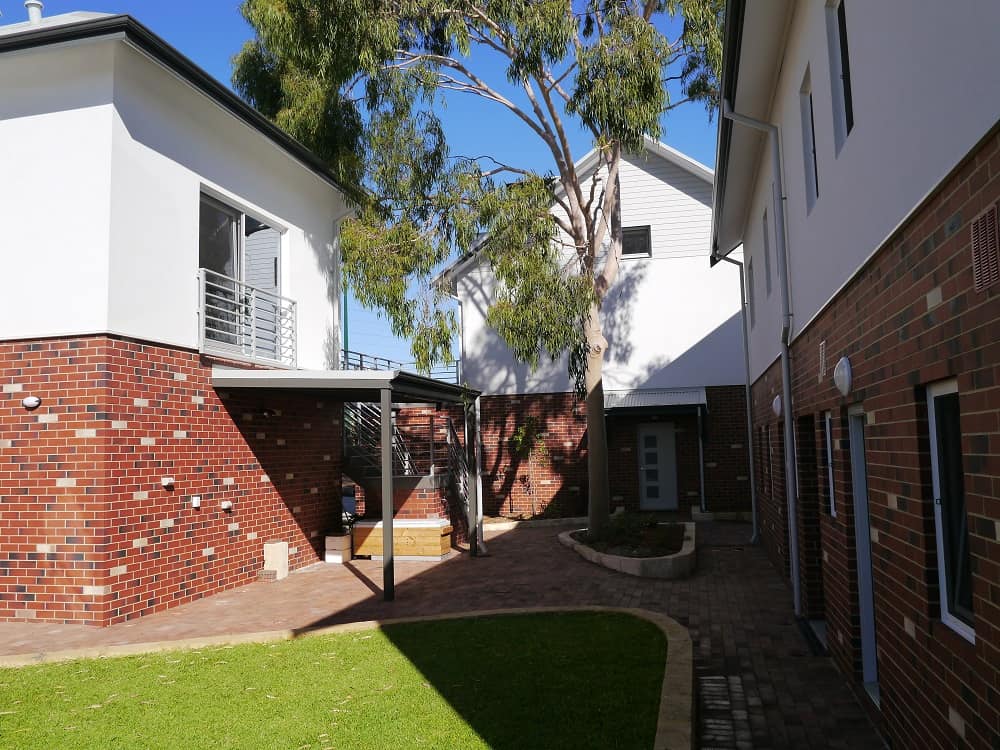
There are 3 building on the site, with 7 homes in total. This is the back view of our building – there are 3 units in this one. There are 3 solar hot water systems and 3 solar PV systems on the roof – one for each of us.  The communal veggie garden sits at the back of our building : )

Solar Panels and Solar Hot Water Sustainable Home Green Swing

Solar hot water and solar panels, plus a communal veggie garden.

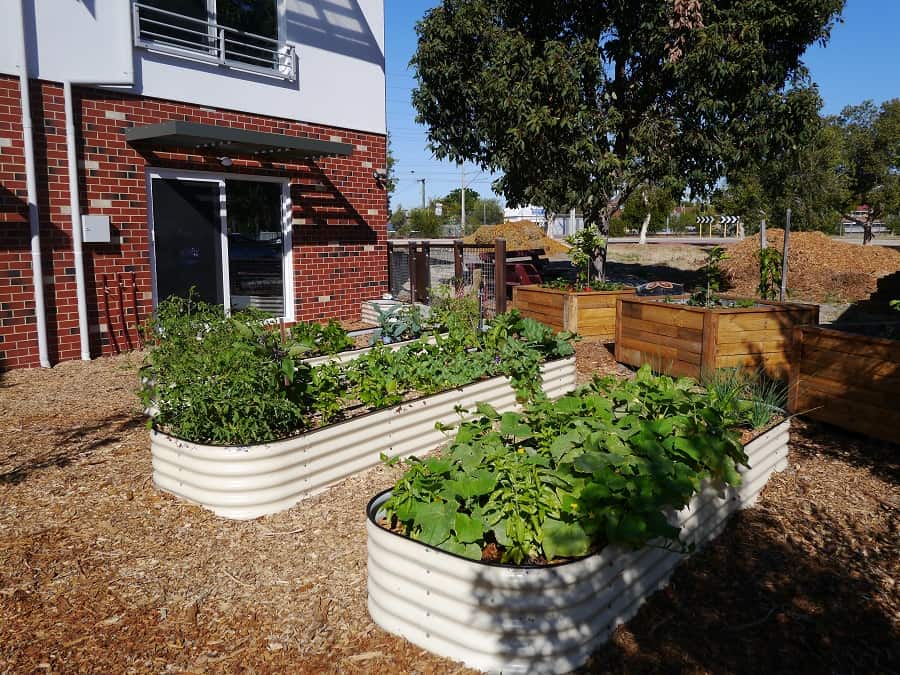
The veggie beds have to be my favourite part of the whole development and I cannot wait to start growing my own food. Luckily some seedlings were planted before we moved in meaning there is already food to harvest. The beds are second-hand and there is some leftover metal from the roof to make more if we decide we need them (I’ve already decided we do!).

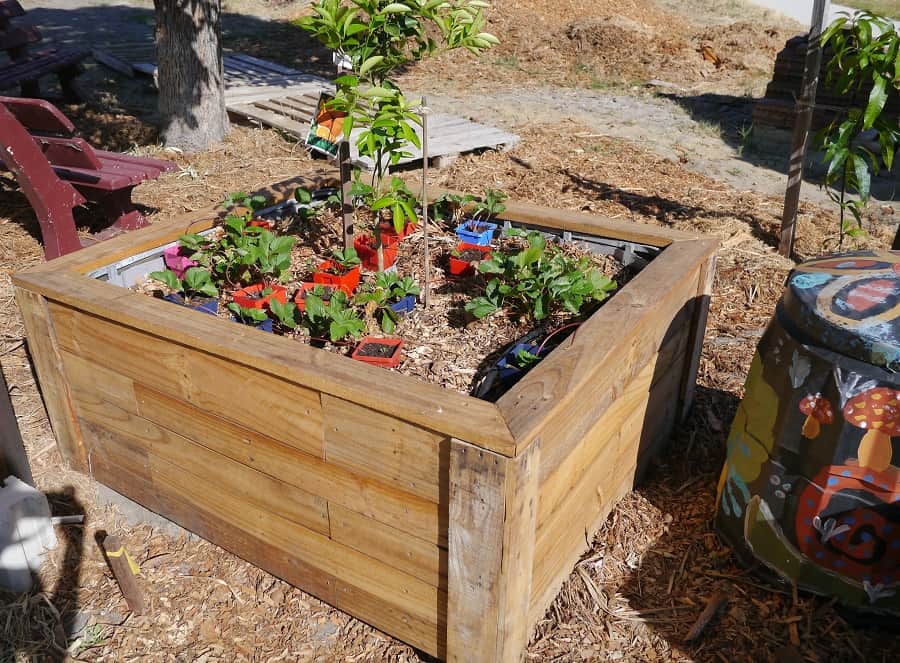
The wooden boxes mark the boundary and have fruit trees in them. They are made from old pallet tanks / IBCs, which are basically huge square plastic drums for transporting bulk liquids. They’ve been cut in half and clad in scrap wood.

Communal Veggie Garden Sustainable House Green Swing

Garden beds in full swing, and plenty of space to add a few more ; )

Upcycled IBC Tank Sustainable House Permaculture Green Swing

An old pallet tank cut in half and clad in scrap wood to made a planter. The three planters all contain citrus trees. Pleased to report too that my compost bin had already been dug in!

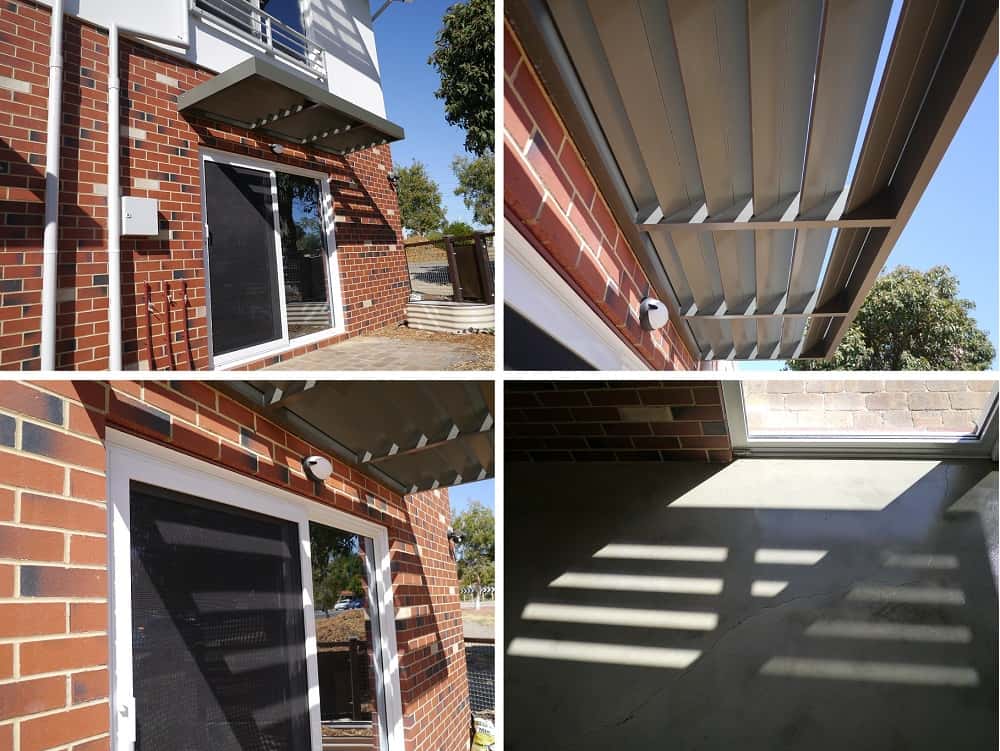
This side of the building faces the sun, so normally rooms facing this way get ridiculously hot. In addition to double glazing and glass tinting, all the windows and doors have been fitted with solar pergolas. That’s what the big metal frames with slats above the windows and doors are.

When the sun is high in the sky in summer, the pergola blocks the sun from entering through the glass and heating the inside. In winter when the sun is lower, the sun’s rays can pass through the slats and warm the house inside. Despite seeming like a simple and obvious solution for keeping the heat out (or in), very few houses in Perth are fitted with these. They have huge air conditioning units instead.

How Does a Solar Pergola Work Sustainable House Green Swing

The sun is hitting the pergola and casting a shadow on the outside of the building, rather than heating the inside. The bottom right image is the inside of the building: were the pergola not in place, the sun would be heating the floor where the shadows are. These pergolas are fixed but if they were adjustable it would be possible to eliminate any direct sunlight from entering.

This is the central area where the three buildings meet. All the entrances come off this central space (the 3 upstairs units are all accessed by the stairway) – a deliberate design feature so people are encouraged to speak to their neighbours and create community!

The wooden box in the left of the picture is a degassed old fridge (clad in wood) which is the communal worm farm. Plus all the pavers are recycled.

I’m not a huge fan of the lawn. My first idea was to turn it into a chicken coop. Now I’m thinking I’ll just dig up the grass and grow food! However, as my husband points out, we are 1 unit out of 7, and we can’t just tear it all out before everyone moves in. Democracy and all that. They might want to keep it.

Maybe I’ll start by planting food around the edge…

Centre Courtyard Sustainable Home Green Swing

I love the central space, but it feels very new and sterile at the moment. Looking forward to bring it to life!

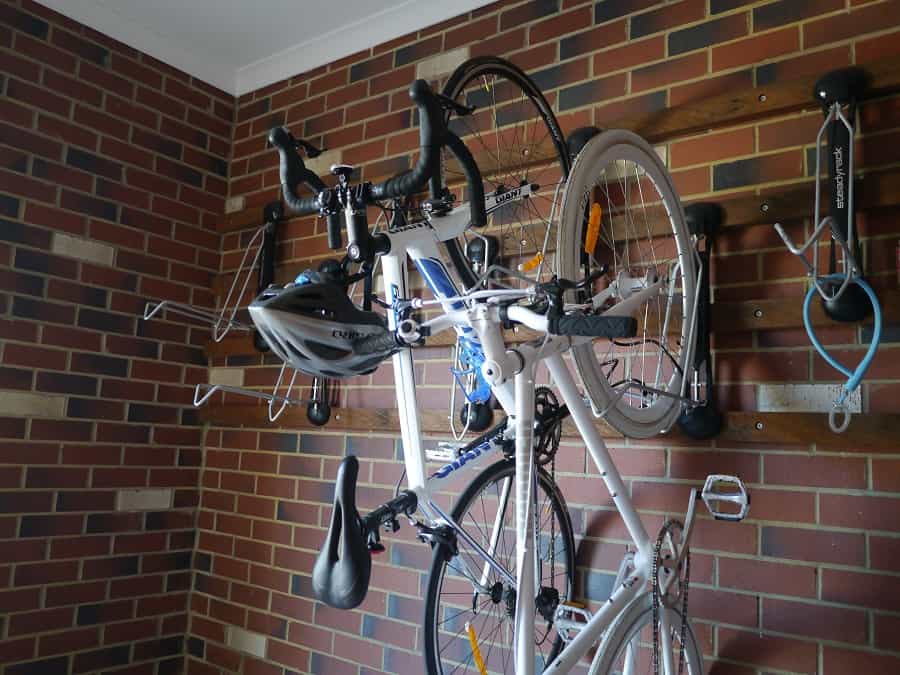
In rather exciting news, there is a communal bike shed! We no longer have to store our bikes in the bedroom – hurrah!

Bicycle Storage Shed Sustainable Home Green Swing

Bike storage in action!

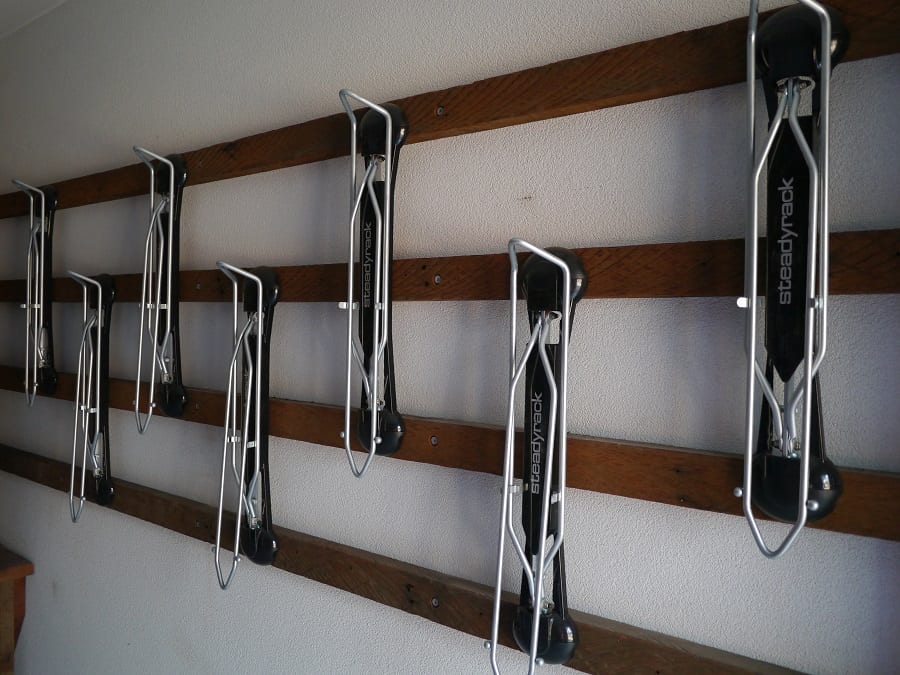
Bicycle Storage Shed Spare Racks Sustainable Home Green Swing

When not in use, the bike racks fold against the wall.

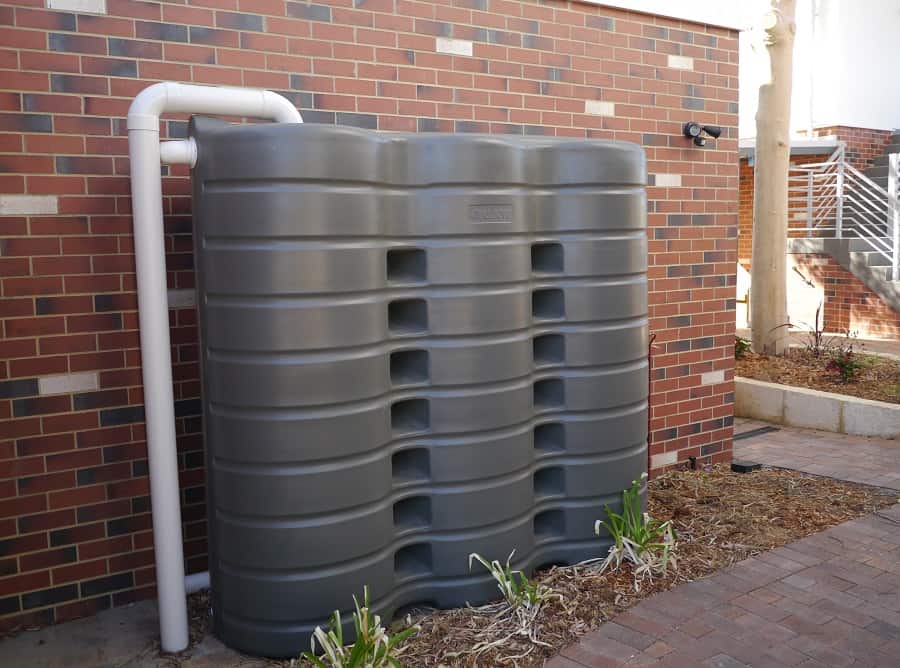
Rainwater tanks sound fantastic in a city that is so short of water it already uses two desalination plants to supply 40% of its water, and will be drinking treated sewage as of 2016. But red tape means it’s not quite as good as it should be. The units, which have a joint roof, are legally not allowed to use rainwater for anything other than the washing machine and toilet.

Ironic really, that we can’t drink rainwater for health reasons, yet drinking treated sewage is acceptable. Still, better than nothing. That’s why the tanks are smaller than you might expect – along with the fact that water is actually really cheap (it costs $1.50 for 1000 litres), meaning there is little incentive to plumb in rainwater unless you really care about sustainability.

Rainwater Tank 3000L Green Swing

A 3000l rainwater tank. Water in Perth costs $1.50 for 1000 litres, so it would cost just $4.50 to fill this from the tap. Madness!

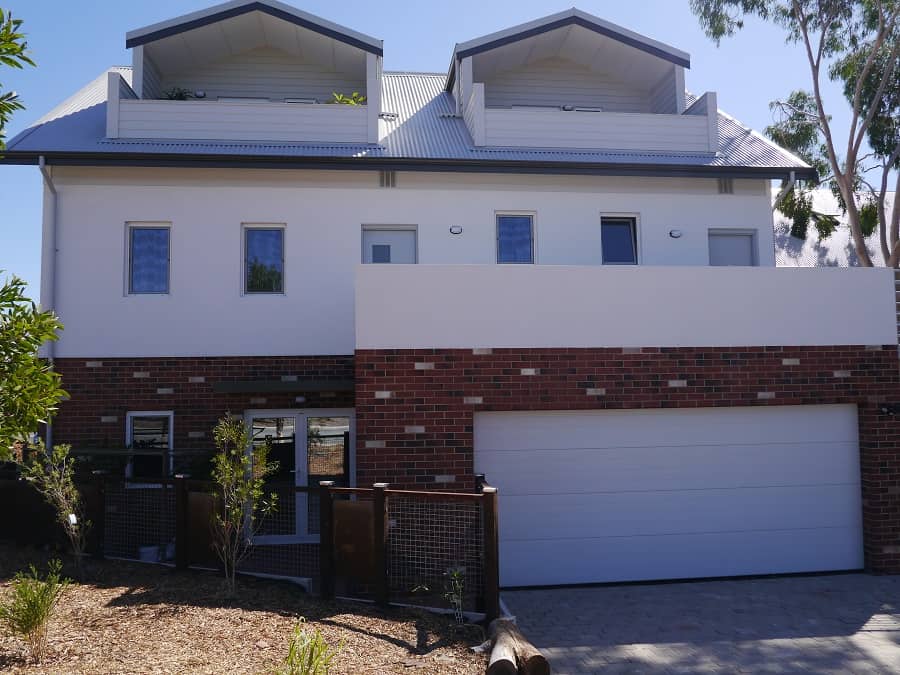
This is the front of the house. The double garage that you see is actually a shared garage – each unit has one garage space and shares the garage with others. There are electricity points in each garage for the time when electric cars are the norm.

Front of Sustainable House Green Swing

This double garage is shared between two flats. There are more spaces for bike parking than car parking!

That’s the tour of the outside finished, so here’s a quick rundown of some of the sustainability features on the inside. Once we’ve settled in I hope to show you round the inside properly but until then, here’s some glimpses ; )

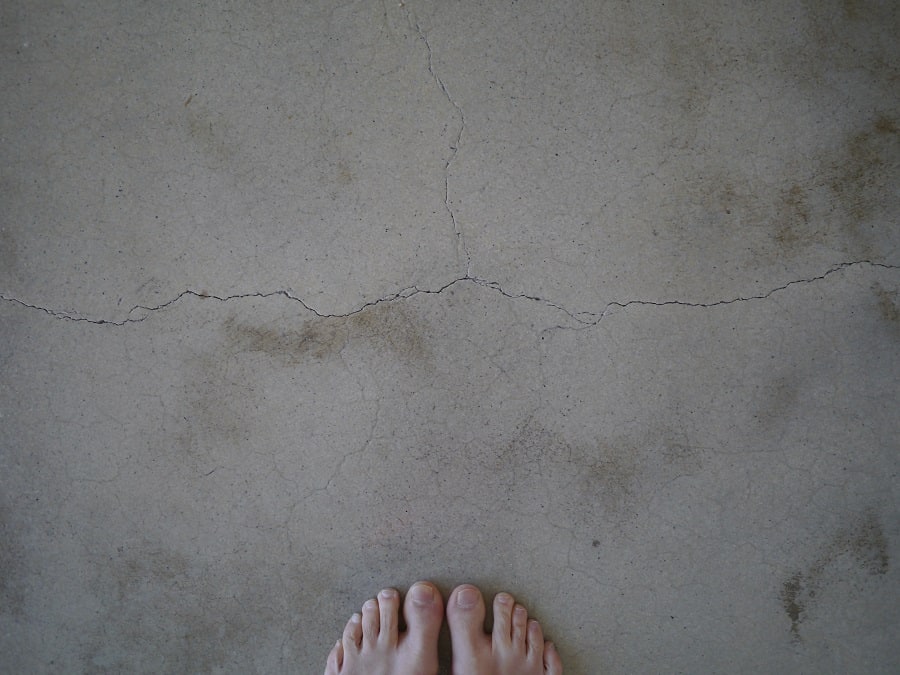
This is the floor in most of our unit – polished concrete. It’s a very sustainable flooring, great for helping to maintain the temperature and as homes are built on concrete slabs, it makes use of what is already there.

Polished Concrete Sustainable Home Green Swing

Polished concrete flooring. The cracked surface adds to the charm.

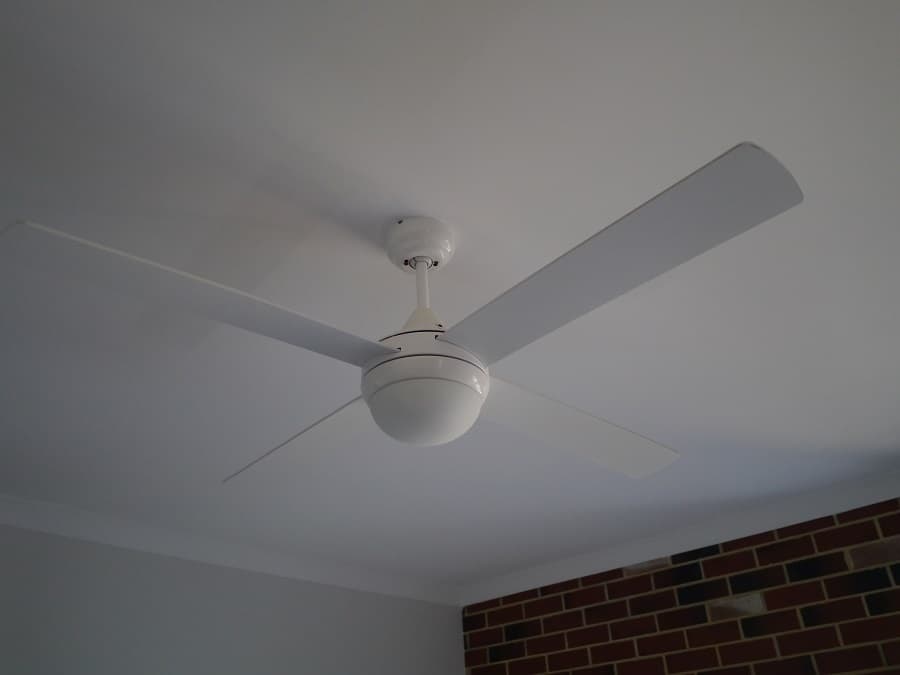
There’s no air-con in our home – insulation, double glazing, good thermal mass and correct orientation means we shouldn’t need it. There are ceiling fans to circulate the air.

Ceiling Fans Sustainable Home Green Swing

The ceiling fans have two modes – cooling in summer and heating in winter. You just need to flick a switch, apparently. I didn’t know that ceiling fan heating was a “thing”, so I’m interested to try this out!

I’ve had gas cooktops for many years, and I remember how terrible electric cooktops used to be. You’d lower the temperature of the hob, and your saucepan would continue to boil itself dry and burn your dinner because the hob didn’t realise you meant reduce the temperature NOW, not in about 15 minutes time.

Now we have solar power it doesn’t make sense to have gas too, and so we have electric hobs again – but induction ones.

Electric induction cooktops are a far cry from those dodgy electric hotplates. I’m in awe. I did not realise it was possible for a kettle to boil so quickly!

Not to mention they are easy to clean (always a bonus). I’m a convert.

Induction Hob Sustainable Home Green Swing

Convection hobs are a million light years ahead of those old electric cooktops. They’re faster and more energy efficient.

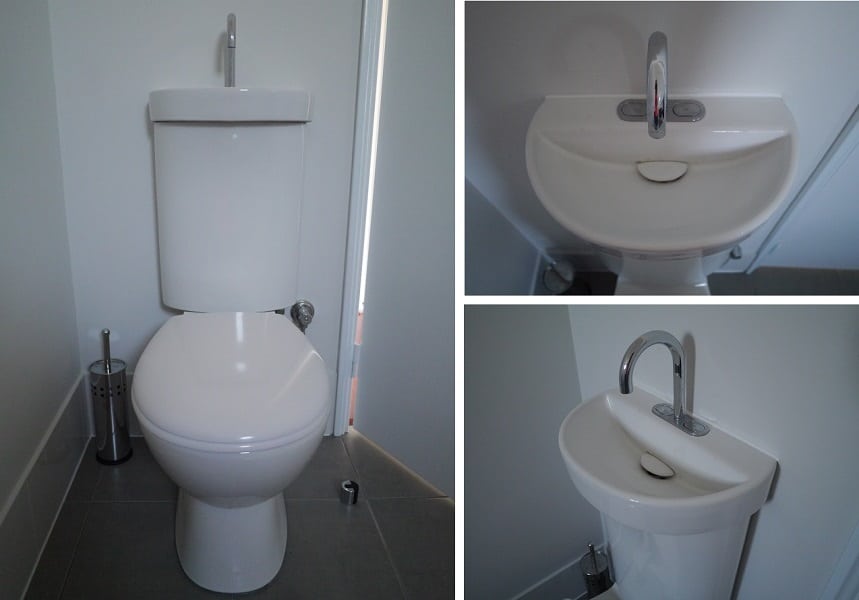
Finally I have to show you our toilet (yes, the toilet) because it has a sink built into the cistern. When you press the flush (there is a dual flush button either side of the tap) the water that ultimately fills the cistern runs into the sink so you can wash your hands.

You’d be amazed at how much water is needed to fill a cistern.

I’ll tell you. An old style toilet needs 12 litres. This one uses either 4.5 litres or 3 litres depending on which button you press. There is enough time to flush, walk over to the main (laundry) sink, remember that the toilet has a sink on top which is pouring water out of the tap and you’re meant to be washing your hands with this one, wander back, realise you left the soap over on the side, walk over to pick it up, return to the toilet-flush sink, wash your hands, dry your hands, return the soap and marvel that the water still continues to flow.

The reflex in me wants to grab a container to collect the water that’s gushing out of the tap…except it doesn’t work like that, obviously – it’s filling the tank!

Toilet Cistern with Integrated Basin Combined Pics Sustainable Home Green Swing

When you flush, the water that fills the tank first flows through the tap so you can wash your hands with the water.

That’s the tour complete – I hope you found it interesting! I’m looking forward to sharing how our new community develops and what the gardens are looking like this time next year – and all the learning and insights I have along the way. I’m sure there will be many!

Now I want to hear from you! What do you think of my new home? What are your favourite features? Do you have any ideas you’d like to share about what we should do with the space? What would you do if you moved in?! Is it the kind of development you could move into, and if not, why not? Anything else you’d like to add? I’d truly love to hear your thoughts so please leave me a comment below!

[leadpages_leadbox leadbox_id=1429a0746639c5] [/leadpages_leadbox]

How to Read Your Gas Bill + How I Saved $300 a Year

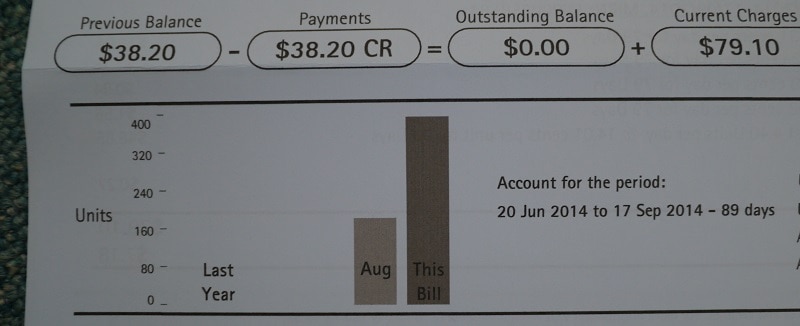
I have a confession. I actually enjoy receiving our power bills. It’s because I’m a bit of a nerd and I like to see how much energy (and money!) we’re saving by being as energy-efficient as possible. Today we received a new gas bill in the post, but when I ripped open the envelope my heart almost stopped because I saw the graph:

Graph on gas bill

Energy usage graph on gas bill

How on earth had our gas usage skyrocketed that much?

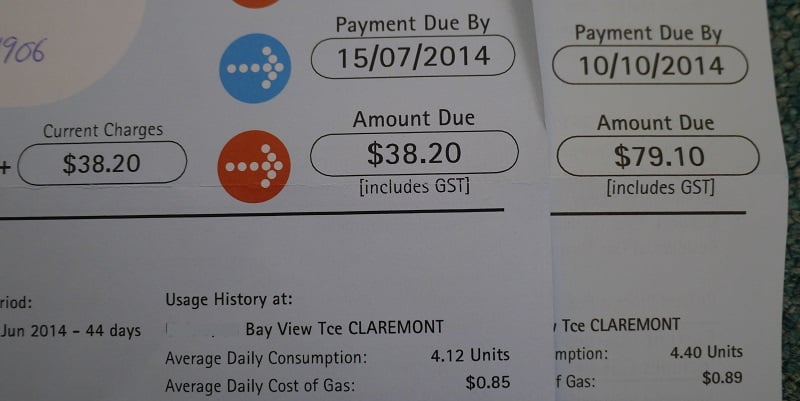
Before panic ensued, I checked our average daily consumption in units. This information is always included on your bill. It turns out that we hadn’t used many more units than the previous bill after all. Phew!

Gas bills for new flat

For this billing period we used 4.40 units per day, compared to 4.12 units per day on the previous bill.

The new bill confirms that we’re using less than half the energy we used at the previous flat. That sounds pretty impressive. This works out to be a saving of $300, which, I think you’ll agree, is even more impressive. So what is the secret?

First up, I’m just going to explain how to read your gas bill. It’s vital if you want to know how much energy you use and how much it’s costing you! It also means you can compare your usage with similar households to find out if you’re actually paying more than you should be. (Extra bonus –  knowing how to read your bill also prevents heart-attacks when you receive misleading graphs!)

A Quick Guide to Reading Your Energy Bill

  • The first thing to check is that the bill you’ve received correlates with your meter! (This isn’t likely to be a problem unless you’ve just moved, but it’s worth mentioning.)
  • Secondly, check if the bill is based on a meter reading or an estimate. If the bill is estimated, the amount may be very different to what you’ve actually used. You can usually contact your energy company to give an accurate reading and receive a new bill.
  • Be wary of graphs! The energy companies can use data to manipulate what you see. The reason my graph had such a huge change was because I moved mid-way through a billing cycle. The first bill I received was for 44 days. The second was for 89 days. It stands to reason that my second bill will cost twice as much as the first bill – it’s for double the amount of days!
  • Look for the average daily consumption, measured in units. That tells you how many units you are using every day. Energy is priced per unit, so the cost to you is the amount your company charges per unit multiplied by the number of units you have used.
  • If you can’t find your average daily consumption, it’s easy to calculate by finding the total number of energy units used and dividing by the number of days in the billing period. For my latest bill I used 391 units over 89 days, which is 4.39 units per day.

How I Saved $300 a Year in Gas Bills

This isn’t the part where I tell you I switched providers, and offer you a nifty little affiliate link like you’ve no doubt seen a gazillion times before. Nope. Sadly the gas company in Perth has a monopoly on the supply, so I’m stuck with these guys for now. I saved that much money without switching providers. I’ll tell you how I did it.

I moved house.

Not to a smaller house. I moved to a bigger house.

I moved to a bigger house with an additional demand for gas over the previous house (this place has a gas oven; the previous place had an electric one).

I might also add that the flat I moved to is in the same complex, made from the same materials and with the same insulation (or lack of).

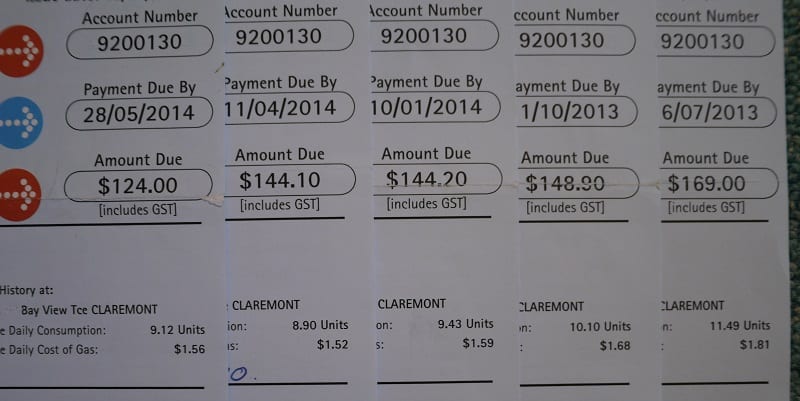
Despite all of things thing, my gas bills have halved. See?

The daily energy use at my old flat was between 9 and 11.49 per day compared to less than 5 in the new flat.

The daily energy use at my old flat was between 8.9 and 11.49 per day compared to less than 5 in the new flat.

Do you know what made all that difference?

This guy.

New Boiler

This 5 1/2 star energy rating boiler that doesn’t have a pilot light meant my gas bills halved…without me doing a thing!

The boiler.

Compared with this guy:

Boiler with a pilot light

Meet Mr Inefficiency: Boiler with a pilot light

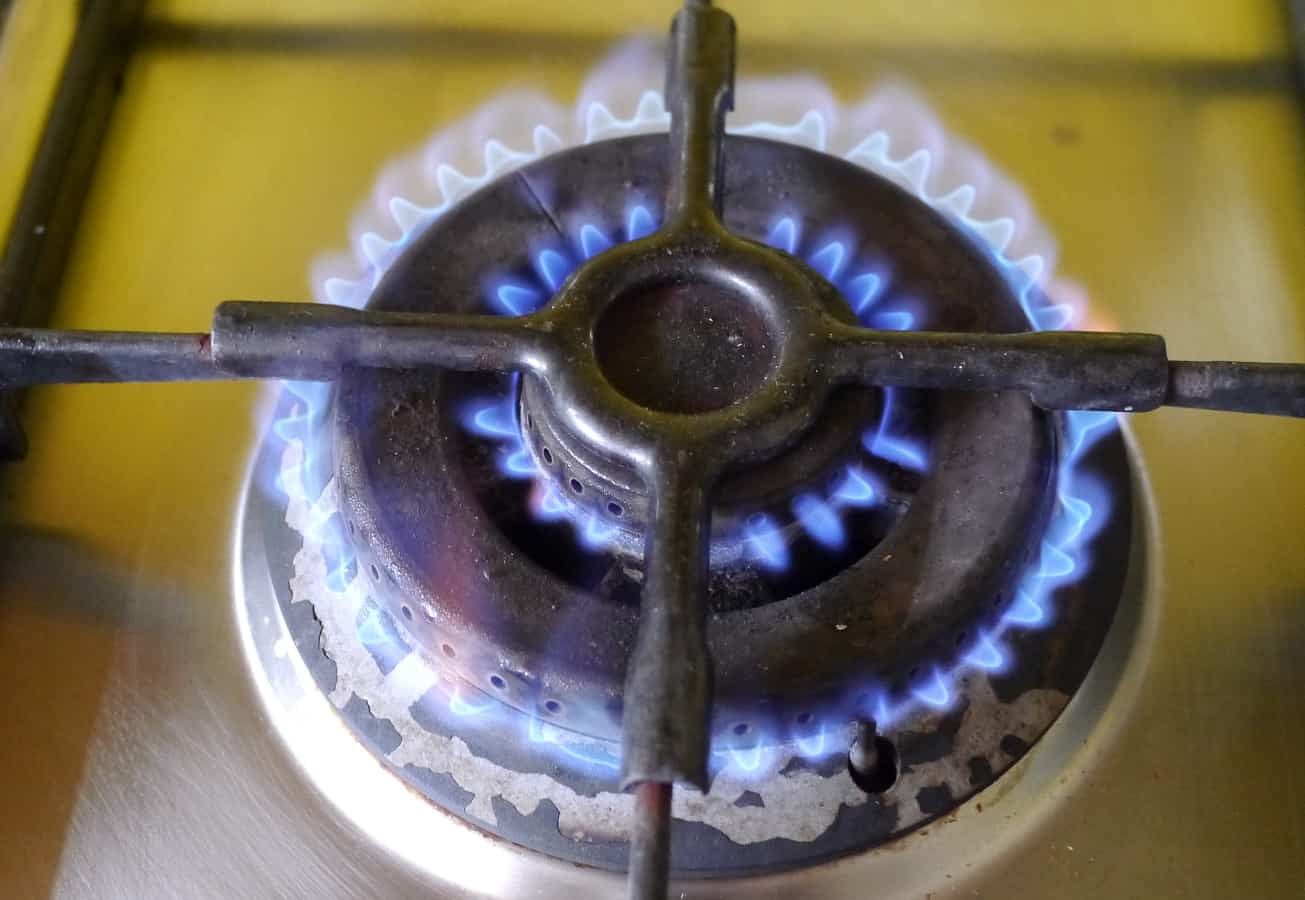
I did everything in our old flat to reduce our gas use (that’s why the unit consumption dropped a little during the year), but there was one thing I couldn’t get away from. The pilot light. That boiler burns gas even when it’s just sitting there. Even when it’s 40ºC day and you really don’t want any kind of heat at all. Our new boiler, by comparison, only burns gas when it’s ignited.

That’s all it’s taken to cut our bill by $300.

We didn’t install the boiler ourselves, it came with the rental, and in that regard we’ve been lucky. However, it has also highlighted to me the importance of fuel-efficient appliances, not just for the emissions they produce but also the cost savings they provide.

You may not be able to change your gas boiler, if you’re unfortunate enough to be stuck with an inefficient one (but if you are, here’s one idea for reducing how much energy it costs you). There are, however, plenty of other appliances that use energy that you do have control over. Think about all the other energy drains in the home: the heating, lighting, washing machine, dryer, the vacuum cleaner, small kitchen appliances, fridge and freezer, and other electrical equipment. Next time you need to change something, don’t just consider the initial cost, because in the long term it may end up costing more than you think.

Are you a homeowner who has installed energy efficient appliances, or are you a renter who is stuck with rubbishy inefficient junk that your landlord installed to save himself a buck or two? Are there any other appliances you’ve switched to energy saving and know have saved you money and cut your bills? Do you have any tips or experiences to share? I always love to hear from you so don’t forget to leave a comment!

[leadpages_leadbox leadbox_id=1429a0746639c5] [/leadpages_leadbox]

An exciting letter in the post…

I’ve been excitedly waiting for the gas bill for a couple of weeks now, and yesterday it finally arrived! Yep, you read that right. I was excited by the thought of receiving the gas bill.

Three months ago we decided to be pro-active about reducing our gas consumption because we realised our gas bill was unusually high for such a small flat, and being conscious of our environmental footprint, we decided to do something about it. Living in a rental, we couldn’t do much about the rubbishy cheap inefficient boiler with the gas-wasting pilot light that the landlord had installed. What we could do, and what we did, was reduce the pilot light to the lowest setting and lower the temperature setting so that we no longer need to add any cold water when we shower. Read more